When you click on links to various merchants on this site and make a purchase, this can result in this site earning a commission. Affiliate programs and affiliations include, but are not limited to, the eBay Partner Network.
There is always more to do
Just waiting on money to get more done. Mrs just o.k'd me to get a z1 undersheild. Been running without one for a long time. Found a deal i couldn't pass on and the guy lives less than 5 miles away. Funny how i found him here on market place.
I saw his post. I definitely would have paid for shipping. The wife never would have been okay with that at the current time lol
It is with great displeasure that the thought of calling it quits on this mount replacement (for now) has entered my head. Took more time today to attempt to get everything unbolted with no success. Here are the dilemnas I am currently facing.
Driver's side:
Removed ex. manifold heat shield to allow more room to access top nut. I can attach a short 14mm ratcheting wrench to the top nnut, but don't know how I will get leverage to break this nut loose. Thanks to Nissan's brilliant mount bracket engineering the wrench can only go on perpindicular to the frame due to the "lips" on each side of the nut. I tried reaching this nut from above using extensions and a swivel, but the angle at which I have to go to reach it prevents it from seating properly on the nut, running the risk of rounding it off.
Passenger side:
Defintely a PITA. I can get a shorty 14mm in there, but again, do not know how I will get leverage on this nut. I have seen two sources that remove the bracket rom the block, but I do not see how this will be feasible in my case. the front two bolts are deep within a crevice tucked behind the manifold and there is no room to get a turn on the wrench if I can get it on them.
I am considering placing this project on the backburner until I can get a hoist and just remove the engine.
any thoughts of getting a healthy amount of PB Blaster on it and let it chemically loosen-up?
maybe you tried this but can you take off the 4 bolts on the engine mount bracket and take the two pieces out as one?
Doused it in PB blaster the first day I began this and let it set overnight. I doused it again today when I said "screw it".
That was how they did it did the two write ups that I read through. My problem is getting the wrench all the way up to the front top bolt on the passenger side and then having room to break it loose. There is no space to get a turn on the ratchet.
Originally Posted by rustyschopshop
Not sure why i didn't think of this, but what about a crow's foot on an extension. Should give you much more offset than a socket.
That's actually a great idea! I didnt even think about that. I may have to run out tomorrow or Wednesday and pick up a set.
Just be careful with the cheap crowsfeet, they tend to spread open on higher torqued fasteners. Eventually want to upgrade mine for this reason. Also want to see if they have boxed end crowsfeet for this reason.
Just be careful with the cheap crowsfeet, they tend to spread open on higher torqued fasteners. Eventually want to upgrade mine for this reason. Also want to see if they have boxed end crowsfeet for this reason.
a little longer than i was thinking but could work in alot of scenarios. Looks like the next set of tools to add to my box this year.
Looking back, I did notice that one of the write ups used that to get a good grip on the DS upper nut. I noticed that I could not get the boxed end of my ratchet on the PS nut like I could on the DS so I may end up having to try an open ended on that one.
Just for reference, here are the sources I have been viewing for tips on this swap:
What do you do when it begins to monsoon outside? You tackle that upgrade that has been kicking your backside...and you SUCCEED!
Managed to get the driver side mount upper not broken loose and off. What a pain. Here's the challenges I faced and how I did it:
A few of the methods I had seen in write-ups and videos had failed me. Street Banditos' video was able to get a short ratchet and 14mm socket onto the nut. Picked mine up from Harbor Freight just as he did, but maybe it was different, my sockets were slightly deeper, or he has some type of alteration because my socket would not seat fully on the nut. What ultimately worked for me was being a slight contortionist, a short 14mm ratcheting wrench, and a long extension.
Anyone who has attempted to remove this top nut may have noticed the lips of the mount bracket make it nearly impossible to get a standard wrench on the nut in any orientation other than running parallel to the subframe away from the engine. I also had a stupid bracket in the way that ended up being bent off and later removed (I'll sort it's use out later, it's not going back on). After numerous attempts using other methods I had begun to round the nut. I placed the shorty ratchet on the upper nut, placed the end of a bar over the end of the ratchet that was hooked onto the nut, and tapped the other end of the pole with a hammer to fully seat the ratchet on the nut and ensure it had the best grip it could. I then got under the car and placed one end of the extension on the side of the wrench closest to the front of the car and the other end on the side of the subframe closest to the rear of the vehicle. I got my left arm up along the ac compressor and used it to push on the ratchet while I used my right hand to pry down on the end of the extension. After a bit of force it finally broke loose.
Here are a few pics of the upper nut. As you can see, it was thrashed pretty badly. My local Nissan dealer ship has a few in stock so I will be purchasing two new nuts for reassembly not only in case I thrash the passenger's side, but just because why not? New hardware never hurts and it's only a couple dollars. Should anyone share the same issues I had and tear up this nut, the part number from Nissan is 08918-3401A. It does not show on the diagram for the mounts on Courtesyparts, but can be had by themselves.
Once the rain subsides I will grab my manual jack and get the mount removed entirely. I'll update with further pics at that time.
I have this weekend off so I will be tackling the passenger side mount. This should be the biggest challenge. I have pretty much decided that I am going to pull the radiator fans and alternator. This should allow me clearance to do the same that I did with the driver's side.
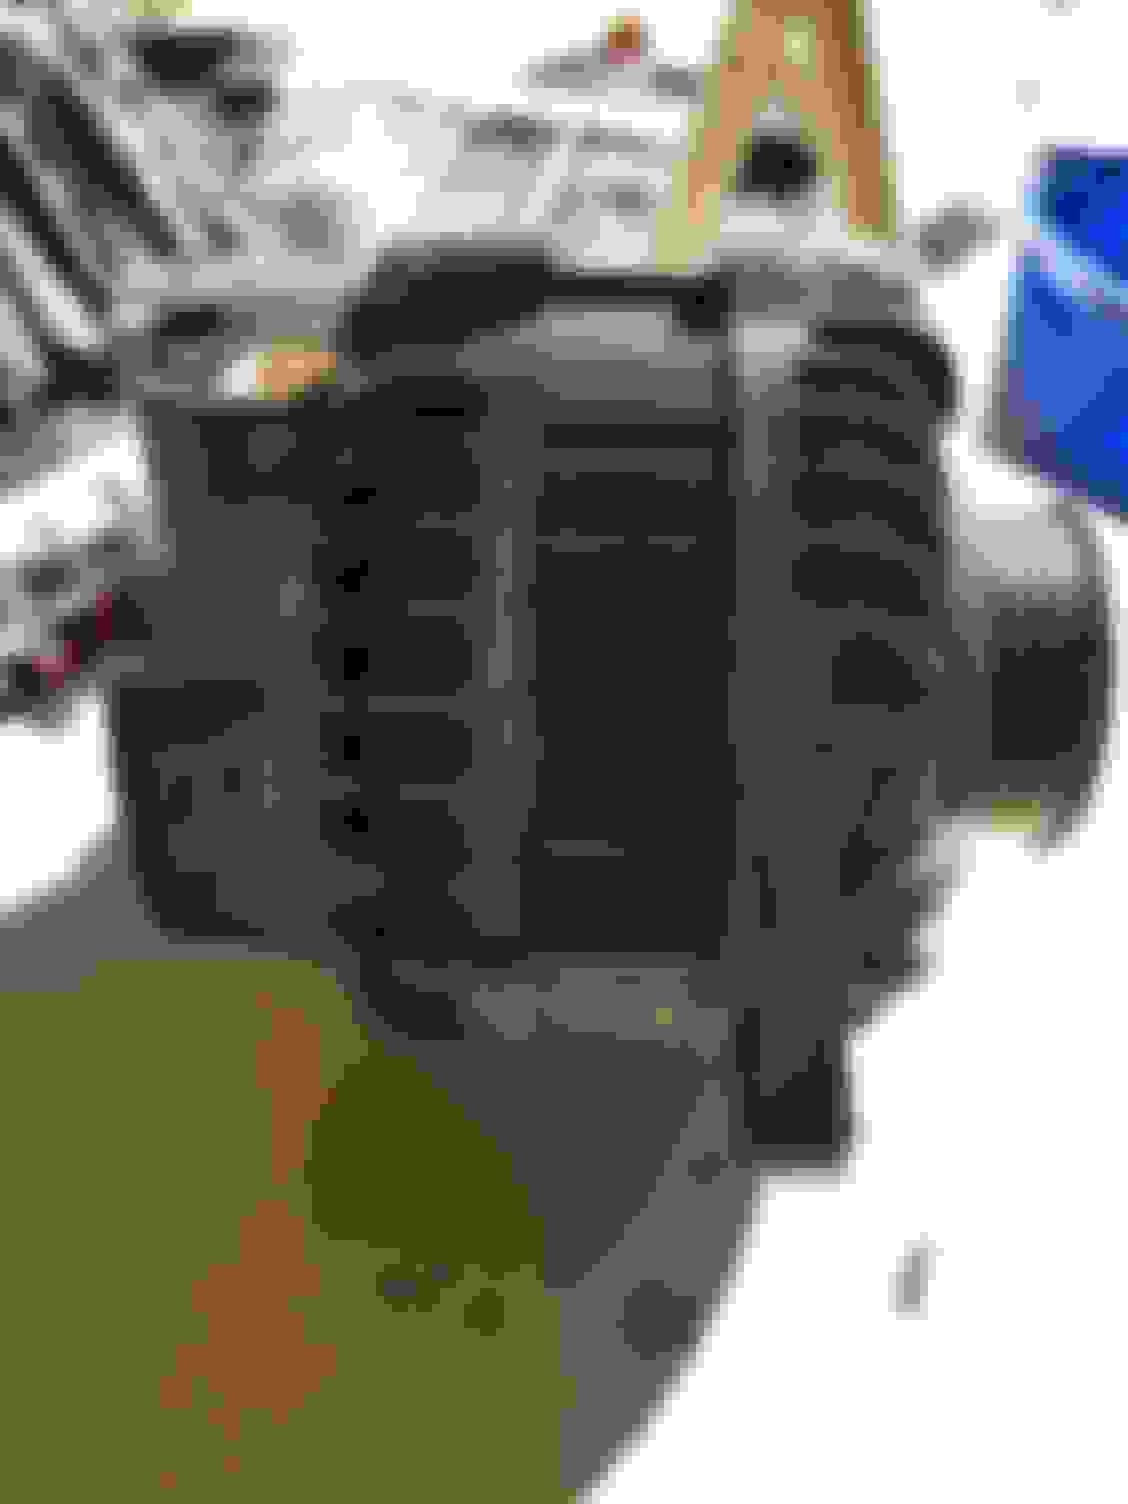
Took a little time this morning to start chipping away on the passenger side mount. Got the radiator drained, fans out, and alternator removed before taking a break for a while to spend time with the family and get some food. I think it was a wise choice to remove the alternator as I have a good amount of working room now on the front side of the mount. Special thanks to Bealljk for having such a picture-heavy build thread. Once I stalked through his pictures and found how much room could be had with the alternator out I knew it was the route to take. I will make some more progress tonight.
So far I have not run in to any difficulties. Alternator came out without a hitch and I took the time to clean up and degrease the brackets and bolts that came off.
You know, I never gave it much thought, but while removing my alternator I noticed the sticker... OEM Nissan. This car is (now) 15 years old. Nissan provided me with all service records and unless it was replaced by the previous owner by himself with OEM parts, this is the original alternator. Pretty impressive in my opinion and a sign of Nissan's excellent design with it!
Managed to get a little wrench time in while the baby was sleeping. Wife isn't feeling well so I couldn't work on it all day like I normally could/would have.
Anyways, got the starter unbolted and out of the way. Remember what I said about the impressive quality of Nissan's OEM alternators? Their starters, not so much! As I went to unscrew the nut that holds the posi cable to the starter I gave it a hair of torque and SNAP! The stud snapped right off, rendering the starter useless. So now this project just got a bit more costly. Thankfully the starter is completely independent of the reassembly, so I can replace it later once everything is all back together.
Despite this setback, removing the starter and alternator proved to be a great decision. I am convinced Nissan knew I planned to do this and made the clearances on my engine different, in a bad way, from everyone else's. In the write-ups and videos I viewed the Zs seemed to have more clearance between the upper nut on the mount and the bottom of the manifold. Mine did not have enough clearance to fit the closed end of the stubby wrench on it and, again, I thrashed the nut. I decided to go ahead and just unbolt it from the block. Removing the starter gave me plenty of clearance to access the rear bolts and the alternator the front. 3 of the 4 bracket bolts are loosened, but the upper rear is kicking my rear. I hit it with a solid amount of PB blaster and called it a day. Once I get the last bolt undone, I will drop the bracket, cut the nut off, bolt the new mount to the bracket and reassemble. Feels good to be nearing reassembly.
Plenty of space to work with the alternator removed. Starter removed

 12-28-2019, 06:46 PM