When you click on links to various merchants on this site and make a purchase, this can result in this site earning a commission. Affiliate programs and affiliations include, but are not limited to, the eBay Partner Network.
Posting this in the ZR section even though it's a DIY guide since it only applies to us ZR owners.
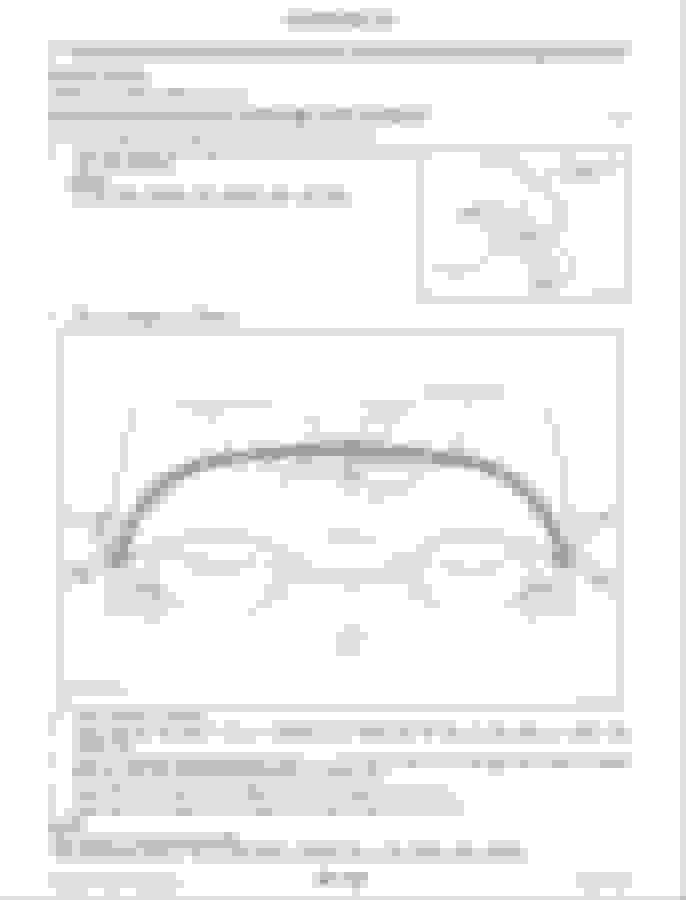
I saw a few threads out there, but nothing definitive so I figured I would make this thread. This is for that clear protective strip which is applied to the top of the tonneau to prevent the top from scratching the paint. The FSM calls it the "Storage Outer Protector" on page 126 of the RF section.
If you're like me and you actually drive your Roadster with the top down a fair amount, that clear strip on your tonneau cover has likely seen some better days. The last 17 years have not been kind to mine. I recently replaced the top and I guess the old one was so nasty, the dirty and crusty strip blended in with it. After the top replacement, it definitely stuck out. If you've ever applied a vinyl wrap or tinted windows, it's just about the same technique. It's not terribly tough, but you do need to take your time to get it right. So, here's a guide to what I did.
From the FSM:
Materials needed:
- XPEL R4003-P Clear Paint Protection Film Roll 6" x 84" (this universal kit comes with a rubber wedge squeegee)
Tools:
- Heat gun (or a hair dryer would also work)
- Spray bottle with several drops of baby shampoo or liquid dish soap mixed with water
- Plastic razor blade scraper
- Clean, lint-free towels or microfiber towels
- Razor blade/retractable utility knife/cutting utensil weapon of choice
- Adhesive remover or choice (I used Goo Gone adhesive remover spray gel)
- Isopropyl alcohol
For reference, here's a picture of the strip before I got started - nasty!:
1. Put the top down (duh!). Clean the strip and surrounding area really well with the soapy water solution or your favorite vehicle washing liquid mix. You're going to be scraping this area a lot, so make sure it is clean to avoid any surface scratches.
2. Apply a moderate amount of heat with the heat gun and start from one end scraping the old strip with the plastic razor blade. The top layer of mine came off leaving the old adhesive on the paint.
3. Maybe you'll get lucky and all of it will come off on the first-go. Mine did not. I had to spread on the adhesive remover and scrape 3x until it was clean. Repeat step 2 as necessary and then thoroughly clean the surface of the tonneau.
4. At this point, you could certainly give it a good cut and polish, but I was content with the surface area, so I then prepped the area by cleaning it with the alcohol and a lint-free towel. Lay out the XPEL paint protective film strip on a flat surface and cut off a 1.25" strip from the 6" strip. The total length that you will need will not quite use the entire 84" from the universal kit, but it is close. The FSM states that the OEM strip length is 30mm (or 1.18"). I laid out the entire roll and used a beam level with a utility razor knife to make sure the cut was even. Lay out the strip over the tonneau.
5. The FSM says to mark where the strip is going to be applied. You could certainly do that. I did not. Spray a liberal amount of the soapy water solution across the top of the tonneau lid. Don't be shy! Peel off the back of the 1.25" strip and start in the corner.
Because the strip is flat and you are applying this over a curve, it is not going to immediately lay flat. This is where patience comes into play. Take your time, use your heat gun and the rubber wedge squeegee that comes with the XPEL kit, and it will eventually conform to the curve. The corners are most definitely the hardest part. Keep at it until you get all the air bubbles out. Apply a modest amount of pressure to the strip while gently pulling it in the direction you want to lay it down.
Continue laying it down across the nice even flat part of the lid.
Go back over it as needed to squeegee out the air bubbles and imperfections.
The right side is a little hard just like the left, but you'll finally be able to get out the air bubbles using the heat gun and squeegee.
6. Once you're satisfied with the adhesion, clean off the entire area with your soapy water solution. (Now I just need to tackle that nasty paint protective film you see in the background!)
7. Close the top and verify that the strip is in the correct location where it meets the weatherstrip gasket seal.
Done!
This is the "wet-method" for applying this particular type of PPF. If you decide to use vinyl, a lot of options use a dry method which don't involve spraying the soapy water mix. I suppose I could have just used a strip of gloss black vinyl which is a lot easier to bend with the heat gun, but I'm pretty pleased with the results.