
**Steering knuckle ball joints??**


Registered User
Joined: Feb 2010
Posts: 10
Likes: 0
From: nj nj


Registered User
Joined: Feb 2010
Posts: 10
Likes: 0
From: nj nj
yea i have install one of them already , and no i did it my self with a friend of mine, i use a hammer and hammer it out i put a socket right in the middle of the ball joint and hammer the the socket until it came out then i hammer it back in with a smaller socket then i put that pin that dont let it come out and ur done . .....
yea i have install one of them already , and no i did it my self with a friend of mine, i use a hammer and hammer it out i put a socket right in the middle of the ball joint and hammer the the socket until it came out then i hammer it back in with a smaller socket then i put that pin that dont let it come out and ur done . .....
but in general its best you press the bushings in and ensure the ball joint is bridged well with a socket and not hammer or press directly on the ball joint shaft/mechanism itself, but the outside edge common to the wall that needs to be pressed in..
hammering ball joints can ruin them, weaken them and kill their life expectancy......hopefully its fine and the socket you used did bridge the ball joint shaft itself well, but I would still keep an eye on it.
Ball joints are meant to be pressed in slowly and carefully and not abused...
-J
Did your new balljoint come with the little cone shaped "seat"?
Do you guys know if you have to press that little seat on the balljoint as well? I replaced my entire knuckle last year after an accident and the new one didn't come with the seat. I had to remove the seat from my broken knuckle lower balljoint using a vice and then just dropped it onto the new balljoint. It was never pressed on and ever since I have a lovely knocking sound from the suspension when going over bumps on the road. May be related... may not be, just wondering...
I'll admit this hammering doesn't sound to be the best method. And how would one press the new balljoint in the knuckle anyway? You'd have to take the entire knuckle off to get equipment in the position to press it in i'd think. Basically taking apart your entire front suspension just to replace this one balljoint.
Last edited by gregom; Feb 24, 2010 at 05:55 PM.
Did your new balljoint come with the little cone shaped "seat"?
Do you guys know if you have to press that little seat on the ball joint as well? I replaced my entire knuckle last year after an accident and the new one didn't come with the seat. I had to remove the seat from my broken knuckle lower ball joint using a vice and then just dropped it onto the new ball joint. It was never pressed on and ever since I have a lovely knocking sound from the suspension when going over bumps on the road. May be related... may not be, just wondering...
Do you guys know if you have to press that little seat on the ball joint as well? I replaced my entire knuckle last year after an accident and the new one didn't come with the seat. I had to remove the seat from my broken knuckle lower ball joint using a vice and then just dropped it onto the new ball joint. It was never pressed on and ever since I have a lovely knocking sound from the suspension when going over bumps on the road. May be related... may not be, just wondering...
odds are it does need to be pressed on? how did you "remove" the seat from the broken knuckle?? it it just come off? something is most likely not sitting correclty.......check to ensure the ball joint nut is tightened then do the ball joint check on the FSM and ensure there is no play?? eliminate if it is the ball joint or not! then from there, check everywhere else.
look at the other end of the compression arm, translink, etc....
ball joint check -

I'll admit this hammering doesn't sound to be the best method. And how would one press the new balljoint in the knuckle anyway? You'd have to take the entire knuckle off to get equipment in the position to press it in i'd think. Basically taking apart your entire front suspension just to replace this one balljoint.

2. Ball joint tool: (on car)
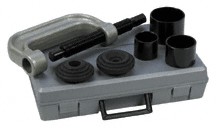
linky - http://www.harborfreight.com/cpi/cta...emnumber=38335
done on the car like this - (this is only an example and of course this is not a z)
-J
I removed the seat from the balljoint using a vice. A little tricky positioning but I managed it... it was on that HARD! I probably applied 200-300 lbs pressure to get it off, made a loud snap.
I simply dropped the seat onto the new balljoint and put the lower control arm over it and tightened it down the best I could. Probably not sufficient and it would not surprise me at all if this was causing the knocking sound in my suspension. Visually however everything looks fine.
I did see that section in the FSM and thought about doing those tests... just haven't done it yet. I'll probably try to do that this weekend since I am replacing my power steering rack, and may even be replacing my shocks if they arrive in time.
Thanks for posting the info! Looks like some good options.
^ cool, ya let us know what you find out....
I luckily haven't run into this issue, but I have researched it before as I know "its coming" lol.... Im glad now there is an option with this ebay seller unit.
I now have a spare spindle with a blown ball joint, Im gonna press it out and start scouring the land (autostores and junk yards) looking for a suitable replacement off other makes and models......I hope im successful in finding another alternative...
at the current moment im pissed waiting for SPL to release their Bushing replacement for the opposite end of the compression arm..........the part where the compression arm attaches to the car! that one is torn on my car and I rather get their new bushing that hopefully comes out next month than get another oem arm--just to get the bushing...
-J
Last edited by JasonZ-YA; Mar 8, 2010 at 12:13 PM.


Guys,
I am planning on doing this myself soon.
-Ordering the ball joints off ebay.
-Getting ball joint tool so I can press it on the car.
-Going to Nissan and getting a new cone shaped seat
I have questions due to never trying to do this before.
1-Using the Tool, I will press the old joint out, which way is out? I know what the area looks like, so am i pressing the joint up or down? (If its only one way, sorry for the stupid question, just want to know more before I start taking things apart)
2-Seeing the Nissan diagram, I now that once off, the new one will go back in with the Ring under it. How does this ring work? Will I be able to drop it in and then press the new one back in over it? Does it attach to something first, before I try to press anything?
If someone has pictures or can help with some detail information, that would be great.
I will continue to search the site and google aswell, but anything helps.
Thanks

Registered User
Joined: Jun 2009
Posts: 50
Likes: 0
From: greece
****CONFIRMED****
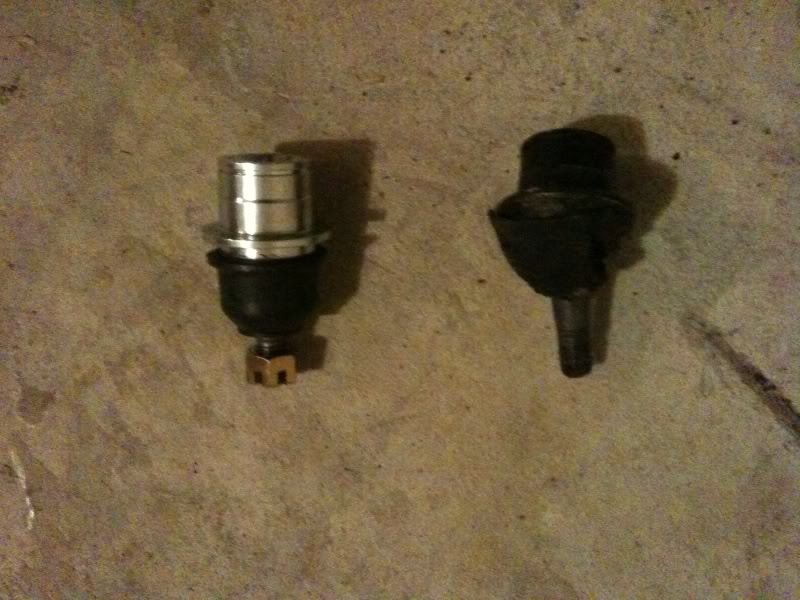
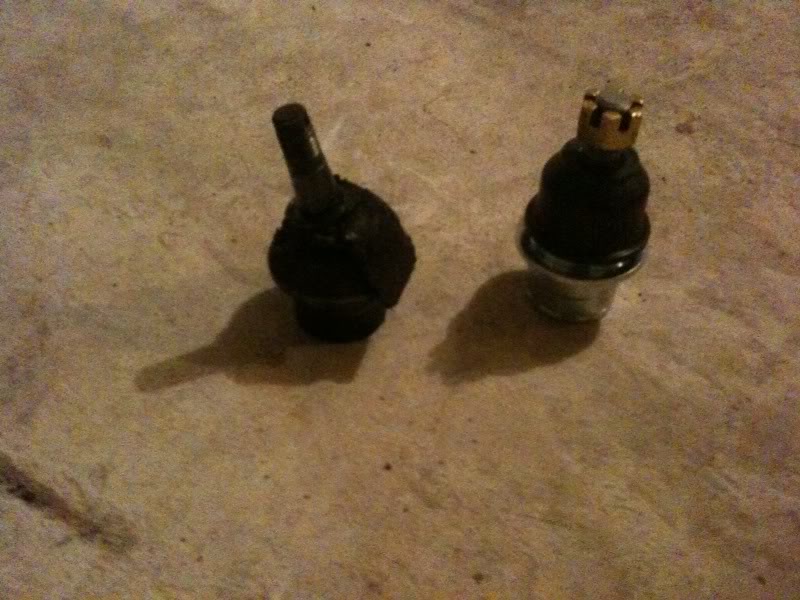
Ordered them on 17/04/10 just arrived today , two pieces for 60usd postage paid to greece. They fit perfectly on my 350z 2003 . The only problem reported by my mechanic was the quality of the rubber part of the ball joint that is (as he said) inferior to the OEM product. Fits perfect and works 100%, took 60 min to install.
http://cgi.ebay.com/ebaymotors/ws/eB...K%3AMEWNX%3AIT
Last edited by dimitris20; Apr 29, 2010 at 06:30 AM.
Ok, parts ordered, got the seat and picking up the tool this weekend.
I have been watching the you tube videos and looking DIY for other cars,
Process looks simple enough.
Now the question, after the joint is in, I put the rubber boot back on, I need to grease the boot first? Stuff it with something? If so, what?
When I look under the car the old boot is leaking grease out of it, so is that coming out of the joint? Or is that grease that was packed into the boot?
Want to make sure I have what I need on hand when I start.
Thanks for any help.
2-Seeing the Nissan diagram, I now that once off, the new one will go back in with the Ring under it. How does this ring work? Will I be able to drop it in and then press the new one back in over it? Does it attach to something first, before I try to press anything?
the ring will then go on at the bottom of it......you would need to use snap ring plyers or just man handle it on.
Pretty much identical to this pic:

They are pliers that have two "studs" on the end that fit into the "holes" so that the ring can be installed..
when going to buy snap ring pliers at the store, be sure to take the rings with you to ensure you get the right snap rings with the right size studs on the ends!!
-J
JasonZ-Ya,
Thank you for the info, I will take the Ring with me to find the pliers.
Going to see if autozone has any tools I can just rent too.
Job looks straight forward.
Ok, I see what the grease is all about now. No need to pack the boot.
To those that have gotten the ebay joints, do they have grease fitting? Will I need to add any, or were they just sealed? just replace and move on?
Thank again.
Last edited by Uinfluence123; Apr 29, 2010 at 08:06 AM.