
DIY - Solid diff bushing install - No subframe drop method, no c clamp either!


Big props on this writeup. The sad thing is my buddy made this tool a year ago and threw it away when he left the shop he was at. He made me one last month and was suppose to change mine with me but he tore his MCL and can't walk. He has been going to rehab and should be good soon. You cleared up a lot of questions I had about the best way to change the front bushings. I was just going to pound it out. Thanks for the detailed write up!
Thread Starter


Joined: Jan 2006
Posts: 11,204
Likes: 32
From: San Antonio/I miss DFW, TX
^ ya the hammer method isnt bad at all.........
call a local steel yard and get a 1-7/8" solid piece of steel about 2 to 3 inches long and use that to pound down on the diff ears.........
One side the metal sleave flares inward and is easy to do:
The other side is a thin race, and requires either the 1-7/8" piece of steel or a perfectly sized socket to sit on the race.
in this pic, acidjake just used the translink franksocket....it wasnt a perfect fit, but worked:
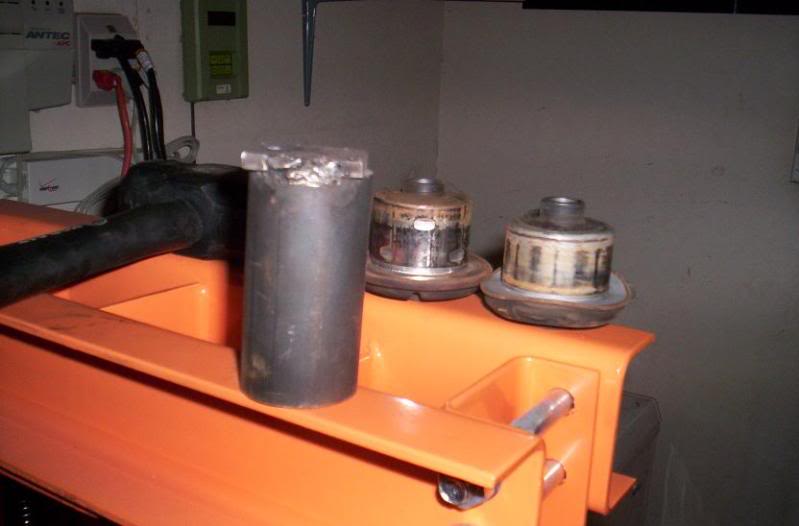
-J
call a local steel yard and get a 1-7/8" solid piece of steel about 2 to 3 inches long and use that to pound down on the diff ears.........
One side the metal sleave flares inward and is easy to do:
The other side is a thin race, and requires either the 1-7/8" piece of steel or a perfectly sized socket to sit on the race.
in this pic, acidjake just used the translink franksocket....it wasnt a perfect fit, but worked:
-J

Thanks for the updated pics! My Haynes manual gave a run down but not nearly in the same detail! I think we are up to a 6 pack by now.
What do you think about leaving the stock subframe bushing them? Is there much benefit to throwing the whitelines in there?
I guess this would be a good time to throw a nismo diff cover on too.
What do you think about leaving the stock subframe bushing them? Is there much benefit to throwing the whitelines in there?
I guess this would be a good time to throw a nismo diff cover on too.
Thread Starter
Joined: Jan 2006
Posts: 11,204
Likes: 32
From: San Antonio/I miss DFW, TX


I plan to monitor them and what not. I just wouldn't switch to whitelines to eliminate slop out of the subframe alone, and if i was ready to replace mine, i would custom fab solids "if" i were...
only if your doing a LSD install and nismo diff cover, motul fluid and diff catch can by extending the diff hose.
-J
I like the revision. A bit messy (when drilling and cutting the OEM bushing), but as long as it gets the job done with less effort, I'm all for it.


Thread Starter
Joined: Jan 2006
Posts: 11,204
Likes: 32
From: San Antonio/I miss DFW, TX
One of these may even do it to quite easily:

-J
Last edited by JasonZ-YA; Aug 5, 2010 at 11:01 AM.
Jason,
Did this install today, went well actually. I didn't have to sawsall any of the front bushings. I just used a large axle nut socket and pounded away. One side came out with a few wacks, the other side was a bit more stubborn but came out. As for the rear mount on the subframe, I was unable to pound that sucker out so I used the sawsall method and it came out perfect. I also installed the Z1 60A trans mount, and instantly I noticed a much firmer ride. It vibrates a tad more then before, probably due to the mount but I believe once it settles in it will be much nicer. I did have a slight whine prior to the install, but much more noticeable now especially around 50-60 mph. Going to change my diff fluid again, if that doesn't help, going to have my installer check the shims on my 4.08 gear. Is an additive needed for 90A motul diff fluid with stock vlsd?
Did this install today, went well actually. I didn't have to sawsall any of the front bushings. I just used a large axle nut socket and pounded away. One side came out with a few wacks, the other side was a bit more stubborn but came out. As for the rear mount on the subframe, I was unable to pound that sucker out so I used the sawsall method and it came out perfect. I also installed the Z1 60A trans mount, and instantly I noticed a much firmer ride. It vibrates a tad more then before, probably due to the mount but I believe once it settles in it will be much nicer. I did have a slight whine prior to the install, but much more noticeable now especially around 50-60 mph. Going to change my diff fluid again, if that doesn't help, going to have my installer check the shims on my 4.08 gear. Is an additive needed for 90A motul diff fluid with stock vlsd?

I don't know how on earth I missed this DIY. I did the install a month ago and it took quite a while. 
I wish that I would have read your DIY before the install. I would have definitely preferred your pressing method.
Ten seconds to put the new bushing in. It took me probably two hours and lots of sanding to do that. I tried to freeze the damn thing but I still had to sand to make it fit. I'll guess I'm learning this stuff the hard way.
Did you re-install the metal plates in the diff ears or is the bolt attached straight to the alloy bushing?
Wheel hop is still there, but It's not as bad. I wonder whats next. Awesome DIY!!!
I wish that I would have read your DIY before the install. I would have definitely preferred your pressing method.
Ten seconds to put the new bushing in.
It took me probably two hours and lots of sanding to do that. I tried to freeze the damn thing but I still had to sand to make it fit. I'll guess I'm learning this stuff the hard way. Did you re-install the metal plates in the diff ears or is the bolt attached straight to the alloy bushing?
Wheel hop is still there, but It's not as bad. I wonder whats next. Awesome DIY!!!
Last edited by 350z-Helsinki; Aug 19, 2010 at 01:00 AM. Reason: Added a question
Thread Starter
Joined: Jan 2006
Posts: 11,204
Likes: 32
From: San Antonio/I miss DFW, TX
I don't know how on earth I missed this DIY. I did the install a month ago and it took quite a while.
I wish that I would have read your DIY before the install. I would have definitely preferred your pressing method.
Ten seconds to put the new bushing in. It took me probably two hours and lots of sanding to do that. I tried to freeze the damn thing but I still had to sand to make it fit. I'll guess I'm learning this stuff the hard way.
Did you re-install the metal plates in the diff ears or is the bolt attached straight to the alloy bushing?
Wheel hop is still there, but It's not as bad. I wonder whats next. Awesome DIY!!!
I wish that I would have read your DIY before the install. I would have definitely preferred your pressing method.
Ten seconds to put the new bushing in.
It took me probably two hours and lots of sanding to do that. I tried to freeze the damn thing but I still had to sand to make it fit. I'll guess I'm learning this stuff the hard way. Did you re-install the metal plates in the diff ears or is the bolt attached straight to the alloy bushing?
Wheel hop is still there, but It's not as bad. I wonder whats next. Awesome DIY!!!
no, per spl's instructions it says to NOT reinstall any of the plates.
wheel hop shouldn't be there at all. I recommend that you maybe get a permanent marker and mark the bushing and subframe and ensure that the bushing isnt moving fwd/aft/spinning........but i honestly cant see that happening......

I have it on my car and i did NEXX 500+ hp TT 350z and zero hop on both cars.......only thing i can think of would be your tires and poor grip on their part?

-J
ya man, we literally had that bushing in quick.......max 10 seconds i swear....lol..
no, per spl's instructions it says to NOT reinstall any of the plates.
wheel hop shouldn't be there at all. I recommend that you maybe get a permanent marker and mark the bushing and subframe and ensure that the bushing isnt moving fwd/aft/spinning........but i honestly cant see that happening......
I have it on my car and i did NEXX 500+ hp TT 350z and zero hop on both cars.......only thing i can think of would be your tires and poor grip on their part?
-J
Good idea to mark the bushing. I'll definitely do that because I really want to get to the bottom of this. I doubt that the bushing is moving because I still had to pound it in pretty hard. I still have the stock subframe bushings. But I'll guess that can't be the reason since those are not shot.
I gotta remove those plates. I just thought that the alloy is too soft for the bolt.
Last edited by 350z-Helsinki; Aug 19, 2010 at 11:41 PM.
Thread Starter
Joined: Jan 2006
Posts: 11,204
Likes: 32
From: San Antonio/I miss DFW, TX
^ its pretty thick aluminum at the diff ears........instructions that came with the spl solid diff bushings say to remove them, should be fine.
I measured, and with them removed you get the typical thread engagement on the bolt to the mating floating nut plate hidden in the subframe.
-J
I measured, and with them removed you get the typical thread engagement on the bolt to the mating floating nut plate hidden in the subframe.
-J
It was really easy. I just needed to move the exhaust a bit to get the bolts. I changed my street tires at the same time so it took probably something like extra 10 minutes. Unfortunately I didn't take any pictures. This thread already has great pictures anyway.
I marked the position of the rear bushing in every way I could think of. I found out that one of the rear shock absorber bushing looked a bit bad. I ordered some polyurethane bushings from whiteline. Maybe thats the reason I still had the wheel hop. I'll give you an update once I receive the bushings and do the install. Hopefully it will take care of the problem.
Now I'll definitely make a tool to pull those out.
Thread Starter
Joined: Jan 2006
Posts: 11,204
Likes: 32
From: San Antonio/I miss DFW, TX
^ sweet.........glad it went smooth..
what exact method did you do? did you do the post 12 updated method?
- saw saw cut out the oem bushing after removing the back two nuts to lower the rear subframe a bit??
Then hammer in the new spl solid bushing while frozen? lube or no lube?
-J
what exact method did you do? did you do the post 12 updated method?
- saw saw cut out the oem bushing after removing the back two nuts to lower the rear subframe a bit??
Then hammer in the new spl solid bushing while frozen? lube or no lube?
-J
I froze the bushing, but it was like 50 meters from the freezer to the place where I did the installation. I kept it on ice and cold sprayed it but there was no way to get it in there without sanding. I had to do quite a bit of that and then I managed to pound the damn thing in with a huge hammer. I put the bushing in from the front side of the car. I also used some lube WD-40. I know I should have used brake cleaner or something similar that evaporates. BTW I noticed that your bushing was black but mine was blue.
Yesterday I made the car hop intentionally a couple of times. I know that it's not good for the car, but I wanted to know if the bushing moves. As far as I can tell it was still in the same exact place.
Last edited by 350z-Helsinki; Aug 26, 2010 at 02:03 AM.
Thread Starter
Joined: Jan 2006
Posts: 11,204
Likes: 32
From: San Antonio/I miss DFW, TX
^ only reason i say to remove the pin stay and remove the back two subframe nuts is so the subframe rear section can hang down a wee bit and allow for easier access to install it.
reason being, because the spl diff bushing has the tapered side to where you have to install it from the rear. I'm surprised you got it in from the front.
yeah, SPL makes them black now........or he changes it up. but thats all.
-J
reason being, because the spl diff bushing has the tapered side to where you have to install it from the rear. I'm surprised you got it in from the front.
yeah, SPL makes them black now........or he changes it up. but thats all.
-J
^
I looked at the picture of your bushing and I see why it was clear that you needed to install it from the back side. My bushing looked like the ones in the picture so the rear collar was actually a bit smaller and therefore easier to get in first. It was also easier to hit it hard from the front side since I didn't drop the subframe.
I read some DIY also and it said to install it from the front if I remember correctly. SPL doesn't say anything about this in their instructions which aren't too good anyway. Now I would definitely drop the subframe and install it from the back side.
Thread Starter
Joined: Jan 2006
Posts: 11,204
Likes: 32
From: San Antonio/I miss DFW, TX
^ interesting...........
wow, well that must be the slight differences between the old(BLUE) and the new (BLACK) if other than color????
ya, the black ones had the directional taper where it must go in from the back side.
hummm....
-J
wow, well that must be the slight differences between the old(BLUE) and the new (BLACK) if other than color????
ya, the black ones had the directional taper where it must go in from the back side.
hummm....
-J

intense motorsports or whatever there called wanted to charge me 850 dollers in labor to do this and an additional 160 for the bushing because when they do it they pull the whole rear subframe so it would be very labor intensive.


I'm almost done with my install but the SPL kit I picked up didn't have instructions (got it from another user) anyway can someone tell me if I need to reuse any of the metal plates from the "ears" on the differential. I know the bottom metal discs are not to be reused, but what about the two curved discs that sit on the top of stock bushings on either side of the differential, can I discard those or reuse them ?