
My built engine swap


Thread Starter
New Member
iTrader: (8)
Joined: Jan 2007
Posts: 6,457
Likes: 7
From: terre haute, IN; STL, MO
So earlier this year I installed my vortech. Of course I decided I wanted more. I fell into a great deal on a built motor along with heads.
Here is the rundown of the motor:
arias extreme duty 9:1 pistons
pauter rods
arp headstuds
ported heads
ferrera valvetrain
tomei 264 cams
Here are some pictures of my progress. I started yesterday getting things pulled off the motor and today I pulled the stock motor out.
There are way too many sensors and wire connections on this harness! My fingers are so sore I can barely type this out from pushing on those connectors to get them loose.
I had a strap break when I started hoisting the engine/trans out. Thankfully when it came crashing down it didn't hit any of my powersteering lines. Total suck.
I also found that my BPV for my vortech has the adjustment screw broken off. Any suggestions on what to do to replace that would be helpful.
It's a little tight in the garage....had to put the car in there diagonal to make room for the toolbox. lol


you shoulda left the radiator/ac condenser/front brace all as 1 piece

and some advice, dont lift your motor like that. You are really lucky you didnt cause a few g's in damage when that strap broke.
use the 2 bolt on the front of the motor and then 2 of the bell housing bolts.

Here's a clearer shot from from rrmedics DIY
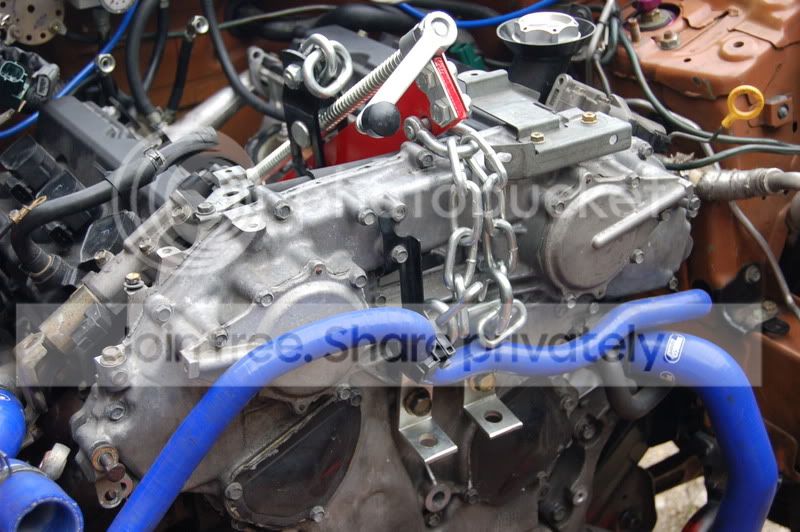
and some advice, dont lift your motor like that. You are really lucky you didnt cause a few g's in damage when that strap broke.
use the 2 bolt on the front of the motor and then 2 of the bell housing bolts.
Here's a clearer shot from from rrmedics DIY
Last edited by str8dum1; Nov 18, 2009 at 05:16 PM.
Trending Topics


Thread Starter
New Member
iTrader: (8)
Joined: Jan 2007
Posts: 6,457
Likes: 7
From: terre haute, IN; STL, MO
you shoulda left the radiator/ac condenser/front brace all as 1 piece
ah, that would have been awsome but i am trying not to open the a/c up. The infiniti dealership i trust is 2 hours away (the closest dealership actually) so i'm trying to save myself a huge setup in charging the a/c properly. It did make some extra work for me but i'll know my a/c is still going to be working perfect when i get it back on.
and some advice, dont lift your motor like that. You are really lucky you didnt cause a few g's in damage when that strap broke.
Ya, i know. I've lifted a few like this and it's not the best way by any means. These motors aren't near as easy to hook onto as the chevys i'm used to. How do you get to those rear bolts with the chain? that was my issue with bolting to them.
use the 2 bolt on the front of the motor and then 2 of the bell housing bolts.
Here's a clearer shot from from rrmedics DIY
 . Oh well, i'll be content with the supercharger and motor for the time being.
Thanks everyone else for the support!
charging the AC is simple and costs 25$ (3 cans of refrigerant at $7) you can borrow the manifold gauges and vacuum pump from autozone for free. its not worth 30$ to risk bending/breaking hundreds of dollars in AC lines. But its already done.
I just attached the L brackets from my balancer right to those bolts. and threaded them right back thru the bellhousing and the motor. it shoulda been obvious when you were pulling the motor out
I just attached the L brackets from my balancer right to those bolts. and threaded them right back thru the bellhousing and the motor. it shoulda been obvious when you were pulling the motor out
Last edited by str8dum1; Nov 19, 2009 at 06:31 AM.
Thread Starter
New Member
iTrader: (8)
Joined: Jan 2007
Posts: 6,457
Likes: 7
From: terre haute, IN; STL, MO
charging the AC is simple and costs 30$. its not worth 30$ to risk bending/breaking hundreds of dollars in AC lines. But its already done.
I just attached the L brackets from my balancer right to those bolts. and threaded them right back thru the bellhousing and the motor.
I just attached the L brackets from my balancer right to those bolts. and threaded them right back thru the bellhousing and the motor.
So you crawled up from the bottom to get to those bolts? Those were a pita when i took the trans out to change my clutch. I don't know if i could get my hands up there to put a hanger bracket on the bolt.
I guess i could put it on there when re-installing so all i will have to do is remove the bolts from below and let the hangers fall out
str8, do you know anything about replacing the adjustment screw on the BPV? mine oddly is broken off. I can get it out, but i'm not sure what to replace it with or if vortech even offers a replacement. Also, the oring for the BPV goes on the sealing face of the disk. Mine keeps coming off the sealing side and going behind the disk around the shaft. how do you keep that oring on the sealing face inside of the bpv?
i've done all my cars AC and its simple. draw a vacuum, crack the refrigerant can, turn your AC on high and thats it.
either way... it was easy to get those bellhousing bolts from the top of the motor. theres alot of room. If you didnt take your plenum off, thats might have been why it wasnt so easy.
if your o-ring is moving, thats a surefire way to get a mess up tune. My 1st BPV did that. Sent it back and they sent me a new one.
As for that bolt, again, prolly have to sent it back. You could try to pull that cap. Maybe its just a threaded rod, but i think its actually attached to the plunger.
If its set properly, it prolly doesnt matter. You should not have to ever touch the BPV.

nice job man. Wish i had those skills/time to do something like that. Looks like a fun project.... How hard is it to DIY pull/install your motor with the right tools?
Last edited by IslandZavage; Nov 19, 2009 at 08:14 AM.


 jealous!!! post up some MOAR pictures!!!
Thread Starter
New Member
iTrader: (8)
Joined: Jan 2007
Posts: 6,457
Likes: 7
From: terre haute, IN; STL, MO

we are taking over the world, one built engine at a time.
str8, that sucks, i'll call vortech and see what they say. I'm sure as heck not paying the 200$ they charge for a new one!
 I'm really not worried about the adjustment. I set it at 6 threads showing and it seemed to work fine. I'm more concerned about this oring not saying in place. I don't see how it is supposed to stay on the face either. It just flops all around when it put it there and the BPV is manually opened it. It doesn't stay in place.
Thread Starter
New Member
iTrader: (8)
Joined: Jan 2007
Posts: 6,457
Likes: 7
From: terre haute, IN; STL, MO
a couple pics. Os giken twin disk all cleaned up and on the new motor!
One of the hardest things was getting that transmission mounted while the engine on the floor. Why was that so hard?!? It was so much easier to get it to line up while it's in the car.
Last picture, engine in the car!
Tomorrow I'll finish hooking up the wiring and it will be all ready to go. I'm pumped.
Nice. This is the way to go, and how I plan on doing it when the time comes. I have been looking at some Rev-up oil consumption motors recently. Would like to buy the entire engine with everything on it. That way the swap is nice and quick, maybe one weekend and your done. Once the motor has been rebuilt ofcourse.
It is also better to do it that way because you remember everything, and how it goes vs taking the motor out, taking it appart, sending the block in for machining...waiting...waiting and then after a while you get it back. Now you have to try and remember details from a few months back.
It is also better to do it that way because you remember everything, and how it goes vs taking the motor out, taking it appart, sending the block in for machining...waiting...waiting and then after a while you get it back. Now you have to try and remember details from a few months back.

