
DIY - Solid Subframe Bushing Install - Sikky Manf bushings
 01-18-2011 | 05:29 AM
#1
Thread Starter

Joined: Jan 2006
Posts: 11,204
Likes: 29
From: San Antonio/I miss DFW, TX
Sikky manufacturing:
http://www.sikky.com/view_item.php?id=147&catid=14
Hi guys,
okay so this isn't my best DIY, as I didnt take many pics at all during the installation process.......I decided to still make this DIY as i had more then enough pictures to do so in my collection and the process really isnt that difficult at all.
I would rate this a 6 of 10 honestly.
Tools needed:
1/2" Breaker bar
1/2" Torque wrench
Deep Sockets:
12, 14, 17, 19mm
Wrenches:
Goose neck 17 are helpful for drive shaft bolts
Floor jack or Tranny jack
2 buddies and beer.
Reciprocating saw - Zaw-Zaw
Electric Drill
Harbor Freight drill saw drill bits - Item #42804
Impacts help
hammer and large flat screw driver
deadblow hammer or hammer and block of wood.
Ok to start off -
This entire job is easiest done by dropping the entire subframe, diff, rear knuckle assemblies as a whole:
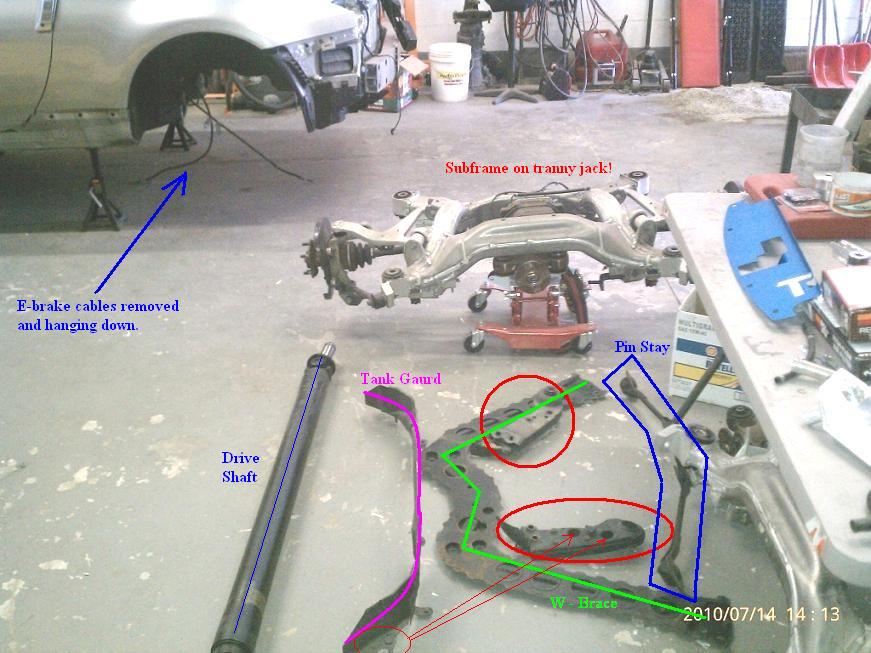
1. START by jacking the car up really high as pictured.........do this level front and rear as you need when realigning the subframe when you go to put it back in with the solid bushings.
2. Then, get a tranny jack or a regular jack - I used a regular jack - and support the entire rear subframe at the differential. I have the nismo diff cover, so i used two hockey pucks on my diff so i didnt damage my diff cover fins.
3. Remove the drive shaft - 17mm nuts and bolts - goose neck wrench helps here.
4. - Remove pin stay, 14mm center bolts only at first.
5. - Remove wheels, calipers, rotors - to access drum brake assembly.
6. - Disconnect e-brake from body - there is one 12mm nut holding a bracket on each side that will free the ebrake cable up really good. remove that nut first then pull on the ebrake cable to gain some slack AFTER removing the bolt holding the ebrake cable into the rear knuckle. From there disassemble the ebrake bracket at the rotor side. Sorry didn't take pics. will update later.
7. remove exhaust.
http://www.sikky.com/view_item.php?id=147&catid=14
Hi guys,
okay so this isn't my best DIY, as I didnt take many pics at all during the installation process.......I decided to still make this DIY as i had more then enough pictures to do so in my collection and the process really isnt that difficult at all.
I would rate this a 6 of 10 honestly.
Tools needed:
1/2" Breaker bar
1/2" Torque wrench
Deep Sockets:
12, 14, 17, 19mm
Wrenches:
Goose neck 17 are helpful for drive shaft bolts
Floor jack or Tranny jack
2 buddies and beer.
Reciprocating saw - Zaw-Zaw
Electric Drill
Harbor Freight drill saw drill bits - Item #42804
Impacts help
hammer and large flat screw driver
deadblow hammer or hammer and block of wood.
Ok to start off -
This entire job is easiest done by dropping the entire subframe, diff, rear knuckle assemblies as a whole:
1. START by jacking the car up really high as pictured.........do this level front and rear as you need when realigning the subframe when you go to put it back in with the solid bushings.
2. Then, get a tranny jack or a regular jack - I used a regular jack - and support the entire rear subframe at the differential. I have the nismo diff cover, so i used two hockey pucks on my diff so i didnt damage my diff cover fins.
3. Remove the drive shaft - 17mm nuts and bolts - goose neck wrench helps here.
4. - Remove pin stay, 14mm center bolts only at first.
5. - Remove wheels, calipers, rotors - to access drum brake assembly.
6. - Disconnect e-brake from body - there is one 12mm nut holding a bracket on each side that will free the ebrake cable up really good. remove that nut first then pull on the ebrake cable to gain some slack AFTER removing the bolt holding the ebrake cable into the rear knuckle. From there disassemble the ebrake bracket at the rotor side. Sorry didn't take pics. will update later.
7. remove exhaust.
Last edited by JasonZ-YA; 02-14-2011 at 09:55 AM.
The following users liked this post:
zxman34 (06-16-2016)
01-18-2011 | 05:35 AM
#2
Thread Starter
Joined: Jan 2006
Posts: 11,204
Likes: 29
From: San Antonio/I miss DFW, TX
Remove drive shaft - easy with 17mm goose neck wrench and regular open end wrench. pull out of tranny and set aside.
You don't NEED to remove the drive shaft, but it makes it easy to get it out of the way...
the Drive shaft is Carbon fiber, so if you leave it in the car, ensure you protect it with a
towel as it hangs....not like the pic in post #5 where the guy is cutting the bushings out.
Use a towel like this:
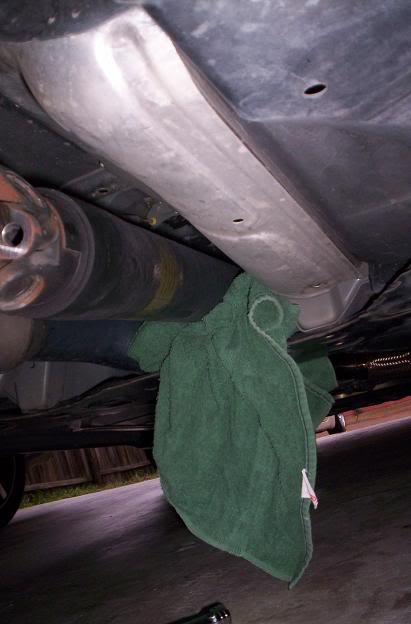
Remember, the W-brace is coming out, so just protect it from damage..
Driveshaft orientation and marking:
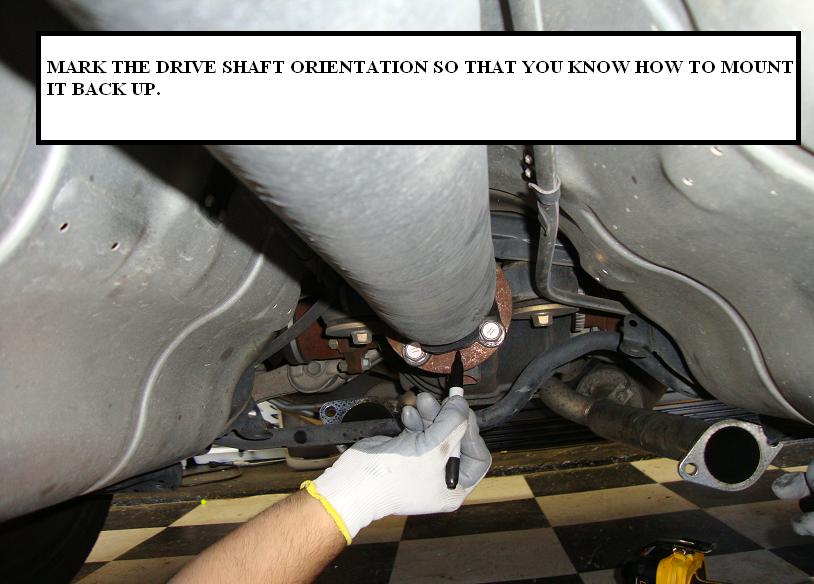
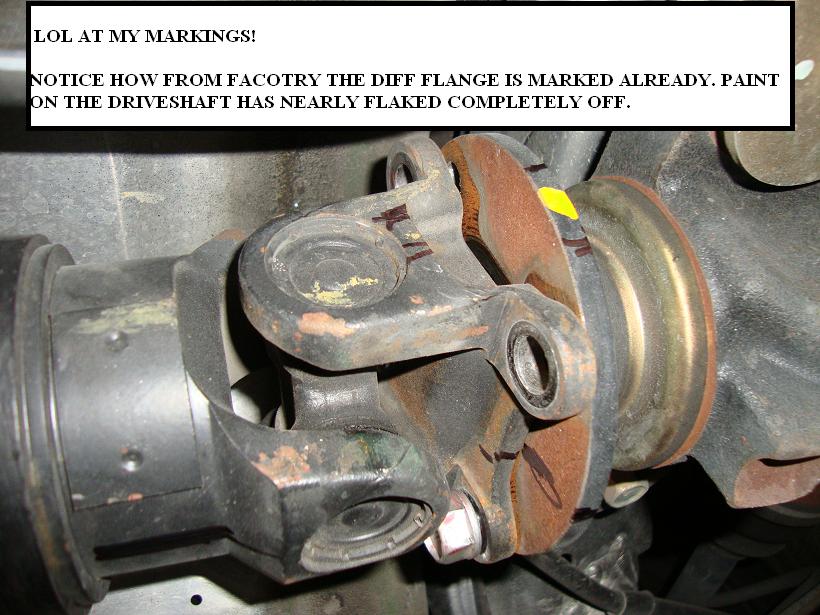
Drive shaft/ "propeller shaft" LOL...Torque specs:
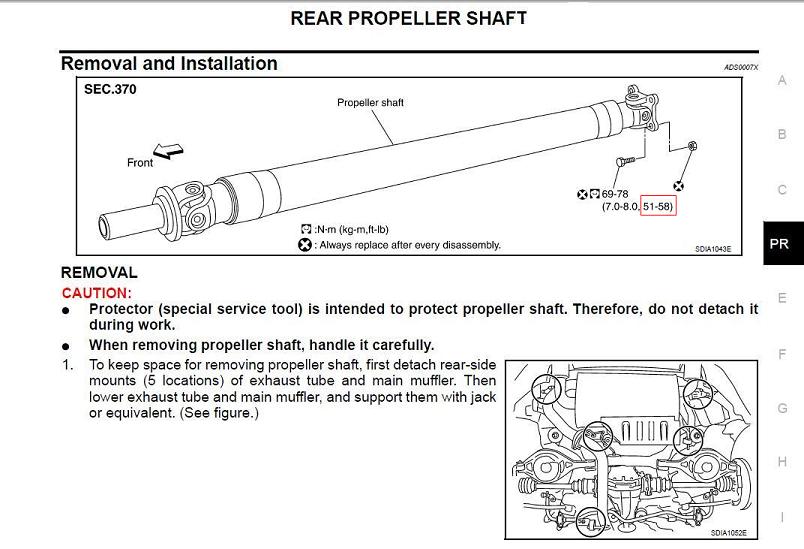
Nuts and Bolts are 'supposed' to be R&R after every use...i never have,but I constantly check....my car is a track car, I am always checking things before and after...
Rear pin stay center bolts: 14mm socket for bolts.
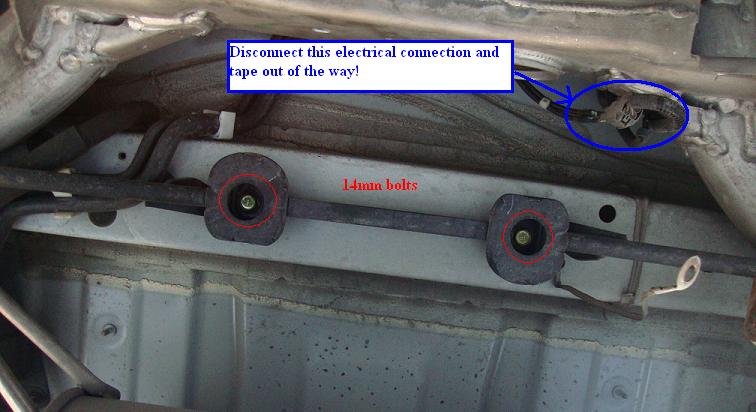
Also remove this diff electrical connection and tape out of the way.
My modified pin stay: https://my350z.com/forum/8795812-post17.html
W-Brace support: 14mm sockets

Kidney looking braces: 12 and 14mm sockets

19mm NUT IS TO BE REMOVED LAST!!! ONCE ALL OTHER PARTS ARE OFF AND SUBFRAME IS READY TO DROP!
Also, prior to removing this kidney brace there are two plastic undertrays located here:

Remove them with 10mm socket - two nuts, one bolt IIRC...
E-BRAKE CABLE: Will update with pics later:
Disconnect e-brake from body - there is one 12mm nut holding a bracket on each side that will free the ebrake cable up really good. remove that nut first then pull on the ebrake cable to gain some slack AFTER removing the bolt holding the ebrake cable into the rear knuckle. From there disassemble the ebrake bracket at the rotor side. Sorry didn't take pics. will update later.
Ebrake assembly from FSM:

Pull ebrake cable over sway bar and push over to the side out of the way!
You don't NEED to remove the drive shaft, but it makes it easy to get it out of the way...
the Drive shaft is Carbon fiber, so if you leave it in the car, ensure you protect it with a
towel as it hangs....not like the pic in post #5 where the guy is cutting the bushings out.
Use a towel like this:
Remember, the W-brace is coming out, so just protect it from damage..
Driveshaft orientation and marking:
Drive shaft/ "propeller shaft" LOL...Torque specs:
Nuts and Bolts are 'supposed' to be R&R after every use...i never have,but I constantly check....my car is a track car, I am always checking things before and after...
Rear pin stay center bolts: 14mm socket for bolts.
Also remove this diff electrical connection and tape out of the way.
My modified pin stay: https://my350z.com/forum/8795812-post17.html
W-Brace support: 14mm sockets
Kidney looking braces: 12 and 14mm sockets
19mm NUT IS TO BE REMOVED LAST!!! ONCE ALL OTHER PARTS ARE OFF AND SUBFRAME IS READY TO DROP!
Also, prior to removing this kidney brace there are two plastic undertrays located here:
Remove them with 10mm socket - two nuts, one bolt IIRC...
E-BRAKE CABLE: Will update with pics later:
Disconnect e-brake from body - there is one 12mm nut holding a bracket on each side that will free the ebrake cable up really good. remove that nut first then pull on the ebrake cable to gain some slack AFTER removing the bolt holding the ebrake cable into the rear knuckle. From there disassemble the ebrake bracket at the rotor side. Sorry didn't take pics. will update later.
Ebrake assembly from FSM:
Pull ebrake cable over sway bar and push over to the side out of the way!
Last edited by JasonZ-YA; 02-15-2011 at 04:20 AM.
01-18-2011 | 05:42 AM
#3
Thread Starter
Joined: Jan 2006
Posts: 11,204
Likes: 29
From: San Antonio/I miss DFW, TX
- Remove shock bolt from upper knuckle bushing mount. if true coilover your done, if oem set up, then as you lower, the springs will come down WITH the spring bucket.
Okay, with the jack holding the diff remove the FOUR 19mm nuts that hold the entire subframe into place.
- As you remove the 19mm nuts the put the kidney braces and the rear pin stay brace off to the side and out of the way.
from there have one guy at the rear of the car operating the jack while there are two guys, one on each side supporting and "guiding" the subframe down and keeping it from pitching over once lowered and off the rear unibody studs.
That part is easy and self explanitory...
Once removed it will look as the first post.
Here is mine:
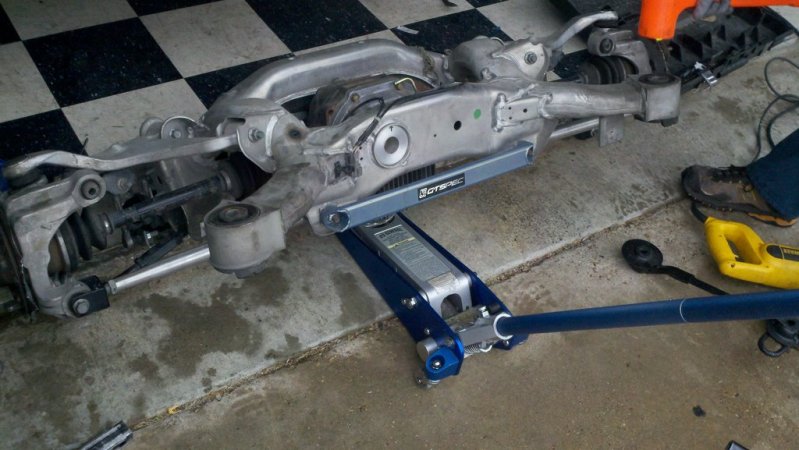
-J
Okay, with the jack holding the diff remove the FOUR 19mm nuts that hold the entire subframe into place.
- As you remove the 19mm nuts the put the kidney braces and the rear pin stay brace off to the side and out of the way.
from there have one guy at the rear of the car operating the jack while there are two guys, one on each side supporting and "guiding" the subframe down and keeping it from pitching over once lowered and off the rear unibody studs.
That part is easy and self explanitory...
Once removed it will look as the first post.
Here is mine:
-J
01-18-2011 | 05:58 AM
#4
Thread Starter
Joined: Jan 2006
Posts: 11,204
Likes: 29
From: San Antonio/I miss DFW, TX
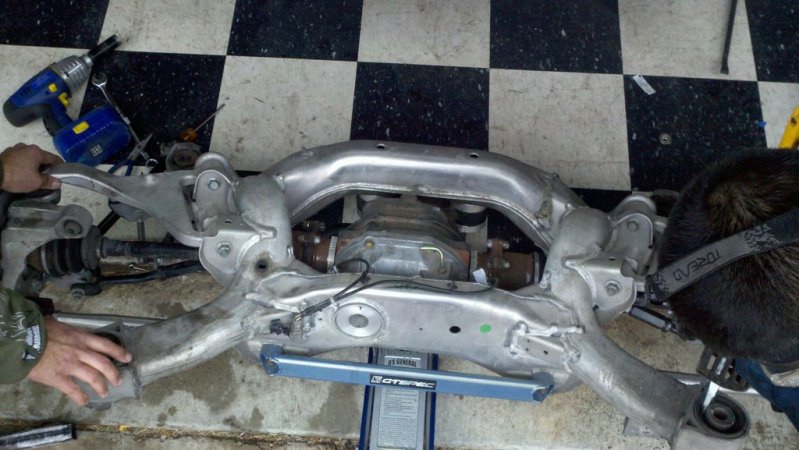
As you can see, i simply pitch the subframe forward and let my subframe assembly sit as shown.
I then proceeded to cut out the sub frame bushings.
Okay first off, you need a reciprocating saw:
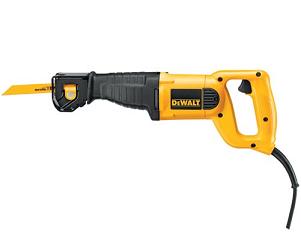
Not needed, but I highly recommend Drill saw bits:

Harbor Freight Item #42804 $6.99
OEM BUSHING CUTTING METHODS:
Ok the rear bushings you can see through the rubber as there are "gaps" allowing you to easily pass a reciprocating saw blade down into the bushing and easily cut out the center SHAFT section of the bushing first.
I found it super easy to cut out the rubber center using a "wood" cutting blade on the reciprocating saw....lol, no lie...easy as pie!
Once the center is removed you can then proceed to cut the steel oem bushing race with a metal cutting blade.
I found later that cutting only two cuts near each other then allowed you to peal the race away with a hammer and flat head screw driver like a banana peal.......this then collapsed the bushing to where you can pound it out with a few hammer hits with a large screw driver at a few various spots.
Bushing cut spots:
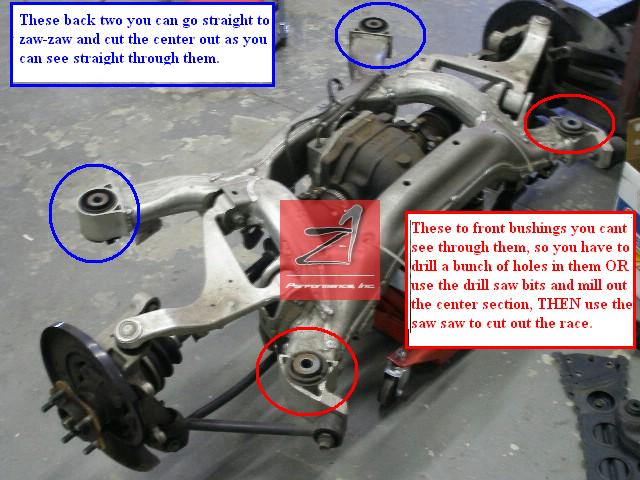
Peal race away with screw driver and hammer:
-J
I then proceeded to cut out the sub frame bushings.
Okay first off, you need a reciprocating saw:
Not needed, but I highly recommend Drill saw bits:
Harbor Freight Item #42804 $6.99
OEM BUSHING CUTTING METHODS:
Ok the rear bushings you can see through the rubber as there are "gaps" allowing you to easily pass a reciprocating saw blade down into the bushing and easily cut out the center SHAFT section of the bushing first.
I found it super easy to cut out the rubber center using a "wood" cutting blade on the reciprocating saw....lol, no lie...easy as pie!
Once the center is removed you can then proceed to cut the steel oem bushing race with a metal cutting blade.
I found later that cutting only two cuts near each other then allowed you to peal the race away with a hammer and flat head screw driver like a banana peal.......this then collapsed the bushing to where you can pound it out with a few hammer hits with a large screw driver at a few various spots.
Bushing cut spots:
Peal race away with screw driver and hammer:
-J
01-18-2011 | 06:09 AM
#5
Thread Starter
Joined: Jan 2006
Posts: 11,204
Likes: 29
From: San Antonio/I miss DFW, TX
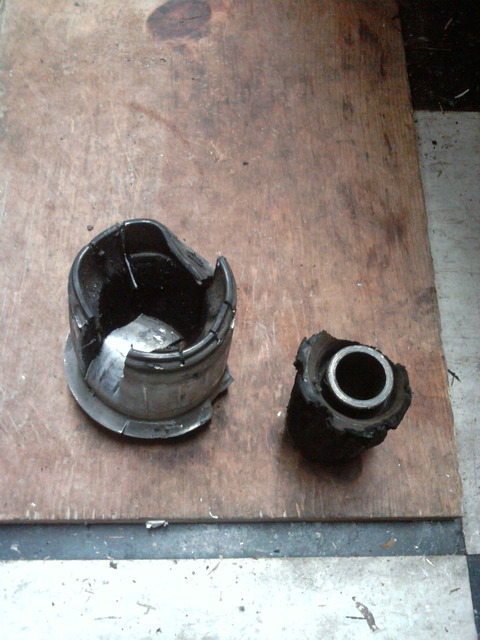
Okay, these are not all my pics, but so you get the idea you can see how to cut the old bushings out:
this pic was prior to us realizing cutting the center out was best! lol...

oh, dont let your caliper hang from the oem rubber line like this idiot....sorry AZ350...
Or your CF drive shaft just sitting on the rear brace to get damaged...

nice toe arms btw...
-J
this pic was prior to us realizing cutting the center out was best! lol...
oh, dont let your caliper hang from the oem rubber line like this idiot....sorry AZ350...
Or your CF drive shaft just sitting on the rear brace to get damaged...
nice toe arms btw...
-J
Last edited by JasonZ-YA; 01-18-2011 at 09:25 AM.
01-18-2011 | 06:17 AM
#6
Thread Starter
Joined: Jan 2006
Posts: 11,204
Likes: 29
From: San Antonio/I miss DFW, TX
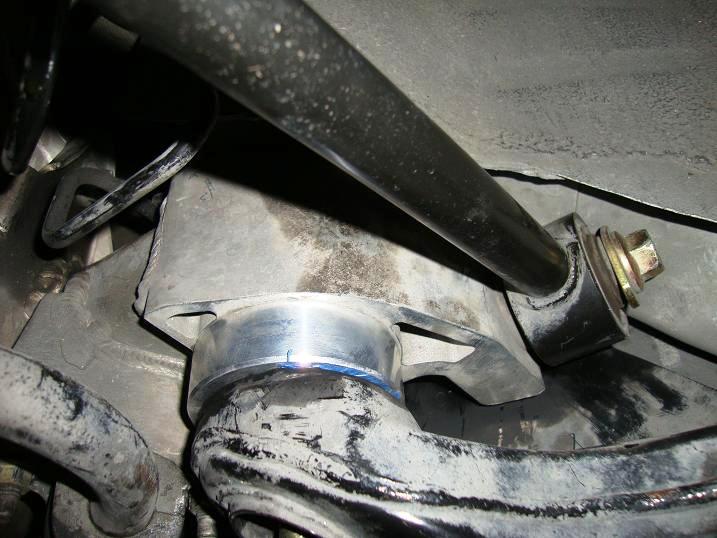
Ok, once the OEM bushings are out, simply hammer the Sikky solid subframe bushings into place.
Use a deadblow hammer, never metal on metal:

Harbor Freight Item #41800 ~ $9.99
If you have a metal hammer, use a block of wood over the bushing.
Bushings are not high press fit, they slide in quite easily with one or two easy whacks if that...
INSTALLED:
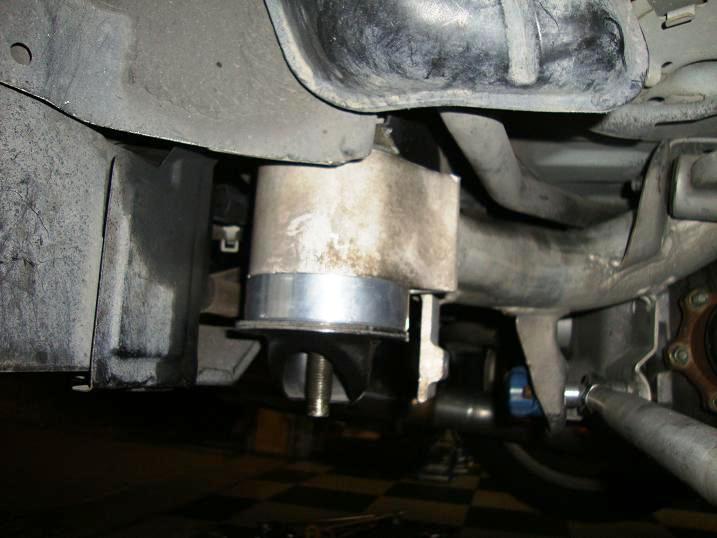
Once you have the bushings in place, i used blue tape to hold the bottom bushing to the subframe. We then used the jack and rolled the subframe back under the car......lined it up by holding it on both sides and began to jack and ensured the studs lined up into the diff.......
this part took us two tries as you must go up STRAIGHT!
once you can get the 19mm nut at all 4 points you can easily hand crank the nuts a few turns at a time alternating bolts at the same time from both sides......
Acidjake was on one side, I was on the other and we did the same out of turns each at each location till the nut bottomed out on the threads.
we then removed the nuts, installed the KIDNEY BRACE and PIN STAY BRACE and did the last wee bit and were done!!!!
-J
Use a deadblow hammer, never metal on metal:
Harbor Freight Item #41800 ~ $9.99
If you have a metal hammer, use a block of wood over the bushing.
Bushings are not high press fit, they slide in quite easily with one or two easy whacks if that...
INSTALLED:
Once you have the bushings in place, i used blue tape to hold the bottom bushing to the subframe. We then used the jack and rolled the subframe back under the car......lined it up by holding it on both sides and began to jack and ensured the studs lined up into the diff.......
this part took us two tries as you must go up STRAIGHT!
once you can get the 19mm nut at all 4 points you can easily hand crank the nuts a few turns at a time alternating bolts at the same time from both sides......
Acidjake was on one side, I was on the other and we did the same out of turns each at each location till the nut bottomed out on the threads.
we then removed the nuts, installed the KIDNEY BRACE and PIN STAY BRACE and did the last wee bit and were done!!!!
-J
Trending Topics
01-18-2011 | 06:18 AM
#8
Thread Starter
Joined: Jan 2006
Posts: 11,204
Likes: 29
From: San Antonio/I miss DFW, TX
https://my350z.com/forum/suspension/...hing-sets.html
Sikky Bushing review:
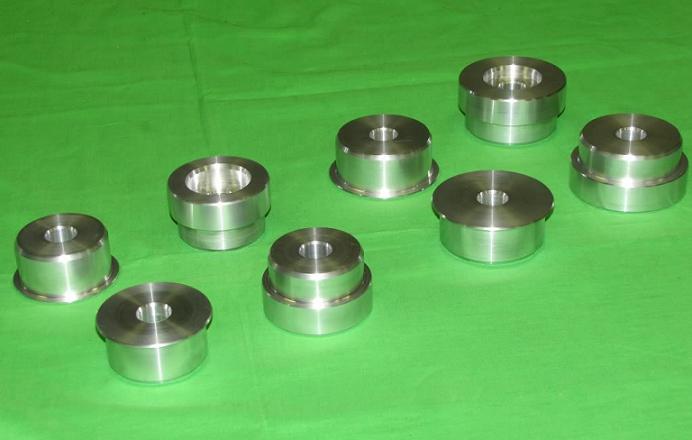
The bushings were top notch!........not a high press fit, they easily hammered into place and had tapered edges for easy installation! Price was right......if any higher i would have made them myself as i have machine shop access.
Drive review to come - haven't lowered the car yet as other mods are in the works while its up on stands.
-J
Sikky Bushing review:
The bushings were top notch!........not a high press fit, they easily hammered into place and had tapered edges for easy installation! Price was right......if any higher i would have made them myself as i have machine shop access.
Drive review to come - haven't lowered the car yet as other mods are in the works while its up on stands.
-J
Last edited by JasonZ-YA; 01-18-2011 at 06:25 AM.
01-18-2011 | 06:33 AM
#11

Im still sore from this install.. NICE writeup J as always holmes.. Totally going to HF and getting those drill bits.. ordering bushings when I can come up with the cash.. Then we are doing mine..! WOO-HOO!
Sub'd for the review..
Sub'd for the review..

 01-18-2011 | 09:15 AM
#17
Thread Starter
Joined: Jan 2006
Posts: 11,204
Likes: 29
From: San Antonio/I miss DFW, TX
if i had to do it again, we could do it fast! 1.5 hours i would bet..
https://my350z.com/forum/engine-driv...?highlight=spl
Next time we do this, im using the drill saw bits for the fronts.......we will have the oem bushings out in 20 minutes tops for sure now that we know what to do!
-J
01-18-2011 | 10:51 AM
#18

I removed my subframe this weekend. Lol, I was going to post a DIY but looks like Jason beat me to it. Guys, this procedure is not difficult, just alittle time consuming. But I highly recommend that you have someone with you to help you out. I did the whole removal by myself! And you can believe these parts are heavy as hell!
Jason, I removed the whole wheel hub/knuckle before I completely dropped the frame. I left the ebrake cable connected. How exactly is the cable connected to the knuckle? I see it has two bolts, but is it hooked to a spring or something? Thats the only reason I didn't disconnect the cable because I was thinking there was some little hook to a spring or something that was going to be a PITA to disconnect/reconnect.
Also, just wanted to mention... and I know this is obvious but someone might have a brain fart like I had. As I was lowering the subframe frame, this was before I removed the rear axle/wheel hub/knuckle... I forgot to remove the brake caliper. Or you can just disconnect the brake line. I just didn't want to have to bleed my brakes afterwards so I removed the caliper and suspended it so it wasn't hanging by the line. I noticed in Jason's pictures he had removed the rotor and caliper before hand.
01-18-2011 | 11:50 AM
#19
Thread Starter
Joined: Jan 2006
Posts: 11,204
Likes: 29
From: San Antonio/I miss DFW, TX
Jason, I removed the whole wheel hub/knuckle before I completely dropped the frame. I left the ebrake cable connected. How exactly is the cable connected to the knuckle? I see it has two bolts, but is it hooked to a spring or something? Thats the only reason I didn't disconnect the cable because I was thinking there was some little hook to a spring or something that was going to be a PITA to disconnect/reconnect.
next in the back of the knuckle is a single bolt holding the cable to the knuckle (in RED below)...remove that bolt and the cable will be really loose and free.........
at this point...with the ebrake handle DOWN in the car, i just pulled and gave slack to the entire ebrake pull cable system...i then pushed the cable back toward the knuckle and the little weird (TOGGLE LEVER item 7) linkage on the rotor side comes apart..........watch carefully as a small dowel pin (ITEM 5 in BLUE) will fall to the floor.......once free, the cable simply comes right out the back of the knuckle....
to reinstall its quite easy.....just falls right back into place and by hand put the pin back in....
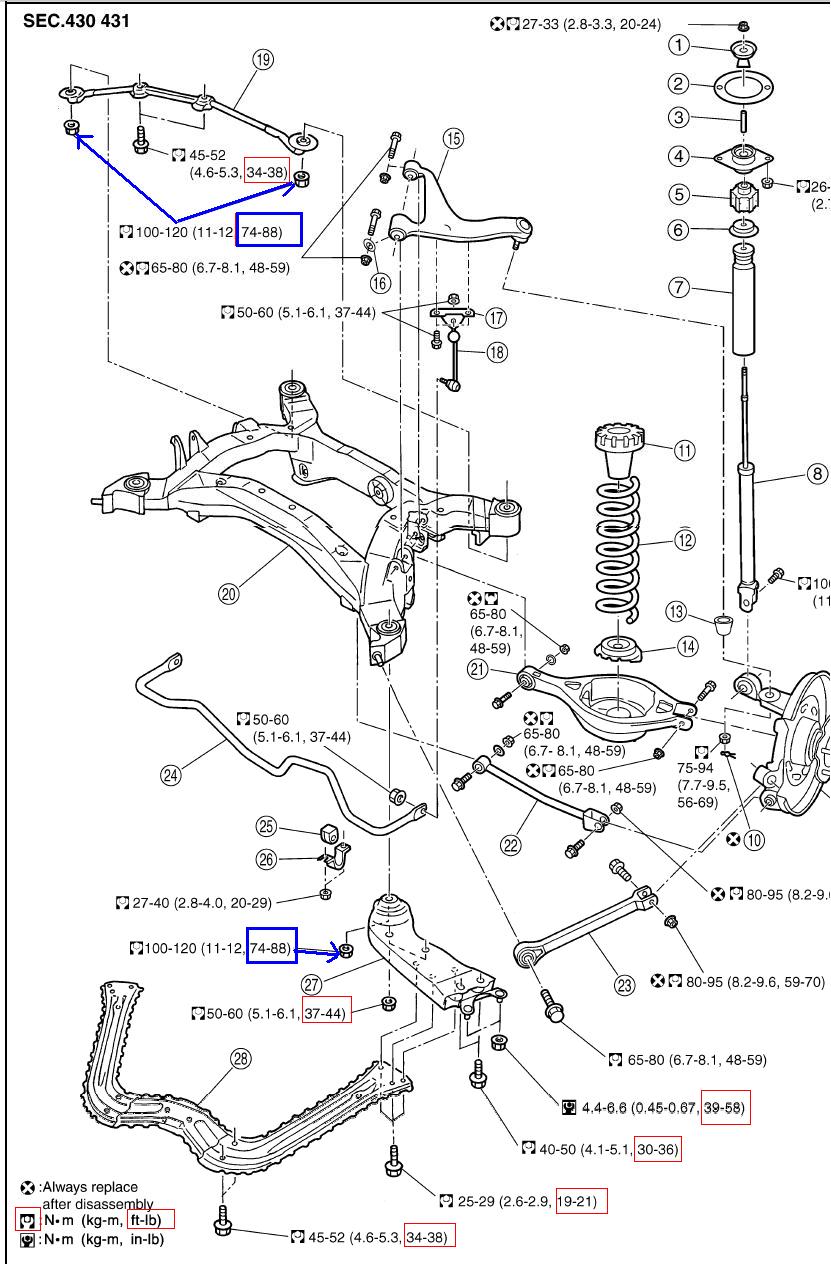
I know it sounds crazy reading this, but its actually quite easy....ill get actual pics for sure....but until then, follow this FSM pic:
Ebrake assembly from FSM:
-J
Last edited by JasonZ-YA; 01-18-2011 at 11:53 AM.
01-19-2011 | 01:41 AM
#20