When you click on links to various merchants on this site and make a purchase, this can result in this site earning a commission. Affiliate programs and affiliations include, but are not limited to, the eBay Partner Network.
Found a huge dripping leak when cars running that at first looked like oil pan. Its a constant flow. I sprayed under the car and looks like its actually flowing from behind the crank... assuming that the front main is toasted.
from the service manual breakout it looks like i remove belts, remove pulley, remove old seal put new one in and reassemble...
just want to verify from anyone that may have done this.
The cause of this leak could be anything from a cracked oil pan, fitting or seal. Do you have the tools and skills to pull the front end and possibly pull the VQ? Do you have the time (and garage) to spare if complications arise?
The cause of this leak could be anything from a cracked oil pan, fitting or seal. Do you have the tools and skills to pull the front end and possibly pull the VQ? Do you have the time (and garage) to spare if complications arise?
definitely not the oil pan... i cleaned everything and started the car and watched the river run from behind the crank pulley.
and yes i have the ability and storage, i just dont see whqt else it could be when i cleaned it all and visually watched it coming from behind the pulley
Maybe you know this stuff, maybe not...but
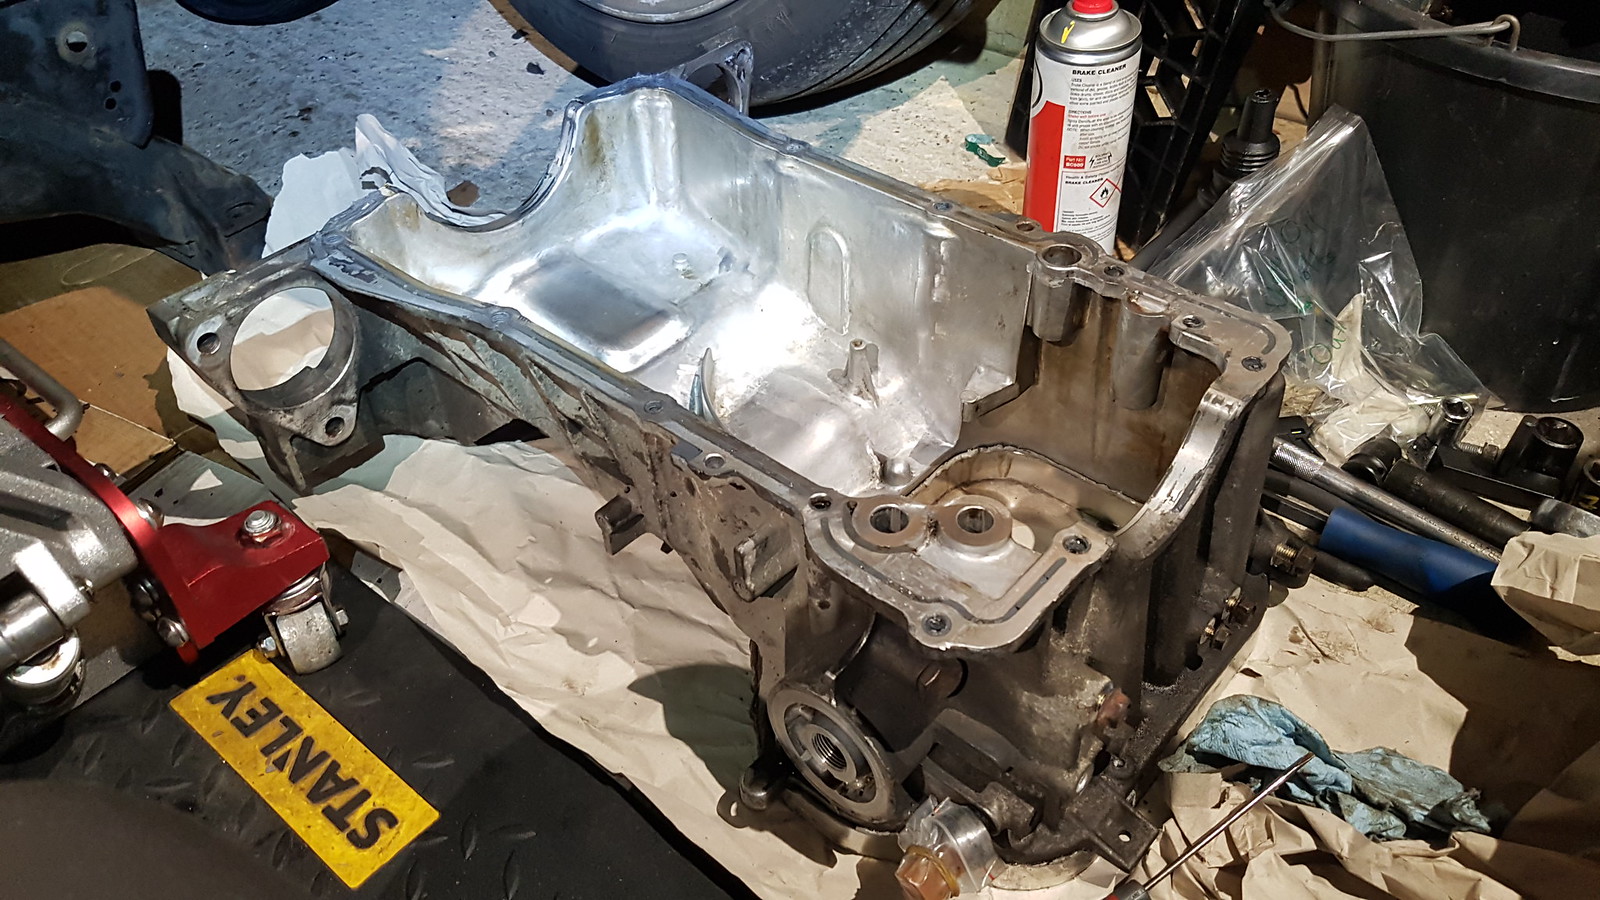
Pretty easy, you might need to get yourself an engine support brace because you'll need to remove the engine sub-frame and hold the engine in place, and move the steering rack out of the way a bit (I didn't disconnect it, just moved it). You need to do that because the upper oil pan won't come out otherwise.
If you do that with the steering rack, make sure you put some paint marks on the upper and lower part of the yoke to get your steering lined up when you put it back together.
My engine support brace had a couple of chains with it, and I bought a couple of 1 ton support straps to wrap around the engine mounts, it did the job fine just ensure you do it neat as possible as the weight will remove the slack quickly if you aren't careful.
I found WD40 softens the old RTV, and a few plastic scrapers make reasonably light work of removing it all.
There are a couple of pry spots on the upper oil pan (near bolts 1 & 2), just over half way along and pointing towards the front of the car IIRC. There are a couple of dowel pins near there which is why it's the prying point.
Check the FSM on page EM-27 onwards, have fun
Last edited by RobPhoboS; Feb 11, 2019 at 05:42 AM.
Maybe you know this stuff, maybe not...but
Pretty easy, you might need to get yourself an engine support brace because you'll need to remove the engine sub-frame and hold the engine in place, and move the steering rack out of the way a bit (I didn't disconnect it, just moved it). You need to do that because the upper oil pan won't come out otherwise.
If you do that with the steering rack, make sure you put some paint marks on the upper and lower part of the yoke to get your steering lined up when you put it back together.
My engine support brace had a couple of chains with it, and I bought a couple of 1 ton support straps to wrap around the engine mounts, it did the job fine just ensure you do it neat as possible as the weight will remove the slack quickly if you aren't careful.
I found WD40 softens the old RTV, and a few plastic scrapers make reasonably light work of removing it all.
There are a couple of pry spots on the upper oil pan (near bolts 1 & 2), just over half way along and pointing towards the front of the car IIRC. There are a couple of dowel pins near there which is why it's the prying point.
Check the FSM on page EM-27 onwards, have fun
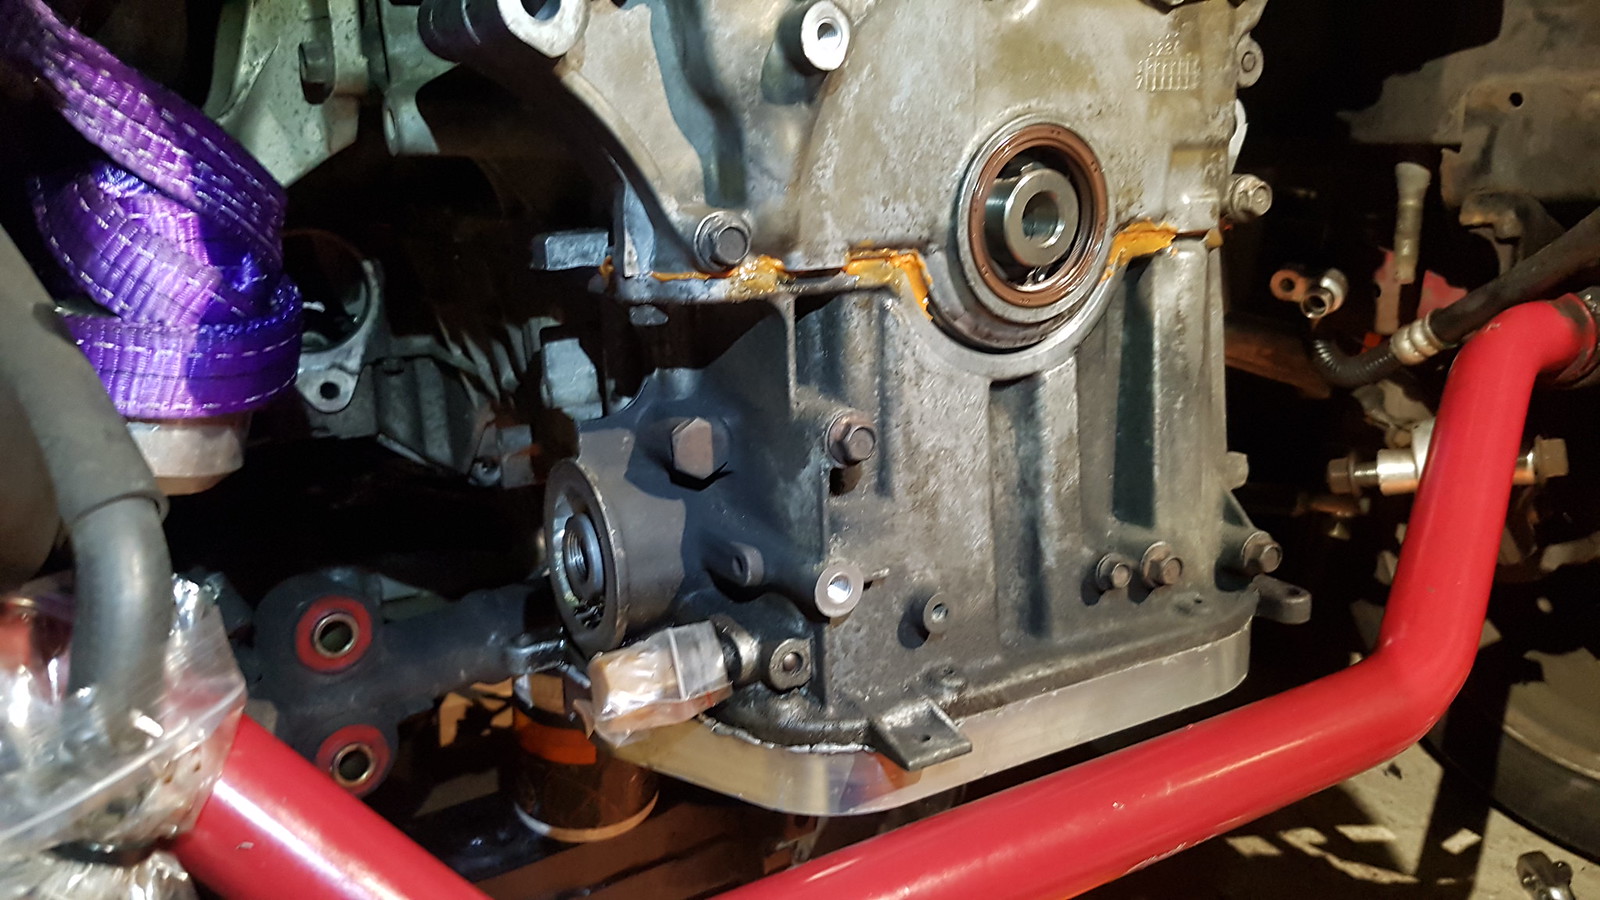
so does the front Main seal require pulling all the timing cover stuff off? It looks like it presses in from the front
If it's the crank seal, you'll need to pull the front timing case off as well unfortunately, if it's the upper oil pan seal then you won't need to worry about the timing case.
These images may help you a little and I'd still replace the upper oil pan seals anway:
If it's the crank seal, you'll need to pull the front timing case off as well unfortunately, if it's the upper oil pan seal then you won't need to worry about the timing case.
These images may help you a little and I'd still replace the upper oil pan seals anway:
correct me if I'm not seeing something correctly but it looks like that seal can pop right out the front and you press back in. That's also how the diagram breakout makes it look as well. If I'm wrong could you explain why I would need to pull the timing cover?
looking at this it could be that upper oil pan seal which would be why it looks like it's running a river behind the crank pulley. I was thinking front Main because it's a steady flow at idle rather than just a few drips
Last edited by Enriquez2000; Feb 11, 2019 at 05:33 AM.
If you're sure it's just that crank seal, you can definitely pry it out, so yep give it a go ! (carefully as you can of course)
Pressing it back in should be ok with a big socket I imagine. I used a flat race bearing press to get it in (quite tough) but I can't see any reason why you can't try your way first
as soon as I get the crank pulley off it should be obvious if it's the main seal or the upper pan gasket I would imagine. This is my first go with the VQ give me a Honda motor and I'd be able to tell you right away what it was LOL
as soon as I get the crank pulley off it should be obvious if it's the main seal or the upper pan gasket I would imagine. This is my first go with the VQ give me a Honda motor and I'd be able to tell you right away what it was LOL
Ah it's not too different, just a bit bigger and probably less space to work with
Depending on your intentions with the car, it's well worth doing a few preventative bits with the mileage/age but if it's just a car to run around in, no worries.
Ah it's not too different, just a bit bigger and probably less space to work with
Depending on your intentions with the car, it's well worth doing a few preventative bits with the mileage/age but if it's just a car to run around in, no worries.
it's a procharged car and it's just a fun little thing for now. At some point I know it needs to be a built motor if I'm going to keep it and do anything else with it
it's a procharged car and it's just a fun little thing for now. At some point I know it needs to be a built motor if I'm going to keep it and do anything else with it
Nice.
It might be worth posting something up when you tackle it, always useful for others.
it's a procharged car and it's just a fun little thing for now. At some point I know it needs to be a built motor if I'm going to keep it and do anything else with it
Getting this bit of info makes me think you're wasting your time by just trying to put together a small fix. With 120K and FI, it's time to build the shortblock at a minimum. Face it, this VQ was never designed for FI and has worn rapidly. All that labor goes to waste if you don't do the repair the right way.
Getting this bit of info makes me think you're wasting your time by just trying to put together a small fix. With 120K and FI, it's time to build the shortblock at a minimum. Face it, this VQ was never designed for FI and has worn rapidly. All that labor goes to waste if you don't do the repair the right way.
Come DK - don't get dramatic!
yes, the VQ wasn't 'built' per say for FI but 8 or 9 psi of boost never hurt anyone...especially at elevation!