DIY - Solid diff bushing install - No subframe drop method, no c clamp either!


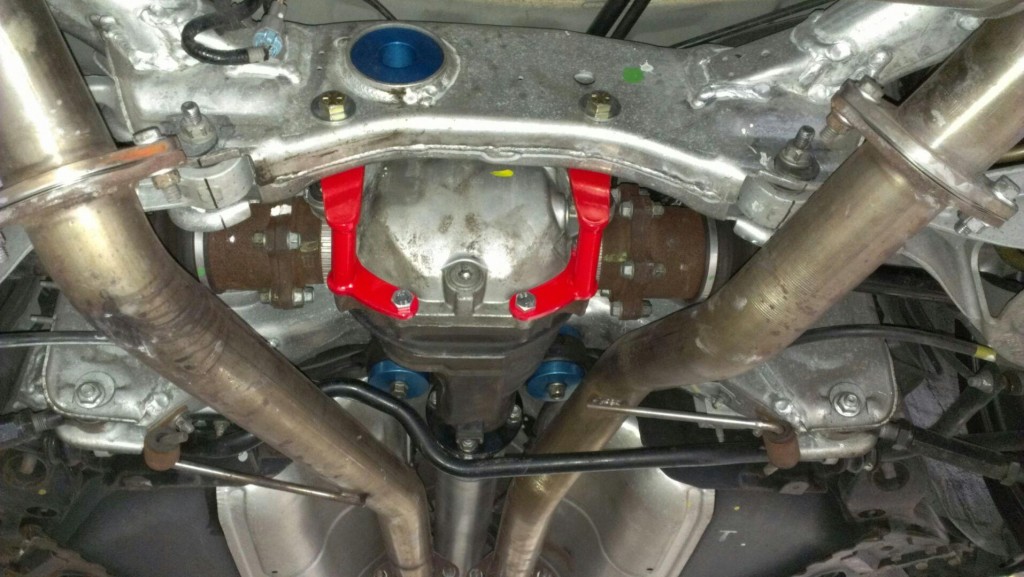
The ES rear bushing is not 'bolted in' by any means. It re-uses the inner sleeve of the stock bushing (the cylindrical part the nut holds onto). The bushing is straight thru held in place by friction between the re-used inner sleeve and subframe. Compounding the issue the kit doesn't come with a lock washer so hard launches eventually loosen the rear nut, after which the play will force the bushing out the rear with hard launching (I average 1.6 60ft). I was lucky the only damage was a thrashed diff stud which I replaced. I haven't had time to call ES and ***** about it but I might. The solid mounts are holding up well so far and I'm just happy it wasn't as bad as it could have been.
Last edited by djamps; Jul 2, 2012 at 06:22 PM.
The main thing to look out for is the rear nut loosening. If it weren't for that, it might still be in one piece. Once it gets loose from hard launches and lack of a lock washer, the play will eventually force the bushing out the rear.
Thread Starter
Joined: Jan 2006
Posts: 11,204
Likes: 32
From: San Antonio/I miss DFW, TX
The following i have taken from another thread and the suspension 101 thread:

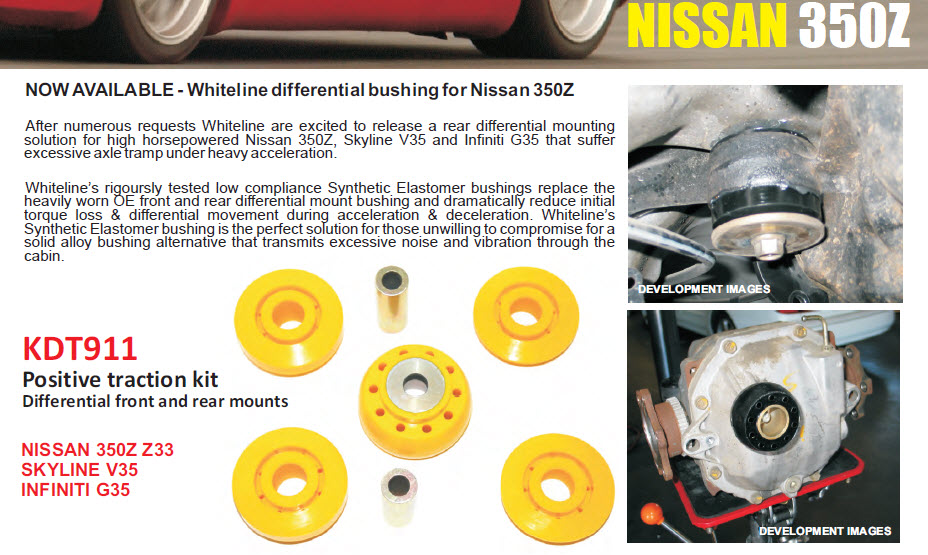
The whiteline KDT911 kit is a great option for those that don't want solid...
hands down, i would choose solid (I only track my car), but for those that are just daily driven cars and want zero noise i would choose whitelines kit.
the engineering/design behind the rear diff bushing p/n 67419 from kit KDT911 that goes into the subframe is great.
Whiteline really put thought into it.
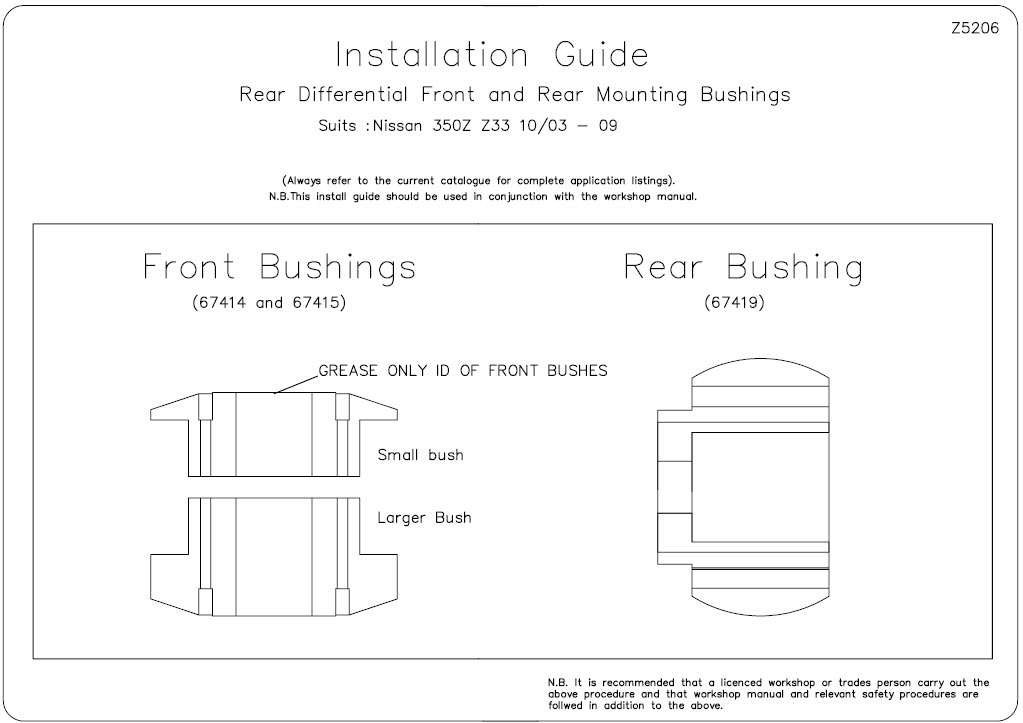
I had mentioned it before and poly in the rear diff isnt a good idea unless its large sleeved like the oem bushing. The whiteline large sleeve helps avoid the permanent deformation that can result from "creep" and having a tear drop shape in the poly. the large sleeve paired with hard poly avoids this. The multiple holes drilled into the bushing and the curved shaped aids in torsional bending. its a great design compared to energy suspensions hands down. A side note, the install of it will be much easier then due to the curved shape...
-J

replaced rear bushing with Whiteline stuff today. I used a rattle gun to push them out. Should have use a press to make it quicker. The OEM bushing on the sub frame was a pain in the *** tho.
Attachment 467339
Attachment 467340
Attachment 467339
Attachment 467340

For the bushing in my subframe, yes, all the OEM **** had been removed. Included the b!tchy steel sleeve. Everything are out or else the Whiteline bushing won't fit into the subframe. It look like i still have the insert in the pic because i use a rattle gun and it scratches up the metal parts, so in the pic, it look like I still have something in it but in fact I dont.

I'm going to assume the "rattle gun" is an air hammer.
Looks like it mangled the rear bushing bore of the subframe.
You'll probably be okay since your using a urethane bushing, if it were a solid aluminum you'd have to replace your subframe.
The press fit of a solid bushing will easily crack the aluminum subframe if there's a stress riser in that area (AKA deep gouge from air hammer).
You need to fix the front ears as well as it may damage the rear bushing from being constantly nosed down. Thats why all the rubber front compression arm bushings got to hell with a lowered car.
Do yourself a favor and do it right....
The instructions for the bushings are, well, yes, terrible, no two ways about it, but, you can garner some info from them.
The right way up, as Ian stated, i would imagine does matter, they wouldn't bother with the different sizes if it didn't.
I guess if you did damage the frame with the air hammer then that's what i'm seeing, your mention of the steel sleeve in the frame lets me know you found that too! I was surprised that was there when i cut mine out, i have more pics, but non are ready/online yet.
The right way up, as Ian stated, i would imagine does matter, they wouldn't bother with the different sizes if it didn't.
I guess if you did damage the frame with the air hammer then that's what i'm seeing, your mention of the steel sleeve in the frame lets me know you found that too!
I was surprised that was there when i cut mine out, i have more pics, but non are ready/online yet.


Put my whiteline setup in the other day, by far the most time consuming part was removing the old subframe bushing fully, I ended up taking a chisel and cutting it down one side until I could peel it out, and then did the same to the outer shell. Installation was super simple after that.

Registered User
Joined: Feb 2003
Posts: 841
Likes: 9
From: indiana
I haven't read this for a few weeks but don't remember seeing this tip. I just did my bushing and used dry ice. Once you have the sub frame bushing out make sure you don't have ANY blemishes from the removal. If there are, fix them with sandpaper but do not make the bore any larger than the original. Your new bushing should be in the regular freezer 24 hours then buy a block of dry ice and one of those disposable styrofoam coolers for a couple of bucks. Place the bushing on the ice block for at least 4 hours. A 10 pound block lasted me almost 24 hours to help you plan your time. Mine shrunk by 0.008" total and was able to quickly place the cold bushing in the bore with just the pressure of the palm of my hand. As with any method you don't get very long to get it in there before you can't move it! Use heavy duty gloves. Dry Ice will destroy your skin! -107 degrees $4 suede work gloves from WalMart are fine.
I got my gloves and ice at Meijer for <$20 (9.4 pound block at $1.39/lb)
Also I did not mess around with removing anything towards the rear of the car. Once I had the pumkin out the new bushing can go in from the front. And probably no matter what brand it is if it shrinks by as much as mine did. Mine was designed to go in from the front anyway (small tapered lip on one end about 0.010" smaller than the rest of the bushing).
Last edited by bjr; Sep 7, 2012 at 01:21 PM.