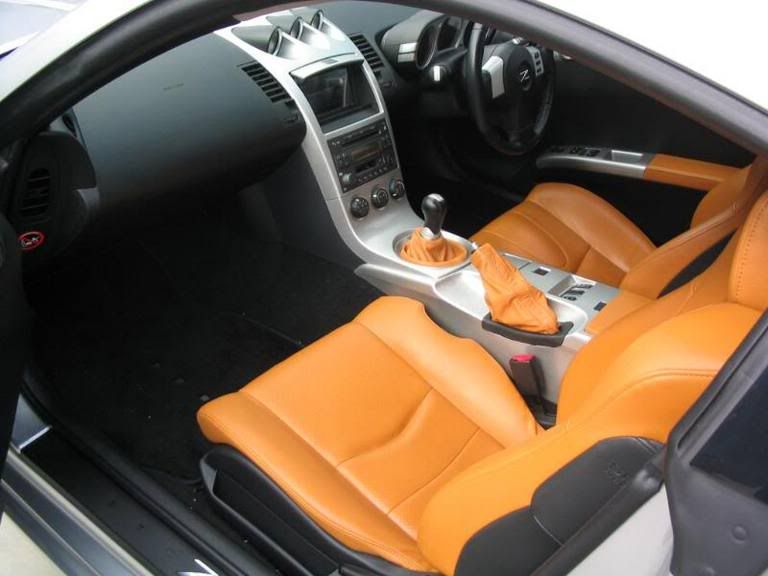
My interior change up.
#21
Registered User
Thread Starter
Thanks guys. Already prepping to repaint!
The momentum **** was out of stock, so I've got to find a new one.
I really like the TWM. But I can't spend that much money on a ****.
The momentum **** was out of stock, so I've got to find a new one.
I really like the TWM. But I can't spend that much money on a ****.
#22
New Member
iTrader: (19)
You may want to consider what i am doing with my amp rack. Not completly done. I will drop the amp a notch lower and add plexiglass on top. maybe some LEDs in there. The sub box slides in further than you see in the pic
Pic was taking while working on it. Generally I keep my car clean. Lol

Pic was taking while working on it. Generally I keep my car clean. Lol

Last edited by beezee; 10-05-2012 at 06:37 PM.
#23
Registered User
Thread Starter
That's pretty much exactly what I want to do with mine. Looks really tight man.
You know you can tuck that Sirius or GPS antennae under the strut bar plastic and it will still get a great signal right?
You know you can tuck that Sirius or GPS antennae under the strut bar plastic and it will still get a great signal right?
#27
Registered User
Thread Starter
Alrighty. So far tonight I got my shifter surround sprayed, both brake And batt covers, and both door finishers sprayed.
There's a couple of rough areas that I need to address with the old sponge sander, as well as spray some of the bigger pieces.
It takes me a long time to spray this stuff because I'm a perfectionist. I'll probably be done next weekend, depending on how much I have to end up sanding.
There's a couple of rough areas that I need to address with the old sponge sander, as well as spray some of the bigger pieces.
It takes me a long time to spray this stuff because I'm a perfectionist. I'll probably be done next weekend, depending on how much I have to end up sanding.
#30
New Member
iTrader: (19)
Awesome. Hope everything come out well. If you decide to go my Amp rack route let me know. I can help with some templates. I just started the next phase. I got the plexiglass framed up and test fitted. Next I will stretch a stretchcloth over and mold them to the rack with fiberglass/filler/bondo stuff. Then I would decide whether to paint or vinyl. Some pics of the testfit and the mock stretchcloth. I will install some LEDs under them as well


Last edited by beezee; 10-07-2012 at 03:14 PM.
#31
Registered User
Thread Starter
Do you have a template for the whole cover? I don't need the windows, obviously, just the outer part. It would save me from a long fight with cardboard...
I love the plexiglass windows. My amps would overheat sealed in like that though. Did you put some LEDs in there?
I love the plexiglass windows. My amps would overheat sealed in like that though. Did you put some LEDs in there?
Last edited by Tackett; 10-07-2012 at 04:12 PM.
#32
New Member
iTrader: (19)
Still a work in progress. No LEDs yet but I will put some in there. The cover is in 2 pieces
I realized it was easy to install and uninstall when in 2 pieces.They meet very flush and straight in the center. I can draw the outlines for you. Just cut and sand to blend. You were right with fight with cardboard. Took me lots of tries, sand and fit routines to get
a good fit.
I realized it was easy to install and uninstall when in 2 pieces.They meet very flush and straight in the center. I can draw the outlines for you. Just cut and sand to blend. You were right with fight with cardboard. Took me lots of tries, sand and fit routines to get
a good fit.
#33
Registered User
Thread Starter
I've been debating on painting the silver rings around the top gauges and AC controls red.
I saw a guy on here once who did that with a black interior and looked amazing.
I saw a guy on here once who did that with a black interior and looked amazing.
#34
Registered User
Thread Starter
Okay so I bought some nice PPG metal flake maroon to paint the rings with.
I took the shift boot into them and had them color match te threads. Should look NIIICE!
For my next trick ill be painting the strut bar cover black to match and the Z in the center as well as the 3 dots in each side the maroon color.
I took the shift boot into them and had them color match te threads. Should look NIIICE!
For my next trick ill be painting the strut bar cover black to match and the Z in the center as well as the 3 dots in each side the maroon color.
Last edited by Tackett; 10-08-2012 at 09:55 AM.
#40
Registered User
Thread Starter


