When you click on links to various merchants on this site and make a purchase, this can result in this site earning a commission. Affiliate programs and affiliations include, but are not limited to, the eBay Partner Network.
Hey, in all the upgrades part purchases, I think I lost sight on the intake plenum. So, I had read the 03 and 04 model benefited from the plenum spacer, but not so much the 05 , so I left that alone. Given I am going FI, I am guessing it would be a good idea to at least put the spacer in there now? Any other suggestions? I did read up on all the other upgraded plenums and they all seem to be a bit of mixed bag, but open to comments on this. The kintex velocity certainly has the "look", but read some really mixed reviews on it and I so sure I am ready to spend that kind of money give where I am at this point. Thanks.
I did find this write up that was very specific to my Vortech setup. Really not a great gain and a lot of people with a lot bad stories about this intake given the cost etc. Interesting that appears the cosworth intake(of much higher build quality) did not seem to do very well either in what I could read. https://my350z.com/forum/forced-indu...h-numbers.html
Last edited by Jim Stephens; 10-10-2020 at 04:01 AM.
No happier day than when you get your Driver's License! The lady who was getting the paperwork done looked at his learner's permit and said I guess you are not 5'11" anymore, nope, 6'1". Basically another 2" in about 18 months. LOL. He is enjoying walking up to me and showing he is taller than Dad. Going to miss our year and a half of driving together everywhere!
Last edited by Jim Stephens; 10-11-2020 at 03:51 AM.
My left axle was clicking. The most annoying sound ever. The click is more like CLICK. Did it per the TSB. Took out axle, cleaned it, put the recommended grease on, rotated it 180 degrees and reinstalled it with new hardware. Problem solved! The axle nut came off easy with the electric impact driver. One of the very nice things about this Z is there is zero rust and the bottom of the car is very clean. Every time I do a project everything unbolts without any drama. Also, the Motordyne Y-pipe replaced an Agency Power Y-pipe and I must say it noticeably made the sound of the exhaust better and is a bit quieter at speed. Would not think just the Y-pipe would do that. The Cat back is a Nismo exhaust.
Last edited by Jim Stephens; 10-12-2020 at 11:05 AM.
Hey all, doing research on my last parts. So, it appears that on 2005 350z I can get live AFR readings with uprev and the OEM ECU. So, I am thinking that will be sufficient for the tuner to set up the engine. Trying to decide if I really need to spend the money and installation time to put in an AFR/Boost gauge? My thinking is unlike a turbo, the boost is dialed in with the gear ratio and is stable unlike the variable boost you can do with a Turbo. Therefore, when you tune the motor you can get the right AFR ratio and it pretty much is what it is at that point. Hence an AFR gauge is optional. Am I getting that right? Is there a another route to just get a bluetooth OBDII adapter with my iphone to monitor and check it that way?
On another note, I called Z1 yesterday and they confirmed to me that he 34 row Oil Cooler will fit in there just fine with the Vortech intercooler. Whew. Was concerned about fitment.
My stock oem AFR gauges are not accurate under the very rich conditions seen under boost. My tuner used the aftermarked afr sensor to tune the fueling. I think talking to who you plan to have tune it would be the best way to answer that question. You are correct about the boost gauge, you don't really NEED one, but if you decide to get an afr gauge I would think it would make sense to get a combo gauge that can show both.
Well, The fuel pump turned out to be a learning process.
1. Did the complete install, test drove it and all was great.
Then I noticed a few days later the gas gauge was not working right. I did some research and figured I had gotten the fuel return line tangled on the float.
2.. Removed the fuel pump and got it untangled. Went for a test drive and the gauge was fixed. Thought I was good to go.
3. Then I smelled fuel. The gasket was not sealing.
4. Learned that the gasket can swell and get larger when exposed to fuel. That was what I was seeing and spent too much time trying to make it work for me., so I ordered another gasket plus all new screws for the plate.
5. Success. It’s sealed, gauge is right, pump is working.
I completely can change out a fuel pump petty quickly now! Lol
Check out the swollen Blue gasket. I actually installed a new blue OEM one. This black one was the same size though from autozone.
Last edited by Jim Stephens; 10-16-2020 at 06:53 PM.
OK, this is going to be very basic question Sunday, so please be kind. Remember, that anything I do, is pretty much the first time I have ever done it. Or, we could say the phrase "there are no dumb questions" is really bullcrap. LOL.
1. Trying to figure out the right size line to run from the supercharger down to the oil pan. I have at least determined both fittings need to be 3/8" diameter male fittings (z1 oil pan spacer below, supercharger above). That is easy enough. I then got lost in the new world to me of AN and NPT. Both brand new things for me. I have done some basic reading this morning, on Army/Navy fittings and NPT, but when I look at the charts of I.D. and O.D I am a bit lost. So, the basic question is what specific fittings should I be using and what type of hose? Being specific(like a link) would be great as the variation of hardware and hoses is endless. Still going to read some more, but I think learning by doing might become buying 8 different things before I get it right. Appears they just used 1/2" rubber hose and a clamp on the original install as there was a piece of hose still attached to the original fitting.
2. Oil pan spacer from Z1. You know how they have those grooves cut into the aluminum for the sealant. Why do they stop well before the bolt? Are you supposed to apply the sealant just in the grooves or in the flat surfaces as well, but just less of it? I think when I did the diff cover I did the entire way around the part, but thought I would ask to ensure I am doing it the right way.
3, Sealing threaded items. I bought some high heat permatex to put on the threads to seal them as I put this together. Is this the preferred method or is teflon tape fine? Got a feeling either works, but did read that teflon can break off and cause issues if you don't put it on correctly.
4. Putting new Cog and Ribbed pulleys on my Supercharger bracket today. I am planning to put the gears in boiling water to expand them before I slip them on. If that does not work I will break out my new little friend the Map Torch, which worked well taking them off, did not even need a gear puller. Two questions. One, you put the key on the shaft first and then tap (or use the bolt to pull it on) the gear on right? Two, is it okay to cheat a bit and lightly oil the shaft to help with slipping it on or does that defeat the entire purpose of having the metal bind to the shaft?
OK, so this completes basic bolting things together questions for the day. Better to ask than guess I suppose. I am known to over think things before doing them.
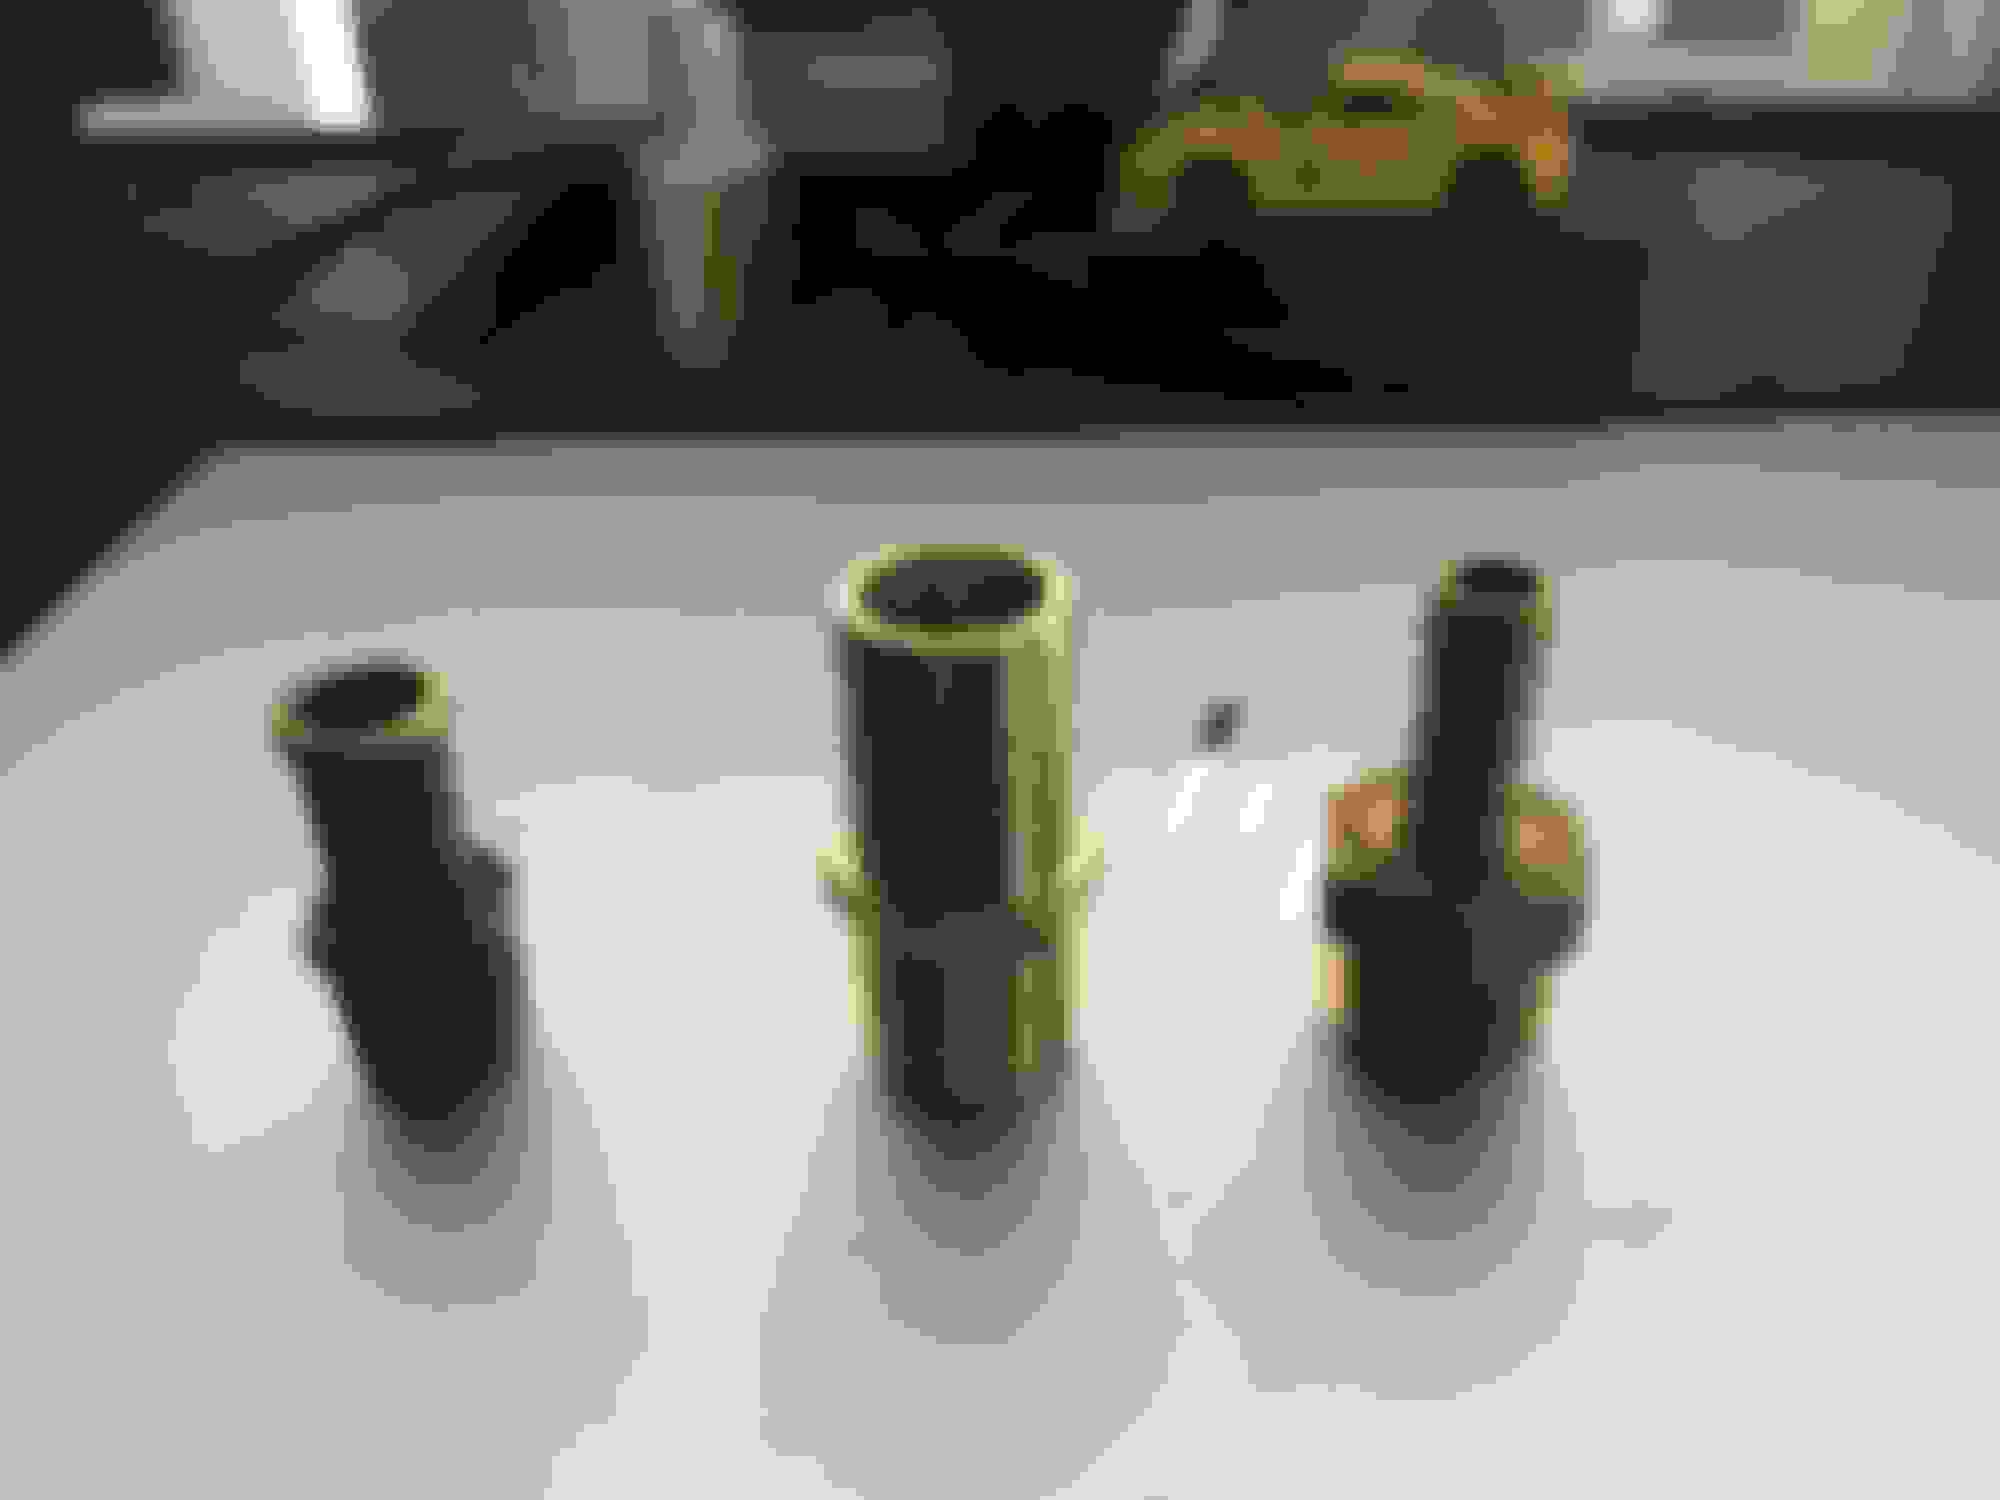
See my mistakes in the pic below. I must be the village idiot. The fitting on the left came off of the supercharger. It is 3/8" diameter male and appears to fit well to the 1/2" rubber hose I purchased. The two fittings on the right were me ordering stuff on Amazon unsuccessfully, yeah, it's embarrassing. So, I could just go down to Autozone and tell them to get me new ones of the thing on left that came off the supercharger, but I thought I might want to spend a bit more and put in a Stainless steel line? Not really sure that is necessary though and not set on doing it that way.
Last edited by Jim Stephens; 10-18-2020 at 06:38 AM.
OK, it's coming together on the supercharger reassembly. I boiled the gears to get them to expand and that got them on to a point, but then I went to a 5lb dead hammer(rubber) and the blow torch to get a little more heat on it and they tapped on without to much effort. Looking good. Not all completely tight down, but getting there. Still not wild about how the belt tracks on the blower side, but will do some further looking into that to see. I have seen other pictures that look like mine on it, just seems you would have the guide out about another 1/4" on the COG, but they may be to compensate for how it tracks when the whole thing is spinning. Looks a lot better painted black.
Last edited by Jim Stephens; 10-18-2020 at 11:44 AM.
1. Trying to figure out the right size line to run from the supercharger down to the oil pan. I have at least determined both fittings need to be 3/8" diameter male fittings (z1 oil pan spacer below, supercharger above). That is easy enough. I then got lost in the new world to me of AN and NPT. Both brand new things for me. I have done some basic reading this morning, on Army/Navy fittings and NPT, but when I look at the charts of I.D. and O.D I am a bit lost. So, the basic question is what specific fittings should I be using and what type of hose? Being specific(like a link) would be great as the variation of hardware and hoses is endless. Still going to read some more, but I think learning by doing might become buying 8 different things before I get it right. Appears they just used 1/2" rubber hose and a clamp on the original install as there was a piece of hose still attached to the original fitting.
So all three of those barbs are barb on one end and I am guessing 3/8" NPT on the other. You can check to see if it is 3/8" NPT by measuring the outer diameter of the threads. 3/8" NPT thread outer diameter is .675". If you want to build nice hose, this is what I would get. Always stay to one brand. This is vibrant, but earls, summit, aeroquip are all good, just don't mix. This is cleaner, but obviously much more expensive. I included one 90 degree and one straight, but you can mix those around to what fits best. The feed to the supercharger is also very important. I would think that it would need some type of restrictor like an oil fed turbo, but I am not sure. Do not put thread sealant on AN fittings. Always put thread sealant on NPT fittings. You want specific permatex thread sealant with PTFE.
Originally Posted by Jim Stephens
2. Oil pan spacer from Z1. You know how they have those grooves cut into the aluminum for the sealant. Why do they stop well before the bolt? Are you supposed to apply the sealant just in the grooves or in the flat surfaces as well, but just less of it? I think when I did the diff cover I did the entire way around the part, but thought I would ask to ensure I am doing it the right way.
Continuous bead, on the inside of the bolt holes per the FSM.
Originally Posted by Jim Stephens
3, Sealing threaded items. I bought some high heat permatex to put on the threads to seal them as I put this together. Is this the preferred method or is teflon tape fine? Got a feeling either works, but did read that teflon can break off and cause issues if you don't put it on correctly.
Originally Posted by Jim Stephens
4. Putting new Cog and Ribbed pulleys on my Supercharger bracket today. I am planning to put the gears in boiling water to expand them before I slip them on. If that does not work I will break out my new little friend the Map Torch, which worked well taking them off, did not even need a gear puller. Two questions. One, you put the key on the shaft first and then tap (or use the bolt to pull it on) the gear on right? Two, is it okay to cheat a bit and lightly oil the shaft to help with slipping it on or does that defeat the entire purpose of having the metal bind to the shaft?
Lubing the shaft is fine. As far as spacing, as long as the belt is completely on the cogs, it is fine. It is okay to not be perfectly centered. Spacing it isn't a bad thing though.
Many thanks for the answers! I will order the setup you have for the line. What tool are using to cut the SS lines? Never worked with it before. Will need to look up a video on how you attach the fitting to the line.
I got the tension pulley to line up pretty nice with two washers. See Pic. Might back it off to one washer. I also discovered my new filter is not correct nor is the old one. The filter works fine if you have a catch can or some other type of set up, but I just want to run the hose from the valve cover to the filter as Vortech does it. Called Vortech and they will sell you the filter with the nipple on it for the same price, they just don't advertise it. Will see if I can find a pic to show the difference.
Last edited by Jim Stephens; 10-20-2020 at 04:14 AM.
I was out driving the Z yesterday and noticed the cruise was turning on, but not working. Then today I go to an auto event and on the way back the dreaded airbag light came on. When I got the car home I tried to reset the airbag(Driver airbag) a few times and no luck. Then it occurs to me, Cruise quits, airbag light starts equals bad clockspring. Ugh. I have been here before, but I made the mistake of buying an aftermarket clockspring to replace the OEM one. This time I will buy the OEM clockspring and hopefully not have to go into this steering wheel again. I remember after replacing it someone saying be sure and buy the OEM clockspring, they were right. On a bright note, I am getting to know the car pretty well in some areas at least. My wife claims I enjoy these projects, I told her I do, but I do not enjoy doing repeat projects. Going to get this fixed before I start the big project.
Last edited by Jim Stephens; 11-01-2020 at 06:58 AM.
The car has been creaky mostly in the rear end. Did some reading and replaced the end links on the rear OEM sway bar with OEM links. Great news. The rear is silent. The less than great news is I hear some popping on the front where I have new spl end links and a hotchkins sway bar. Not too bad, but will need to look at it at some point. Anything I should be looking for when I check that out? Tempted to just install some new OEM links.
Last edited by Jim Stephens; 11-01-2020 at 11:20 AM.


 10-10-2020, 03:50 AM