
Suspension 101

Thread Starter


Joined: Jan 2006
Posts: 11,204
Likes: 32
From: San Antonio/I miss DFW, TX
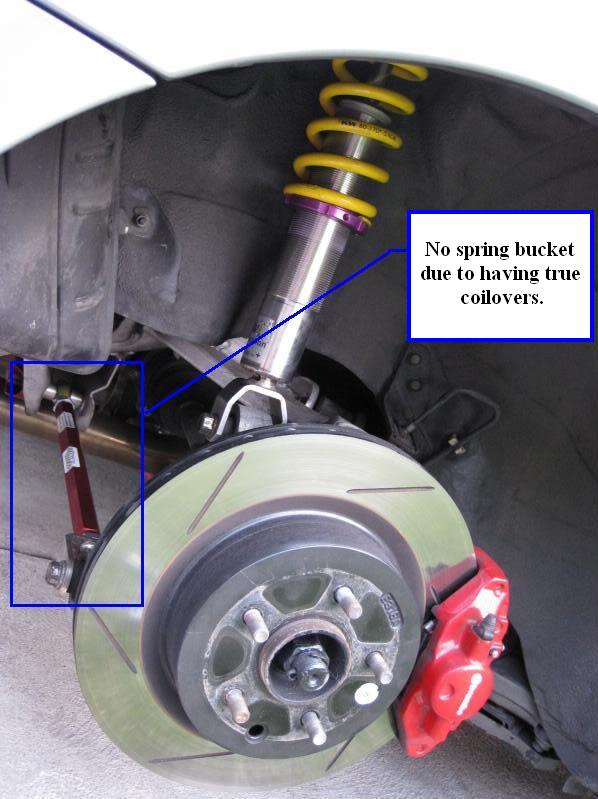
Okay, if you review from before toe is adjusted at the aluminum sub frame where the spring bucket attaches to the car. :Review: SPC TOE BOLT 72055: Post #4 and Post #19:
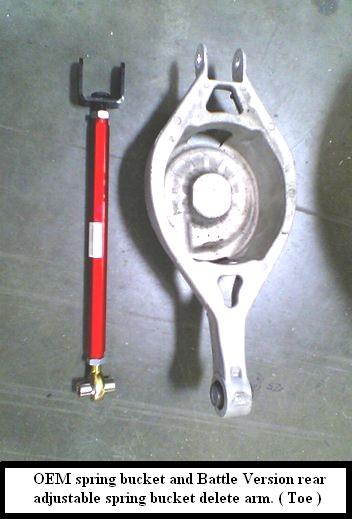
If you purchase the TRUE COILOVER DESIGN suspension coilovers you will then have the option of purchasing rear adjustable toe arms INSTEAD of using the SPC/3 degree toe bolts to adjust toe. The adjustable toe arms will REPLACE your oem spring bucket - go make a flower pot out of it!!
**Battle version, circuit sports and SPL are some of the companies that make them. GOOGLE "350Z Toe Arms" etc...My advice is to purchase a quality unit with a solid machined rod end versus the casted cheap 2 dollar rod ends!

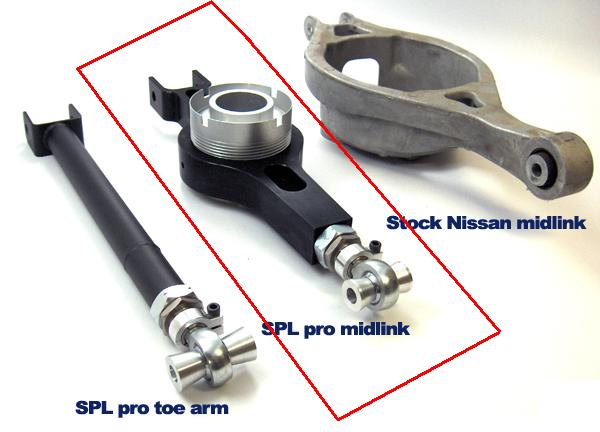
SPL: also makes their "Pro Midlink" which works with oem style coilovers because it keeps the spring bucket adjustable:
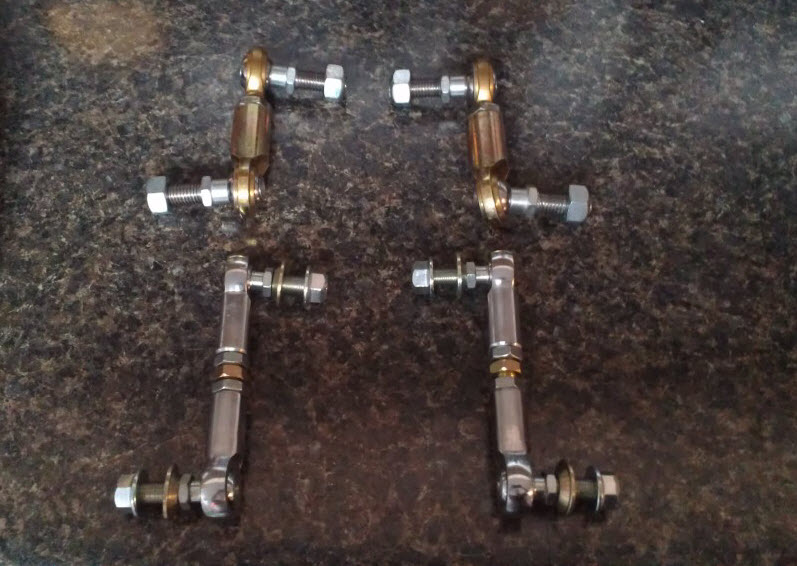
I made my own Toe Arms: of course with lock out washers....
Shown is plain bolts, but i use zinc bolts.

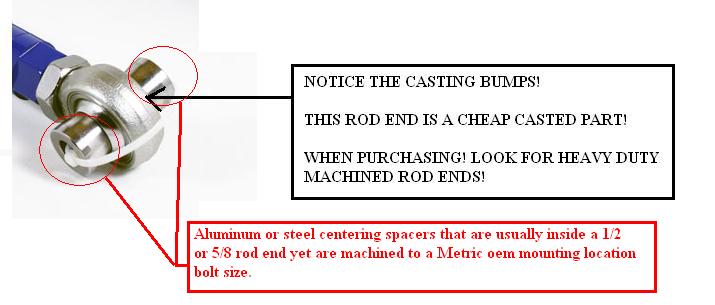
CASTED ROD ENDS:
Stay away from the cheap casted rod ends.........9 out of 10 "ARMS" built for the Z use aluminum or steel spacers at the rod end in order to accept the oem bolt and mount on the car! This allows many manufactures to purchase CHEAP 1/2" or 5/8" cast rod ends that cost $2 bucks or less and simply machine the spacers to the METRIC size M12 bolt of the car!
Purchase ARMS that use machined rod ends for strength and are of METRIC thread size, etc...
SEE HERE:
-J
ONCE AGAIN - THE REAR SPRING BUCKET "IS" YOUR TOE ADJUSTMENT LOCATION!!!!
If you purchase the TRUE COILOVER DESIGN suspension coilovers you will then have the option of purchasing rear adjustable toe arms INSTEAD of using the SPC/3 degree toe bolts to adjust toe. The adjustable toe arms will REPLACE your oem spring bucket - go make a flower pot out of it!!
**Battle version, circuit sports and SPL are some of the companies that make them. GOOGLE "350Z Toe Arms" etc...My advice is to purchase a quality unit with a solid machined rod end versus the casted cheap 2 dollar rod ends!
SPL: also makes their "Pro Midlink" which works with oem style coilovers because it keeps the spring bucket adjustable:
I made my own Toe Arms: of course with lock out washers....
Shown is plain bolts, but i use zinc bolts.
CASTED ROD ENDS:
Stay away from the cheap casted rod ends.........9 out of 10 "ARMS" built for the Z use aluminum or steel spacers at the rod end in order to accept the oem bolt and mount on the car! This allows many manufactures to purchase CHEAP 1/2" or 5/8" cast rod ends that cost $2 bucks or less and simply machine the spacers to the METRIC size M12 bolt of the car!
Purchase ARMS that use machined rod ends for strength and are of METRIC thread size, etc...
SEE HERE:
-J
Last edited by JasonZ-YA; Jun 21, 2012 at 03:15 AM.
Thread Starter
Joined: Jan 2006
Posts: 11,204
Likes: 32
From: San Antonio/I miss DFW, TX
ENDLINKS:
HERE IS A GOOD THREAD ON ENDLINKS:https://my350z.com/forum/brakes-and-...l+endlink+bolt
Okay many people report breaking factory endlinks.
Same thing, there are companies that make endlinks for the Z��..These are a few companies off hand, but there are others, once again - you research/search google and decide....
SPL �www.splparts.com
Z1 � Powergrid endlinks.
https://my350z.com/forum/suspension/...r-z-and-g.html
Whiteline endlinks:
http://www.jscspeed.com/catalog/Whit...35-4239-1.html
Adjustable end links will allow you to fine tune corner balancing on your Z. They all for adjustments, removing preload from swaybars on corner balancing with out touching the coilovers, thus affecting height, spring settings.
Nearly all of them out there are stronger than the oem end links.
I made my own as well:
EDIT: I made my own because I personally am not really happy with the units out there and plus i have the means, supply's, knowledge to do so.........My rear design is much more unique and stronger than others out there.
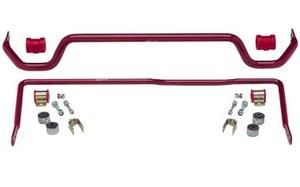
SWAY BARS:
Sway bars stiffen the cars roll��..if you have a GOOD set of coilovers, this is not so predominant as springs��.
Going to the motorsports section you can talk about sway bars and settings.
I wouldn�t buy any unless they were adjustable�.
-J
Last edited by JasonZ-YA; Jun 20, 2012 at 05:43 AM.
Thread Starter
Joined: Jan 2006
Posts: 11,204
Likes: 32
From: San Antonio/I miss DFW, TX
Before we begin - ensure you review POST #2 first and "know" exactly where we are pointing at and which bushings we are referring to on the suspension!

Okay, lets talk about bushings!
The 350z in general has a BUTT load of bushings………dear god man…….
Most of the critical ones, suck nuts for track guys……..daily driving as well, its all in due time…..
BAD BUSHINGS WILL RESULT IN BAD ALIGNMENT AND A pulling/pushing CAR WHEN ON THE ROAD….
FRONT BUSHINGS:
THREE in particular –
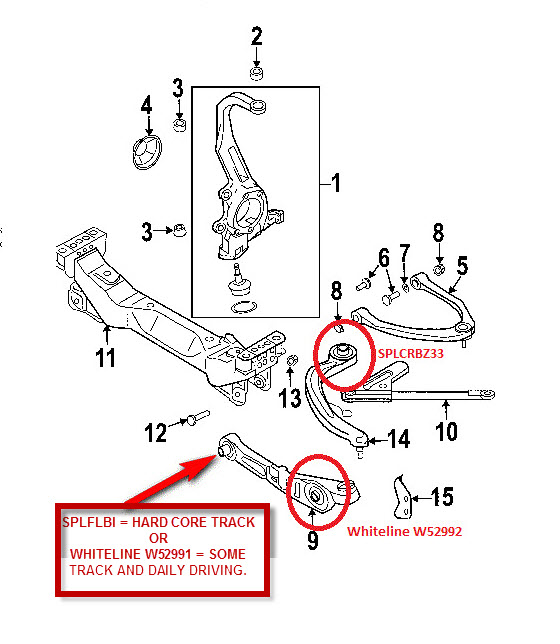
1. Translink (#13 transverse link) inner bushing – The straight lower control arm:

This bushing is (position #4 on next pic) the bushing at the inside of the translink where the lower control
arm translink connects to the LUG of the engine steel K member lower lug.
SEE HERE:
https://my350z.com/forum/brakes-and-...ight=translink
2. Translink to shock/assembly mount location.
This is point #2 here:

Replacement options for items 1 and 2 are either (spl or whiteline)
WHITELINE:

Whiteline bushings installed in both locations in the translink:

shown is the front lower inner and front lower outter(ie, shock mount) bushings.
SPL bushings for the translink - both locations:

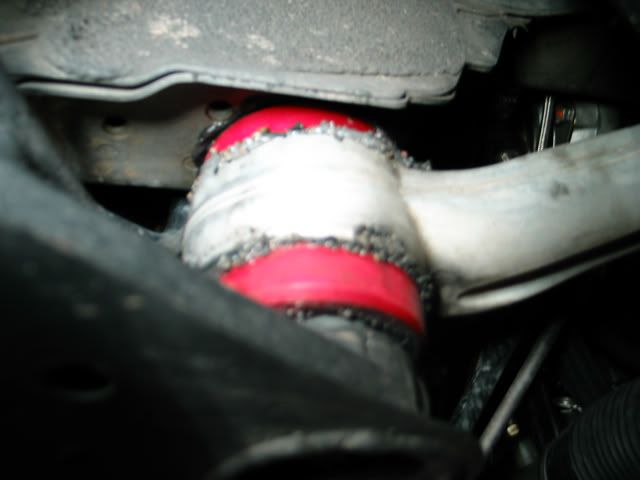
3. COMPRESSION (#11 compression rod) ROD BUSHING:

Ok, this bastardo is the reason why your car drifts to the left while your on the highway even after you just got your alignment done…
Get a flash light and inspect this ugly fugger……….yep its cracked/torn or misaligned……….
YOU MUST KNOW - THAT IF YOUR CAR IS LOWERED, YOUR COMPRESSION ARM BUSHING IS GONNA TEAR. See only at stock height is the bushing at its correct position. When you lower the Z, the compression arm bushing is always being pulled/stretched........thus leading to the inevitable bad caster,drifting on the hwy, etc...
The bushing is rubber, and rubber isnt supposed to be ALWAYS stretched, its supposed to come back to its original state, a lowered car doesn't allow this..........thus tearing the bushing intentionally with the lowering....
once again, if its lower than stock, then its in jeopardy....Get your alignment sheet out and check the cars caster!
CASTER AND ITS ALIGNMENT SPECS DISCUSSED:
CASTER by spec should not DIFFER by more that .75………..so the FSM says!!!
What the hell .75?? that’s super high!!!
I have never seen a car that is that high!
Once again, the difference in caster is typically what causes a car to drift/pull to one side on the hwy…….
I would never be happy with caster that isn’t at least under .5 from each other?!!? And at that i would be pissed and want no difference between the two at all…
OEM is 1.5 degrees of total caster range (( 8.9 minus 7.4 = 1.5 ))
So your telling me a difference of .75 (half) of its range is acceptable in difference……….blasphemy!!


.5 should be what you want AT WORST!!! ….I say worse, because it is bad……
and of course zero difference between the two should be desired of course, but I have yet to see a Z with that!!!!
8.17 degrees is factory setting……….
Okay, sorry for the *****’n……
See once again the range is (7.42 to 8.92)

Notice that this dude has 9.1 and 8.9 -- First off, stock is 8.17???
Second, the difference of .2 isn't bad, however that is a really high caster.......and 9.1 is out of spec..........
COMPRESSION ROD BUSHING REPLACEMENT OPTIONS (SPL AND OEM replacements):
SPL is saying they are coming out with one of these compression rod bushing, but they are waiting for parts to come in so its release date has been pushed back a wee bit..…….hopefully by the end of this month...
UPDATE: SPL Compression rod bushings are out and available now!
SPL COMPRESSION ROD BUSHING: - if there are any bushings you buy for your car it must be this one!!! trust me!!!
SPL Compression rod bushing install thread:
https://my350z.com/forum/brakes-and-...g-install.html
https://my350z.com/forum/brakes-and-...-bushings.html
http://splparts.com/store/product-info.php?pid24.html
Mynismo.com oem replacements: $25 each, $50 for a pair.
http://www.mynismo.com/products/?id=7780
Now trust me, if your lowered, and this bushing is torn, buy the SPL, the My Nismo dot com bushing is cheap yes, but its simply an OEM replacement, IF Your lowered, you will tear that sucker and be right back where you started in 6 months or less....
This dude had some made back in the day: ***'n baller!!! I sure as hell don't blame him!!!! at that time, there were no options available......
https://my350z.com/forum/brakes-and-...s-awesome.html
UPDATE: - Energy Suspension now makes a compression rod bushing:
Found here - https://my350z.com/forum/suspension/...-bushings.html
I dont recommend them as they will cause friction, limit the movement of your compression arm...this is hard to explain, but here goes:
- if you have the Z in the air and compression arm attached only with the other end free, try pulling up and down on the compression arm - yup, you will be fighting the poly bushing......tons of friction and push back from the bushing. - with that amount of fight, u will see that it will cause your passenger side steering rack to blow its seal and leak. dun dun dun.....
- SPL Compression rod bushings are free to float and move....no adverse friction or steering input from a compression arm thats fighting you.
BALL JOINTS:
Ok, front spindle translink ball joint is another known issue……
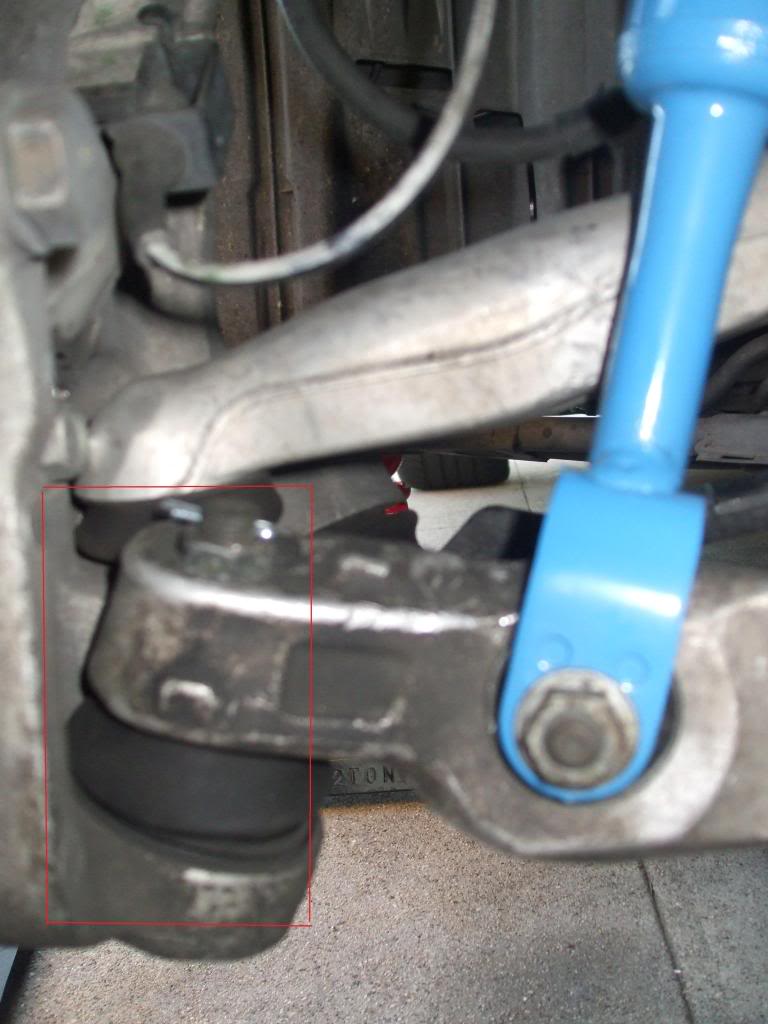
it’s a random failure and is unpredictable……….some have the issue, others don’t…
See here:
https://my350z.com/forum/brakes-and-...ght=ball+joint
If you read through that thread you can see that Z1 offers an option to replace it, and now a ebay seller?
http://www.z1auto.com/prodmore.asp?m...ng&prodid=3417
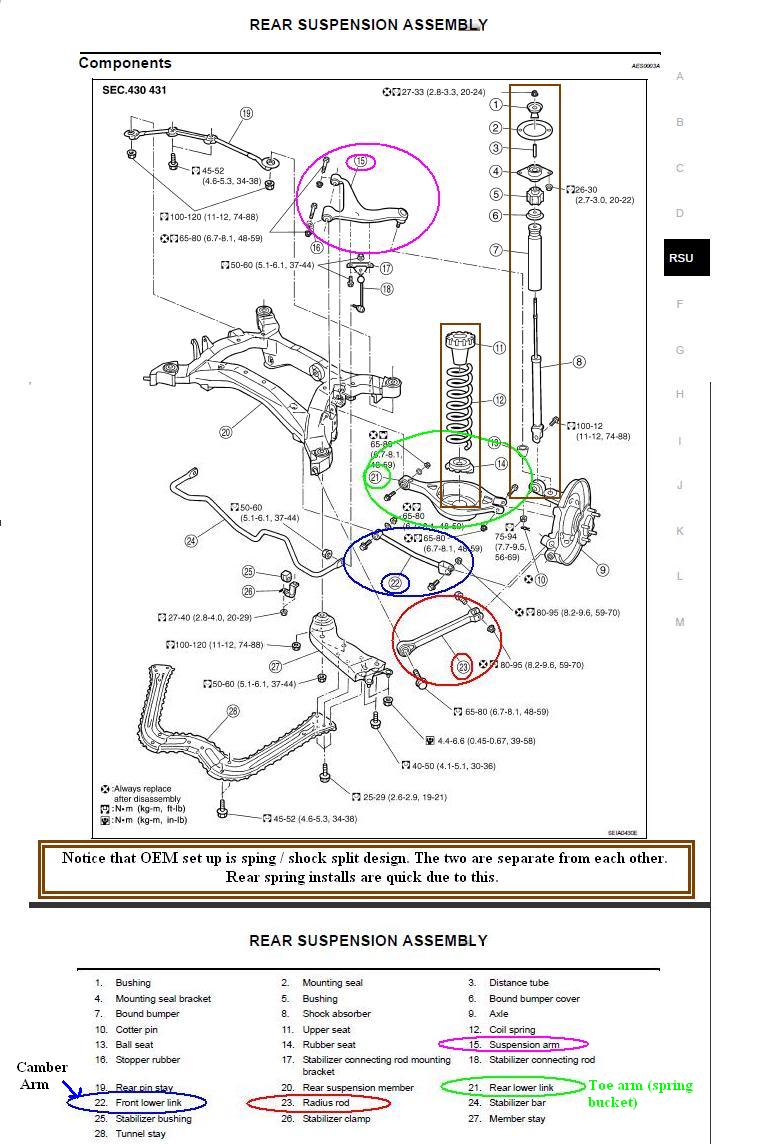
REAR BUSHINGS:
The rear spindle has 4 bushings:
The only one in question I have ever seen is the rear SHOCK to SPINDLE mount location.
I have seen many off centered and pushed down, but not torn or blown "yet"
Whiteline makes rear spindle poly -sleeved bushings:
shown in this pic from Z1 - which also shows the fronts and the spring bucket to subframe location one as well:

SPL's Rear spindle monoball bushings:

Installed:

http://splparts.com/store/product-info.php?pid34.html
Nismo hard bushings for the rear as well:
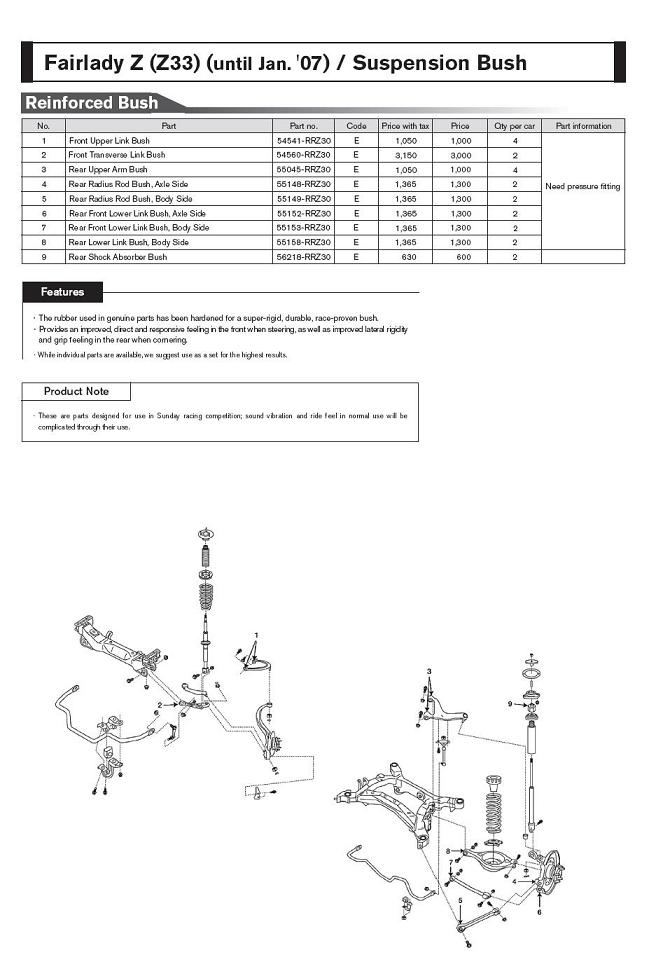
http://www.mynismo.com/products/?id=5348#
LMFAO at their PRODUCT NOTE on that chart -- "Sunday racing"
Product note:
These are parts for use in Sunday racing competition; sound vibration and ride feel in normal use will be complicated through their use.
ALSO NOTE:
This took a bit of research as NO sites that sell these bushings clearly explain or even give part numbers for the spring bucket to knucke mount bushing location. But in case you need its the same bushing as the commonly listed "knuckle to shock mount bushing" that everyone replaces when going to coilovers. mainly those with true coilovers as thats the only point of mounting for them to rear suspension arms.
see here:
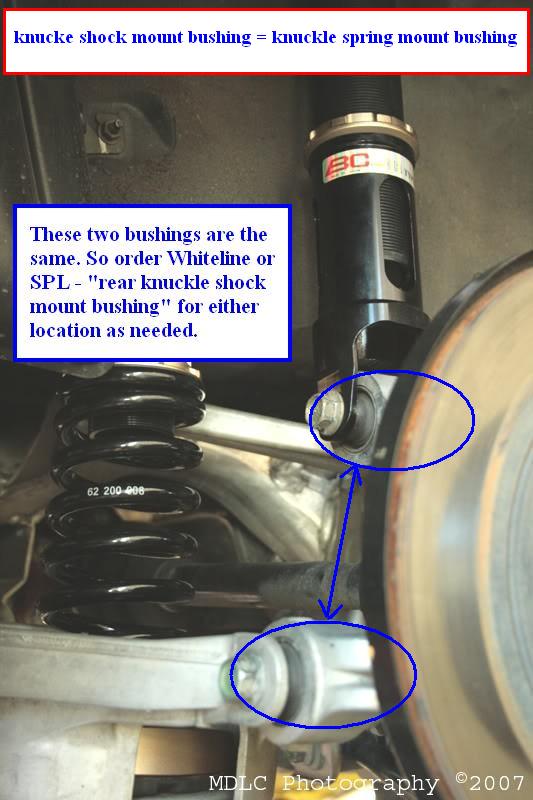

That bushing is the same for both locations - whiteline p/n is W62535 - if you notice on most sites, its the same price for those two, because they are the same. To install this whiteline bushing you need to go to a local steel yard and get a 1.5" DOM STEEL round stock with a .083 wall.
that results in a 1.33 Inner diameter that fits over the W62535 rear shock mount bushing perfectly:
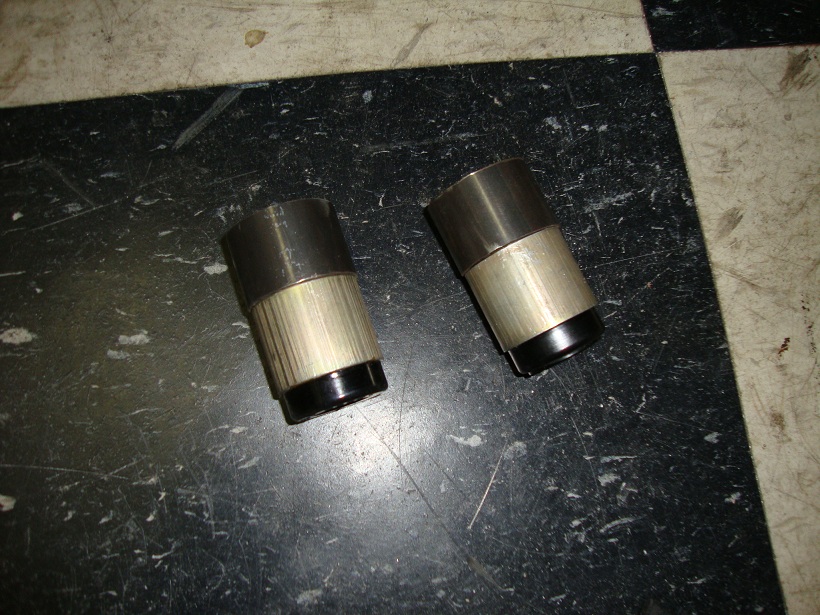
That 1.5" steel DOM shown will now be the driver for installing that bushing.
How to install the rear shock to knuckle bushing is shown here:
https://my350z.com/forum/8843943-post17352.html
Remaining rear knuckle bushings are shown here:

W62999 - Rear camber arm connection point at the rear knuckle

W62998 - Radius Rod connection point at the rear knuckle
Overview of the entire rear of the 350z:
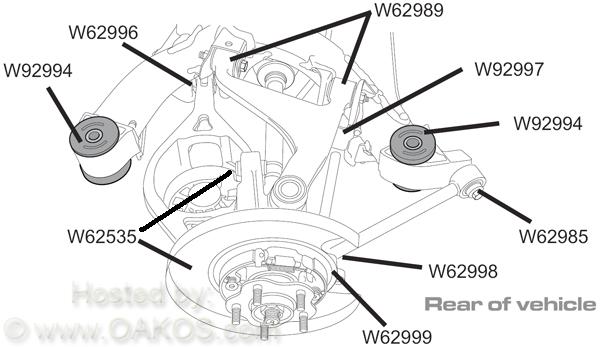
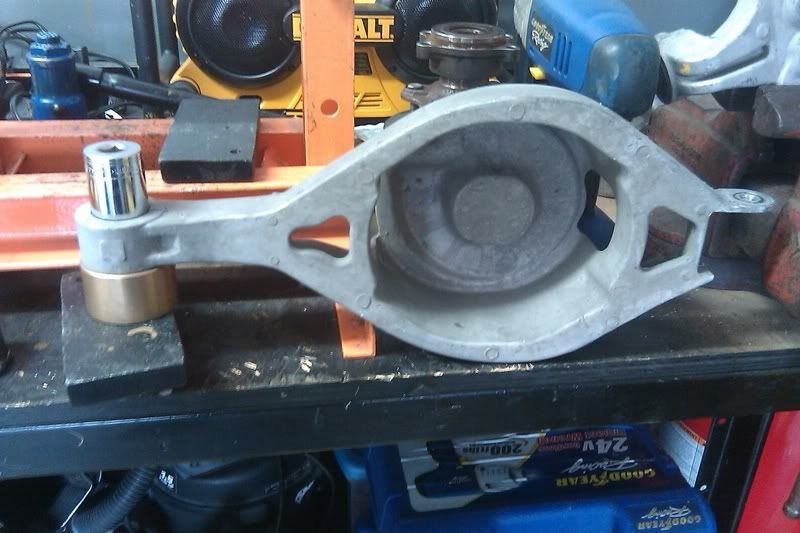
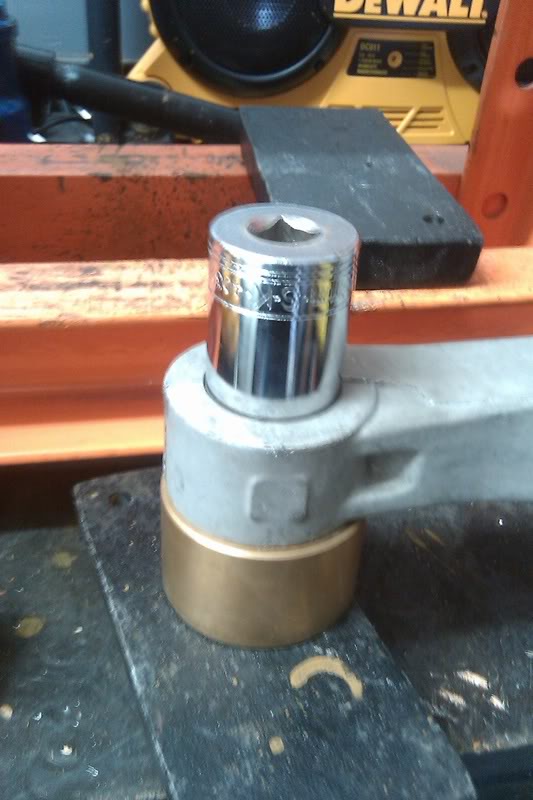
SPRING BUCKET BUSHING - if you need to replace this bushing its W62996:
You can see i removed the oem bushing from MY spare spring bucket using either a 28mm craftsman socket or using the same DOM 1.5 x .083 wall steel I made for the other whiteline install - can be used for this location - removal! I then had and a brass ring on the opposite side that was like a 2.5 OD:
9addffcb.jpg?t=1283309635
Okay this thread is a dammn good data point for bushings and stability:
https://my350z.com/forum/autocross-r...verything.html
-J
Okay, lets talk about bushings!
The 350z in general has a BUTT load of bushings………dear god man…….
Most of the critical ones, suck nuts for track guys……..daily driving as well, its all in due time…..
BAD BUSHINGS WILL RESULT IN BAD ALIGNMENT AND A pulling/pushing CAR WHEN ON THE ROAD….
FRONT BUSHINGS:
THREE in particular –
1. Translink (#13 transverse link) inner bushing – The straight lower control arm:
This bushing is (position #4 on next pic) the bushing at the inside of the translink where the lower control
arm translink connects to the LUG of the engine steel K member lower lug.
SEE HERE:
https://my350z.com/forum/brakes-and-...ight=translink
2. Translink to shock/assembly mount location.
This is point #2 here:
Replacement options for items 1 and 2 are either (spl or whiteline)
WHITELINE:
Whiteline bushings installed in both locations in the translink:
shown is the front lower inner and front lower outter(ie, shock mount) bushings.
SPL bushings for the translink - both locations:
3. COMPRESSION (#11 compression rod) ROD BUSHING:
:CASTER:
Ok, this bastardo is the reason why your car drifts to the left while your on the highway even after you just got your alignment done…
Get a flash light and inspect this ugly fugger……….yep its cracked/torn or misaligned……….
YOU MUST KNOW - THAT IF YOUR CAR IS LOWERED, YOUR COMPRESSION ARM BUSHING IS GONNA TEAR. See only at stock height is the bushing at its correct position. When you lower the Z, the compression arm bushing is always being pulled/stretched........thus leading to the inevitable bad caster,drifting on the hwy, etc...
The bushing is rubber, and rubber isnt supposed to be ALWAYS stretched, its supposed to come back to its original state, a lowered car doesn't allow this..........thus tearing the bushing intentionally with the lowering....
once again, if its lower than stock, then its in jeopardy....Get your alignment sheet out and check the cars caster!
CASTER AND ITS ALIGNMENT SPECS DISCUSSED:
CASTER by spec should not DIFFER by more that .75………..so the FSM says!!!
What the hell .75?? that’s super high!!!
I have never seen a car that is that high!
Once again, the difference in caster is typically what causes a car to drift/pull to one side on the hwy…….
I would never be happy with caster that isn’t at least under .5 from each other?!!? And at that i would be pissed and want no difference between the two at all…
OEM is 1.5 degrees of total caster range (( 8.9 minus 7.4 = 1.5 ))
So your telling me a difference of .75 (half) of its range is acceptable in difference……….blasphemy!!
.5 should be what you want AT WORST!!!
….I say worse, because it is bad……and of course zero difference between the two should be desired of course, but I have yet to see a Z with that!!!!
8.17 degrees is factory setting……….
Okay, sorry for the *****’n……
See once again the range is (7.42 to 8.92)
Notice that this dude has 9.1 and 8.9 -- First off, stock is 8.17???
Second, the difference of .2 isn't bad, however that is a really high caster.......and 9.1 is out of spec..........
COMPRESSION ROD BUSHING REPLACEMENT OPTIONS (SPL AND OEM replacements):
SPL is saying they are coming out with one of these compression rod bushing, but they are waiting for parts to come in so its release date has been pushed back a wee bit..…….hopefully by the end of this month...
UPDATE: SPL Compression rod bushings are out and available now!
SPL COMPRESSION ROD BUSHING: - if there are any bushings you buy for your car it must be this one!!! trust me!!!
SPL Compression rod bushing install thread:
https://my350z.com/forum/brakes-and-...g-install.html
https://my350z.com/forum/brakes-and-...-bushings.html
http://splparts.com/store/product-info.php?pid24.html
Mynismo.com oem replacements: $25 each, $50 for a pair.
http://www.mynismo.com/products/?id=7780
Now trust me, if your lowered, and this bushing is torn, buy the SPL, the My Nismo dot com bushing is cheap yes, but its simply an OEM replacement, IF Your lowered, you will tear that sucker and be right back where you started in 6 months or less....
This dude had some made back in the day: ***'n baller!!! I sure as hell don't blame him!!!! at that time, there were no options available......
https://my350z.com/forum/brakes-and-...s-awesome.html
UPDATE: - Energy Suspension now makes a compression rod bushing:
Found here - https://my350z.com/forum/suspension/...-bushings.html
I dont recommend them as they will cause friction, limit the movement of your compression arm...this is hard to explain, but here goes:
- if you have the Z in the air and compression arm attached only with the other end free, try pulling up and down on the compression arm - yup, you will be fighting the poly bushing......tons of friction and push back from the bushing. - with that amount of fight, u will see that it will cause your passenger side steering rack to blow its seal and leak. dun dun dun.....
- SPL Compression rod bushings are free to float and move....no adverse friction or steering input from a compression arm thats fighting you.
BALL JOINTS:
Ok, front spindle translink ball joint is another known issue……
it’s a random failure and is unpredictable……….some have the issue, others don’t…
See here:
https://my350z.com/forum/brakes-and-...ght=ball+joint
If you read through that thread you can see that Z1 offers an option to replace it, and now a ebay seller?
http://www.z1auto.com/prodmore.asp?m...ng&prodid=3417
REAR BUSHINGS:
The rear spindle has 4 bushings:
The only one in question I have ever seen is the rear SHOCK to SPINDLE mount location.
I have seen many off centered and pushed down, but not torn or blown "yet"
Whiteline makes rear spindle poly -sleeved bushings:
shown in this pic from Z1 - which also shows the fronts and the spring bucket to subframe location one as well:
SPL's Rear spindle monoball bushings:
Installed:
http://splparts.com/store/product-info.php?pid34.html
Nismo hard bushings for the rear as well:
http://www.mynismo.com/products/?id=5348#
LMFAO at their PRODUCT NOTE on that chart -- "Sunday racing"
Product note:
These are parts for use in Sunday racing competition; sound vibration and ride feel in normal use will be complicated through their use.
ALSO NOTE:
This took a bit of research as NO sites that sell these bushings clearly explain or even give part numbers for the spring bucket to knucke mount bushing location. But in case you need its the same bushing as the commonly listed "knuckle to shock mount bushing" that everyone replaces when going to coilovers. mainly those with true coilovers as thats the only point of mounting for them to rear suspension arms.
see here:
That bushing is the same for both locations - whiteline p/n is W62535 - if you notice on most sites, its the same price for those two, because they are the same. To install this whiteline bushing you need to go to a local steel yard and get a 1.5" DOM STEEL round stock with a .083 wall.
that results in a 1.33 Inner diameter that fits over the W62535 rear shock mount bushing perfectly:
That 1.5" steel DOM shown will now be the driver for installing that bushing.
How to install the rear shock to knuckle bushing is shown here:
https://my350z.com/forum/8843943-post17352.html
Remaining rear knuckle bushings are shown here:
W62999 - Rear camber arm connection point at the rear knuckle
W62998 - Radius Rod connection point at the rear knuckle
Overview of the entire rear of the 350z:
SPRING BUCKET BUSHING - if you need to replace this bushing its W62996:
You can see i removed the oem bushing from MY spare spring bucket using either a 28mm craftsman socket or using the same DOM 1.5 x .083 wall steel I made for the other whiteline install - can be used for this location - removal! I then had and a brass ring on the opposite side that was like a 2.5 OD:
9addffcb.jpg?t=1283309635
Okay this thread is a dammn good data point for bushings and stability:
https://my350z.com/forum/autocross-r...verything.html
-J
Last edited by JasonZ-YA; Jun 27, 2012 at 05:41 AM.
Thread Starter
Joined: Jan 2006
Posts: 11,204
Likes: 32
From: San Antonio/I miss DFW, TX
Taken from my post 38 and 39 from here: https://my350z.com/forum/brakes-and-...hing-data.html
Ill post these pics to show my recommendation:
Sorry I dont have much PC time right now to give my full explanation, but its about free articulation....notice that all the mounting to the car chassis points I recommend SPL.!!!
That paired with an SPL front upper control arm...you would have fully articulating "FRICTION FREE" suspension components up front.
IN OTHER WORDS, if you had the car on a lift with all wheels hanging, and pulled the coilover out ONLY and reassembled everything else back on, then all you were left with is all the MECHANICAL assembly of the front suspension, you would have a free moving front dynamic member all working together not fighting you. the only resistance you would have is the resistance inputed from the steering rack.....if you disconnected the tie rod from the knuckle, you can then see what im saying, completely free moving mechanical front suspension, all articulating and moving with no friction from any bushings as the SPL "MOUNT TO CHASSIS" bushings are all friction free designs with bearings, etc..
TRANSLINK:
1. Inner translink bushing location - mount to chassis via K member. SPL here for sure, hands down! friction free movement of suspension via spl's design.
2. Outter bushing - mount to shock lug - I recommend Whiteline W52992 - why, this point is minute articulation (barely moves up and down with minimal arc). no need for spl at this point, the difference is minimal...
COMPRESSION ROD:
3. Compression ROD in my technical opinion should HANDS DOWN be SPL!!
the amount of FRICTION created with energy suspension bushing at the compression rod location is rediculous...the compression rod bushing location needs to freely articulate.....heck, once installed, getting the ball joint end of the compression rod back into the front knuckle is hard to do...
in the end, it fights your steering inputs - it also blows your steering rack seal, check for leaks guys...on your passenger side...i bet tons of you have a leaking passenger side steering rack at the boot due to energy suspension bushings at the compression rod location and its friction.
if you had to go with NON SPL at the compression rod bushing, i would stay at stock height and get an OEM or use the whiteline W83389 bushing at the compression rod as its taper design isn't like the energy suspension lends to not be so stiff.
also, oem isnt sold separtely to my knowledge, only complete arm.
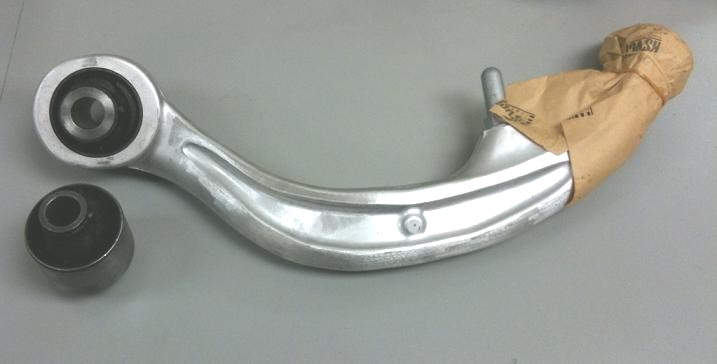
WHITELINE COMPRESSION ROD BUSHING: W83389:

Notice its not full solid and has taper section to lend to bending/twisting easier.


The modified SPL compression rod bushing I mentioned before, kudos for doing it "L-FAB"....
the pic you have looks god, did you machine a full up completely new part, or machine down the existing cone to that shape?? it appears you machined down the cone it comes with.
From there i would just monitor it for cracks...
oh, the rubber washers is a nice idea!! between chassis and cone, and underbrace and cone.
ill post more later...
-J
TOPIC CHANGE - DIFF BUSHINGS:
This thread shows how to burn out and hacksaw method the rear diff bushings:
https://my350z.com/forum/engine-driv...e-install.html
This is my thread on how to install the rear diff bushings - see post 12 on this thread for my latest method of doing this:
https://my350z.com/forum/engine-driv...mp-either.html
REAR DIFF:
SPL
www.splparts.com ~$159
Like mentioned, SPL sells the bushings for the 3 locations on the Z rear diff. (two ears at front of the diff and one at rear subframe diff STUD). If you call SPL you can possibly get them to sell you only the rear subframe bushing alone, but they typically dont want to as going solid rear with out front can lead to diff doing a "diving board" motion which is NOT wanted!!!
350z motorsports:
http://www.350zmotorsports.com/featu...l-bushing.html
They sell the rear only if anyone wants ONLY the rear:
Ebay seller named: ~$115
JDM-IN-STOCK also carriers them. search ebay!
Sikky Manufacturing: ~ $129
http://www.sikky.com/suspension_high...nufacturer.php
SPL two front ear solid bushings:

SPL rear solid diff bushing in subframe - rear diff STUD:
WHITELINE - They "ONLY" offers the two front ears for the diff, they "DO NOT" offer a rear bushing that goes in the subframe common to the diff stud........
UPDATE: WHITELINE now offers a great rear diff bushing set. whiteline p/n KDT911 - see below.
Whiteline old kit was front only bushings shown in one of the front ears:

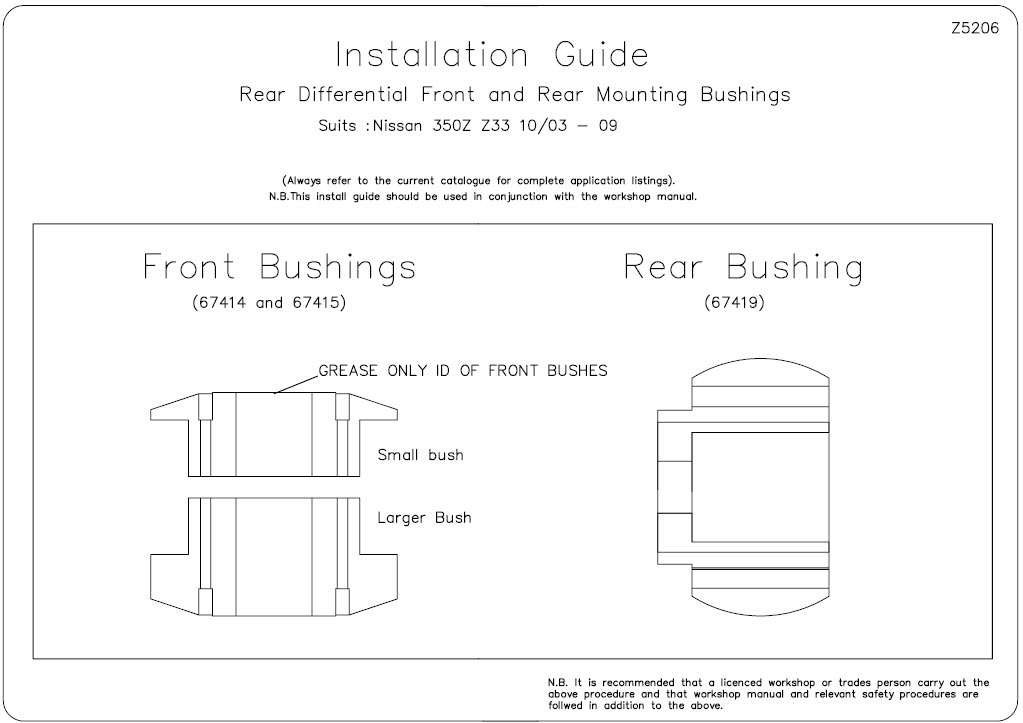
Install manual for the old whiteline kits:
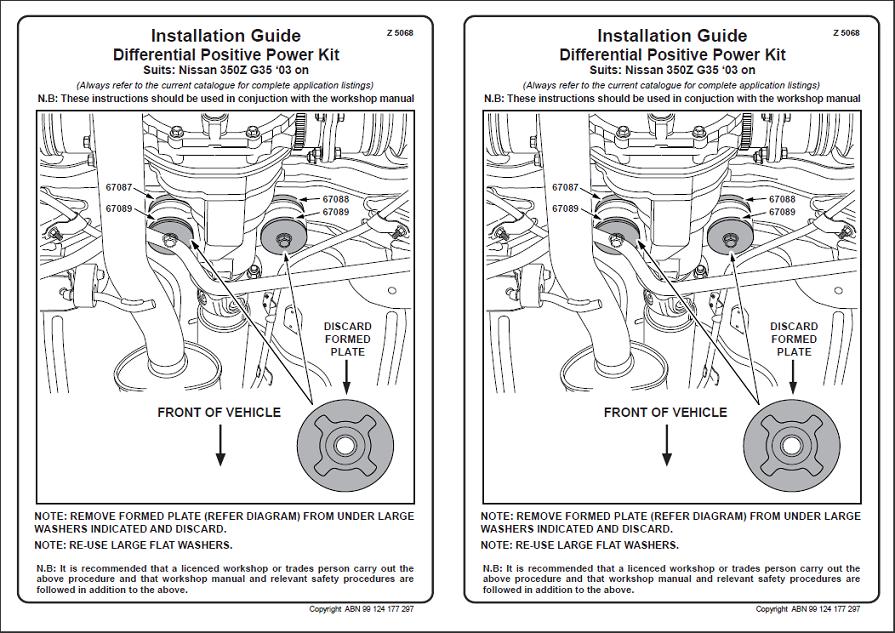
UPDATE: WHITELINE NEW rear diff bushing set. Whiteline p/n KDT911:
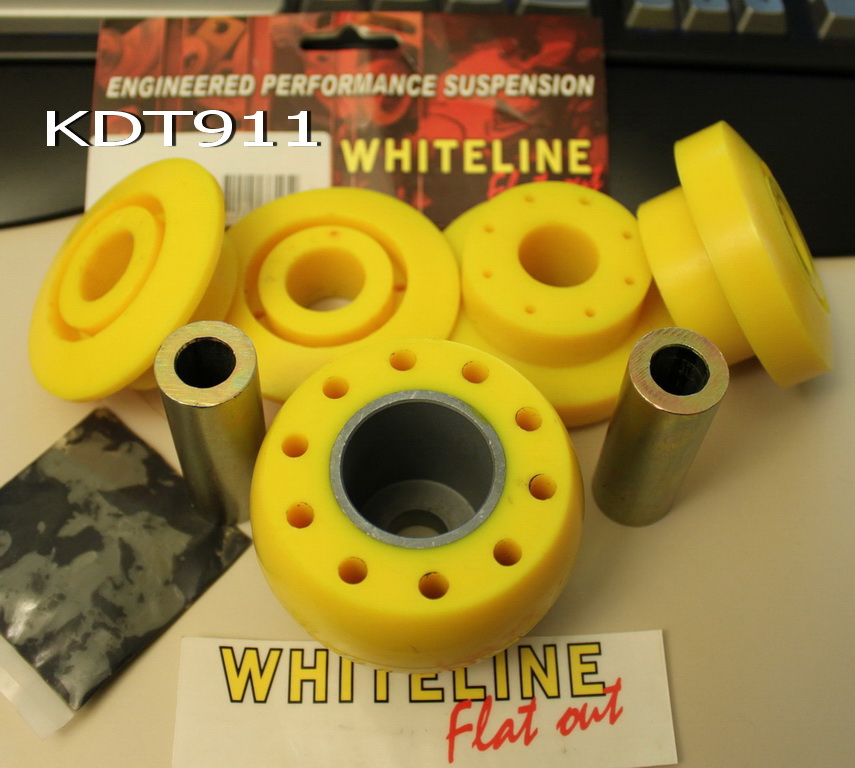
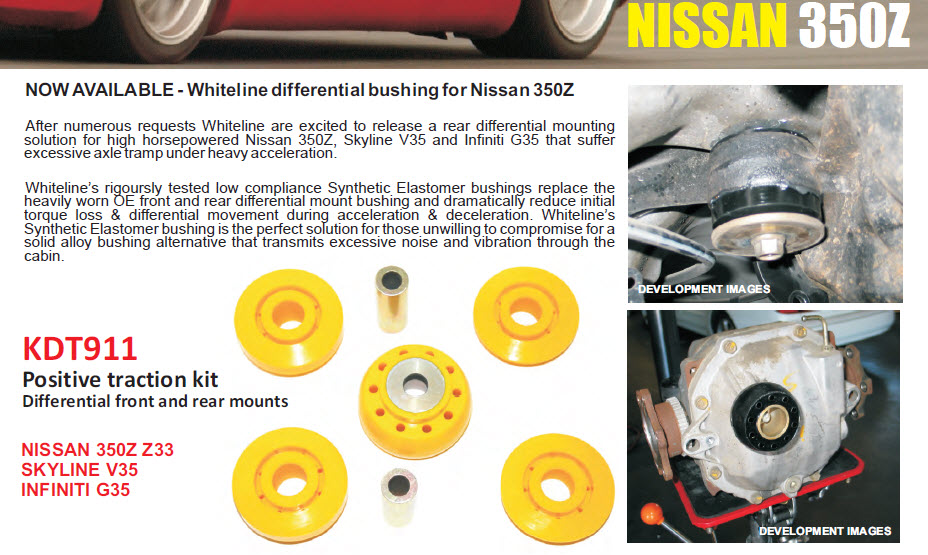
The whiteline KDT911 kit is a great option for those that don't want solid...
hands down, I would choose solid (I only track my car), but for those that are just daily driven cars and want less/no noise I would choose whitelines kit.
The engineering/design behind the rear diff bushing p/n 67419 from kit KDT911 that goes into the subframe is great. Whiteline really put thought into it.
I had mentioned it before and poly in the rear diff isn’t a good idea unless its large sleeved like the oem bushing. The whiteline large sleeve helps avoid the permanent deformation that can result from "creep" and having a tear drop shape in the poly. the large sleeve paired with hard poly avoids this. The multiple holes drilled into the bushing and the curved shaped aids in torsional bending. its a great design compared to energy suspensions hands down. A side note, the install of it will be much easier then due to the curved shape...
-J
PREVENTATIVE MAINTENANCE - REAR BUSHING IS NOT BLOWN:
So, if your rear sub frame bushing is NOT oozing crappy silicone everywhere another option is to install whiteline front ear bushings or ONLY the front SPL bushings and then maybe sound performance diff brace: (installing front is NOT labor intensive)
SOUND PERFORMANCE BRACE:
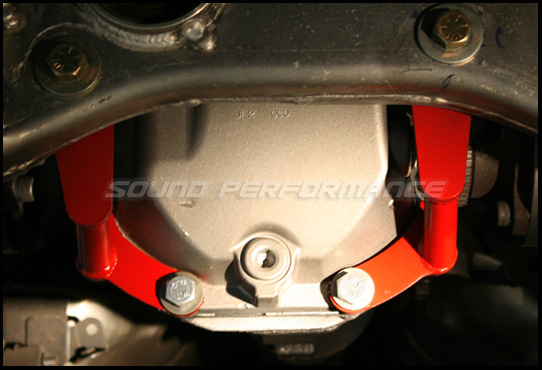
https://my350z.com/forum/engine-and-...brace-kit.html
OR
INJECTED PERFORMANCE PASSENGER SIDE BRACE:
https://my350z.com/forum/drivetrain/...brace-new.html
ALSO,
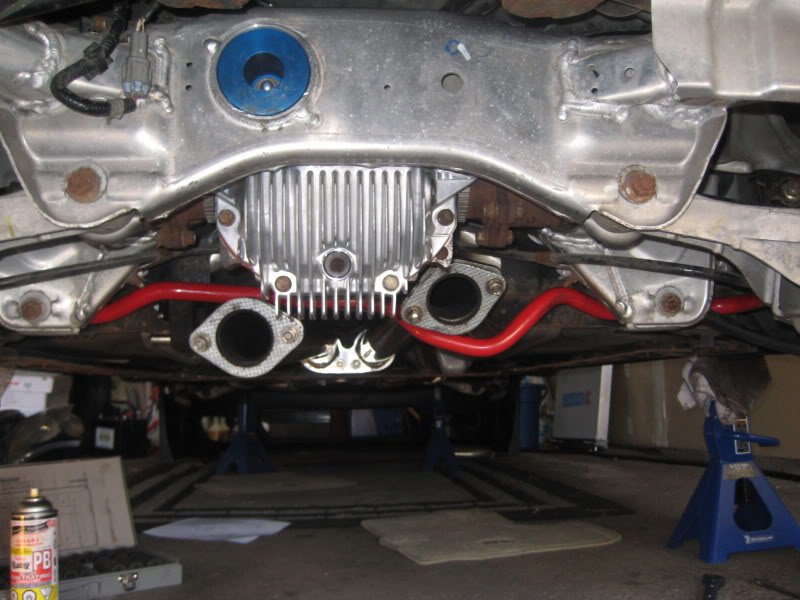
SUBFRAME BUSHINGS:
Whiteline - 4 each upper sub-frame to uni-body mount locations:

you can see the BLUE spl solid diff bushing also in this above pic.
More whiteline pics:


Sikky Manufacturing: ~ $199 also makes solid SUBFRAME bushings!
http://www.sikky.com/suspension_high...nufacturer.php

Also, check your sway bar bushings, steering rack and transmission mount bushing...
DISCUSSION:
Would also like to say..........the diff bushings, most people blow the rear subframe and silicone comes running down the diff housing.....
replacing ONLY the rear diff subframe bushing to solid isnt a good idea.....the diff can deflect up and down if the front two ears are not replaced as well.........
SPL is the only one i know of to make all 3 solid....update, sikky manufacturing makes all 3 as well.
WHY:
well, my take is that the aggressive driving and poor Nissan design "for enthusiast".......most diffs have two mounts in the rear......Nissan's 240sx variants were two diff bushing studs into the subframe.........
the 350Z's single stud creates a 'moment' or some would understand a 'torque' off the centerline/driveline and that load can become quite great.........
Why the single stud??? NVH (Noise Vibration and Harshness).........if you look at their previous two stud designs on a 'sports' car, they were synonymous with having NVH problems and later in time blowing sub frame bushings (240sx)...
The single stud is a great design for the daily driven Z...........
keeps the Z quiet and keeps subframe bushings intact for years.
Nissan allowed compliance into their system...but for us enthusiast its weak sauce...
Not helping is the fact that the front bushings become weak/compliant in time/age from holding up a heavy diff.......and under aggressive driving allow the diff to move,rock and twist on the front ear rubber bushings..........
The rear OEM diff bushing is solid rubber and filed with silicone to avoid creep from weight.......rubber cold form/elongation and tear drop affect of the bushing itself........because of the induced moment of it being off to the drivers side the front diff ears are different, one is solid rubber, the other is silicone filled.
it blows and then your car drives like poo poo.....
PREVENTATIVE MAINTENANCE - FOR THOSE WITH A GOOD REAR BUSHING:
like i mentioned before............If yours IS NOT BLOWN.....and you are weary of dropping the subframe to press out the subframe bushing, OR do the C-clamp/hacksaw/saw saw from post 12 method then you could...
WITH GOOD REAR subframe diff bushing: in no particular order...
1. update - removed due to whiteline makes complete set now!
2. install diff brace - like the SP one or injected performance one i posted. (help keep the diff from twisting....thus blowing the rear bushing.
3. or have a local machine shop make u front solid diff bushings only, paired with a rear brace.
or
if your weary of the install, just purchase spl bushings and install only the front ears....(that would keep the diff from twisting, and blowing the rear silicone filled bushing), then later "IF" you ever do blow the rear, you will already have the rear spl sitting around for install, GIVEN you have a rear brace to support the rear!
Replacing the front ear bushings can be done with out the labor intensive rear install............
that install isn't really that hard......its simply remove and replace bolts...
how long this would hold up?? who knows for sure, but if you ask most of those that do have a blown rear sub frame bushing, its not really high miles, but more so age on the car and abuse/aggressive driving, etc...........which you could avoid with some preventative mods as listed....
Personally, i would replace them all with solid hands down!
More to add on bushings later...
-J
Ill post these pics to show my recommendation:
Sorry I dont have much PC time right now to give my full explanation, but its about free articulation....notice that all the mounting to the car chassis points I recommend SPL.!!!
That paired with an SPL front upper control arm...you would have fully articulating "FRICTION FREE" suspension components up front.
IN OTHER WORDS, if you had the car on a lift with all wheels hanging, and pulled the coilover out ONLY and reassembled everything else back on, then all you were left with is all the MECHANICAL assembly of the front suspension, you would have a free moving front dynamic member all working together not fighting you. the only resistance you would have is the resistance inputed from the steering rack.....if you disconnected the tie rod from the knuckle, you can then see what im saying, completely free moving mechanical front suspension, all articulating and moving with no friction from any bushings as the SPL "MOUNT TO CHASSIS" bushings are all friction free designs with bearings, etc..
TRANSLINK:
1. Inner translink bushing location - mount to chassis via K member. SPL here for sure, hands down! friction free movement of suspension via spl's design.
2. Outter bushing - mount to shock lug - I recommend Whiteline W52992 - why, this point is minute articulation (barely moves up and down with minimal arc). no need for spl at this point, the difference is minimal...
COMPRESSION ROD:
3. Compression ROD in my technical opinion should HANDS DOWN be SPL!!
the amount of FRICTION created with energy suspension bushing at the compression rod location is rediculous...the compression rod bushing location needs to freely articulate.....heck, once installed, getting the ball joint end of the compression rod back into the front knuckle is hard to do...
in the end, it fights your steering inputs - it also blows your steering rack seal, check for leaks guys...on your passenger side...i bet tons of you have a leaking passenger side steering rack at the boot due to energy suspension bushings at the compression rod location and its friction.
if you had to go with NON SPL at the compression rod bushing, i would stay at stock height and get an OEM or use the whiteline W83389 bushing at the compression rod as its taper design isn't like the energy suspension lends to not be so stiff.
also, oem isnt sold separtely to my knowledge, only complete arm.
WHITELINE COMPRESSION ROD BUSHING: W83389:
Notice its not full solid and has taper section to lend to bending/twisting easier.
The modified SPL compression rod bushing I mentioned before, kudos for doing it "L-FAB"....
the pic you have looks god, did you machine a full up completely new part, or machine down the existing cone to that shape?? it appears you machined down the cone it comes with.
From there i would just monitor it for cracks...
oh, the rubber washers is a nice idea!! between chassis and cone, and underbrace and cone.
ill post more later...
-J
TOPIC CHANGE - DIFF BUSHINGS:
This thread shows how to burn out and hacksaw method the rear diff bushings:
https://my350z.com/forum/engine-driv...e-install.html
This is my thread on how to install the rear diff bushings - see post 12 on this thread for my latest method of doing this:
https://my350z.com/forum/engine-driv...mp-either.html
REAR DIFF:
SPL
www.splparts.com ~$159
Like mentioned, SPL sells the bushings for the 3 locations on the Z rear diff. (two ears at front of the diff and one at rear subframe diff STUD). If you call SPL you can possibly get them to sell you only the rear subframe bushing alone, but they typically dont want to as going solid rear with out front can lead to diff doing a "diving board" motion which is NOT wanted!!!
350z motorsports:
http://www.350zmotorsports.com/featu...l-bushing.html
They sell the rear only if anyone wants ONLY the rear:
Ebay seller named: ~$115
JDM-IN-STOCK also carriers them. search ebay!
Sikky Manufacturing: ~ $129
http://www.sikky.com/suspension_high...nufacturer.php
SPL two front ear solid bushings:
SPL rear solid diff bushing in subframe - rear diff STUD:
WHITELINE - They "ONLY" offers the two front ears for the diff, they "DO NOT" offer a rear bushing that goes in the subframe common to the diff stud........
UPDATE: WHITELINE now offers a great rear diff bushing set. whiteline p/n KDT911 - see below.
Whiteline old kit was front only bushings shown in one of the front ears:
Install manual for the old whiteline kits:
UPDATE: WHITELINE NEW rear diff bushing set. Whiteline p/n KDT911:
The whiteline KDT911 kit is a great option for those that don't want solid...
hands down, I would choose solid (I only track my car), but for those that are just daily driven cars and want less/no noise I would choose whitelines kit.
The engineering/design behind the rear diff bushing p/n 67419 from kit KDT911 that goes into the subframe is great. Whiteline really put thought into it.
I had mentioned it before and poly in the rear diff isn’t a good idea unless its large sleeved like the oem bushing. The whiteline large sleeve helps avoid the permanent deformation that can result from "creep" and having a tear drop shape in the poly. the large sleeve paired with hard poly avoids this. The multiple holes drilled into the bushing and the curved shaped aids in torsional bending. its a great design compared to energy suspensions hands down. A side note, the install of it will be much easier then due to the curved shape...
-J
PREVENTATIVE MAINTENANCE - REAR BUSHING IS NOT BLOWN:
So, if your rear sub frame bushing is NOT oozing crappy silicone everywhere another option is to install whiteline front ear bushings or ONLY the front SPL bushings and then maybe sound performance diff brace: (installing front is NOT labor intensive)
SOUND PERFORMANCE BRACE:
https://my350z.com/forum/engine-and-...brace-kit.html
OR
INJECTED PERFORMANCE PASSENGER SIDE BRACE:
https://my350z.com/forum/drivetrain/...brace-new.html
ALSO,
SUBFRAME BUSHINGS:
Whiteline - 4 each upper sub-frame to uni-body mount locations:
you can see the BLUE spl solid diff bushing also in this above pic.
More whiteline pics:
Sikky Manufacturing: ~ $199 also makes solid SUBFRAME bushings!
http://www.sikky.com/suspension_high...nufacturer.php
Also, check your sway bar bushings, steering rack and transmission mount bushing...
DISCUSSION:
Would also like to say..........the diff bushings, most people blow the rear subframe and silicone comes running down the diff housing.....
replacing ONLY the rear diff subframe bushing to solid isnt a good idea.....the diff can deflect up and down if the front two ears are not replaced as well.........
SPL is the only one i know of to make all 3 solid....update, sikky manufacturing makes all 3 as well.
WHY:
well, my take is that the aggressive driving and poor Nissan design "for enthusiast".......most diffs have two mounts in the rear......Nissan's 240sx variants were two diff bushing studs into the subframe.........
the 350Z's single stud creates a 'moment' or some would understand a 'torque' off the centerline/driveline and that load can become quite great.........
Why the single stud??? NVH (Noise Vibration and Harshness).........if you look at their previous two stud designs on a 'sports' car, they were synonymous with having NVH problems and later in time blowing sub frame bushings (240sx)...
The single stud is a great design for the daily driven Z...........
keeps the Z quiet and keeps subframe bushings intact for years.
Nissan allowed compliance into their system...but for us enthusiast its weak sauce...
Not helping is the fact that the front bushings become weak/compliant in time/age from holding up a heavy diff.......and under aggressive driving allow the diff to move,rock and twist on the front ear rubber bushings..........
The rear OEM diff bushing is solid rubber and filed with silicone to avoid creep from weight.......rubber cold form/elongation and tear drop affect of the bushing itself........because of the induced moment of it being off to the drivers side the front diff ears are different, one is solid rubber, the other is silicone filled.
it blows and then your car drives like poo poo.....
PREVENTATIVE MAINTENANCE - FOR THOSE WITH A GOOD REAR BUSHING:
like i mentioned before............If yours IS NOT BLOWN.....and you are weary of dropping the subframe to press out the subframe bushing, OR do the C-clamp/hacksaw/saw saw from post 12 method then you could...
WITH GOOD REAR subframe diff bushing: in no particular order...
1. update - removed due to whiteline makes complete set now!
2. install diff brace - like the SP one or injected performance one i posted. (help keep the diff from twisting....thus blowing the rear bushing.
3. or have a local machine shop make u front solid diff bushings only, paired with a rear brace.
or
if your weary of the install, just purchase spl bushings and install only the front ears....(that would keep the diff from twisting, and blowing the rear silicone filled bushing), then later "IF" you ever do blow the rear, you will already have the rear spl sitting around for install, GIVEN you have a rear brace to support the rear!
Replacing the front ear bushings can be done with out the labor intensive rear install............
that install isn't really that hard......its simply remove and replace bolts...
how long this would hold up?? who knows for sure, but if you ask most of those that do have a blown rear sub frame bushing, its not really high miles, but more so age on the car and abuse/aggressive driving, etc...........which you could avoid with some preventative mods as listed....
Personally, i would replace them all with solid hands down!
More to add on bushings later...
-J
Last edited by JasonZ-YA; Jun 20, 2012 at 03:43 PM.
Thread Starter
Joined: Jan 2006
Posts: 11,204
Likes: 32
From: San Antonio/I miss DFW, TX
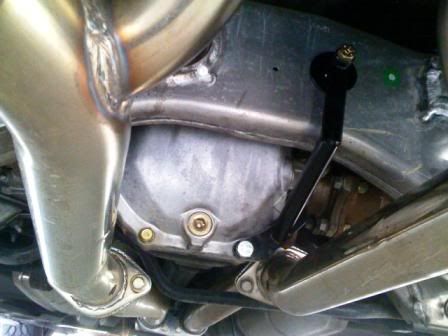
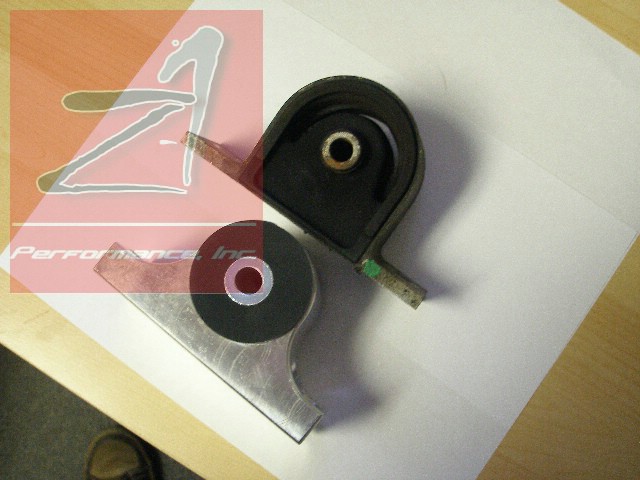
TRANSMISSION MOUNT BUSHING:
Z1 is the only one i know that makes one:

OEM versus's Z1's:
https://my350z.com/forum/drivetrain/...-in-stock.html
Z1's install blog for their tranny mount:
http://cornerbalance.wordpress.com/2...mount-350zg35/
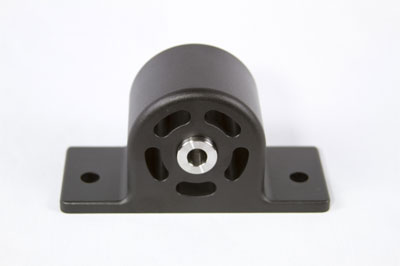
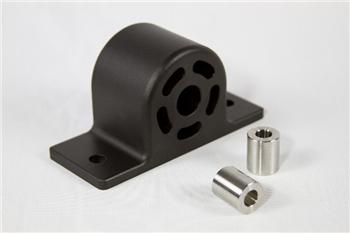
Solid Transmission Mount:
update, seems now they have this one...
Found here: https://my350z.com/forum/drivetrain/...nts-cheap.html
EXOTIC PARTS:
KPRACE steering angle kit:

(Caster and camber adjustable)
https://my350z.com/forum/drift/47432...-sweeeeet.html
Fontana Nissan Racing:
Bi t c h'n cool lower control arm: (translink - camber adjustable):

https://my350z.com/forum/brakes-and-...t-teasers.html
Rear - Adjustable upper control arms:

(Camber adjustable – tick marks)
https://my350z.com/forum/brakes-and-...rms-rucas.html
IKEYA makes a rear upper control arm also, about $1000 bucks.
http://www.ikeya-f.co.jp/en/car_type...j-uparm-e.html

-J
Z1 is the only one i know that makes one:
OEM versus's Z1's:
https://my350z.com/forum/drivetrain/...-in-stock.html
Z1's install blog for their tranny mount:
http://cornerbalance.wordpress.com/2...mount-350zg35/
Solid Transmission Mount:
update, seems now they have this one...
Found here: https://my350z.com/forum/drivetrain/...nts-cheap.html
EXOTIC PARTS:
KPRACE steering angle kit:
(Caster and camber adjustable)
https://my350z.com/forum/drift/47432...-sweeeeet.html
Fontana Nissan Racing:
Bi t c h'n cool lower control arm: (translink - camber adjustable):
https://my350z.com/forum/brakes-and-...t-teasers.html
Rear - Adjustable upper control arms:
(Camber adjustable – tick marks)
https://my350z.com/forum/brakes-and-...rms-rucas.html
IKEYA makes a rear upper control arm also, about $1000 bucks.
http://www.ikeya-f.co.jp/en/car_type...j-uparm-e.html
-J
Last edited by JasonZ-YA; Jul 24, 2012 at 06:49 AM.
Thread Starter
Joined: Jan 2006
Posts: 11,204
Likes: 32
From: San Antonio/I miss DFW, TX
Lazer alignment:


Notice the IR (infa red) sensors mounted onto the wheels (wheel size matters!!!)
Scope out your local alignment shop -
Example of an above ground rack - not idea for a lowered Z guys!
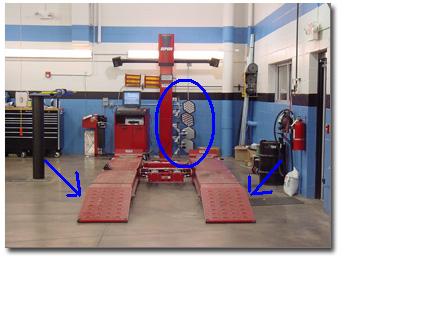
Most that must use this style make 2x8 board ramps to help them get up on this style of alignment rack:

In ground alignment rack!
A lowered 350z's best friend:
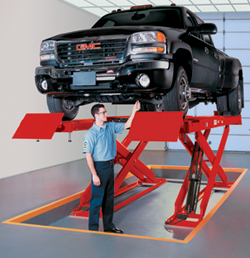
Lazer alignment rack with hydraulic lifts to lift the car up during alignment:
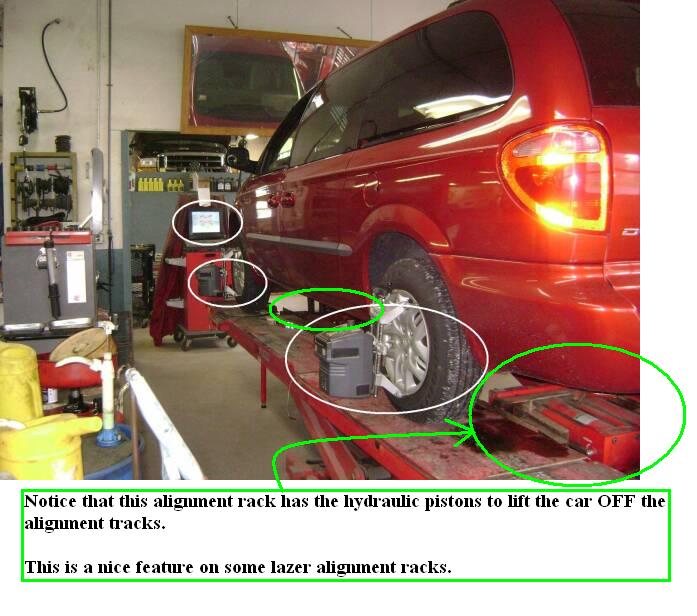
These type of lazer alignment racks will allow you "image shoot" the car with the lazers at the sitting position, THEN allow you to "image shoot" the car at a raise position. WOW!!!!!
This makes adjustment super easy!
especially if you need to adjust camber on front upper control arms!!! get it???
So you have to call your alignment shop and see if their alignment rack can "shoot an image" on and lifted above the rack with the hydraulic lifts.
-J
ALIGNMENT SHOPS SPECIALS - LIFETIME ALIGNMENT, 3 OR 5 YEAR ALIGNMENT DEALS?:
OKAY, this is for you to choose and research. I will say this,
most NTB's and Firestones offer alignment packages/specials.
NTB:
Go online and verify, but they offer 1, 2 and 3 year alignment offers.
call your local shop for details
http://www.ntb.com/alignment.aspx
Firesone:
Offers a lifetime alignment.......call your local shop for details
http://www.firestone.com/
Latest thread on Firestone:
https://my350z.com/forum/southern-ca...-119-99-a.html
of course, most of these places are regional and there are others out there, so call around.
I will say this though!
These specials are ways to get them to try and push more business on you.
I highly recommend you stand at the alignment rack and watch. if they insist you go wait in a waiting room............then leave............
its all up to you, but I make sure i can watch, ensure everything gets done right, hell if i could do it myself i would, but of course they dont let you.
Local to me i have had one location allow me to work on mine and do it myself........i loved it!!
I will also note that NTB tends to have newer locations and facilities and every NTB that is new that i have seen has "in ground alignment racks"
Firestones in general are always older run down buildings that never seem to have inground racks but one or two in an entire metroplex.
ALIGNMENT PROCESS: not particularly in order but here goes:
REAR:
1. alignment is always done at the REAR FIRST on the Z.
2. If your alignment tech starts in the front, hit him and make him start in the rear.
3. Camber - adjust at your newly acquired camber arm adjustment point. Ensure jam nuts are loose.
4. TOE - SPC style toe bolts -- loosen the nut side of the toe bolt to where its finger tight loose or so, but do not remove the nut! and spin/adjust the toe bolt locations with a goose neck wrench at the HEAD of the SPC TOE BOLT!
5. ALIGNMENT TECH should get both left and right side symmetrical! Same camber, same toe!!!
6. ensure all toe bolts are tight and jam nuts back tight and aligment still in spec when doing so! it will move!
FRONT:
Once the rear is done....
1. Toe -
once again at the tie rods connected to the steering rack.
2. Camber -
Only possible with after market front upper control arms. Z must be lifted and "image shot" to be able to access most front UCA adjustment points.
3. Caster - only possible with SPL front upper control arms or SPC front upper control arms.
WHILE ALIGNMENT IS BEING DONE - its your responsibility to check all your bushings!!! take a flash light with you. a good one! Don't expect Mr. Firestone to do his job.....
-J
Notice the IR (infa red) sensors mounted onto the wheels (wheel size matters!!!)
Scope out your local alignment shop -
Example of an above ground rack - not idea for a lowered Z guys!
Most that must use this style make 2x8 board ramps to help them get up on this style of alignment rack:
In ground alignment rack!
A lowered 350z's best friend:
Lazer alignment rack with hydraulic lifts to lift the car up during alignment:
These type of lazer alignment racks will allow you "image shoot" the car with the lazers at the sitting position, THEN allow you to "image shoot" the car at a raise position. WOW!!!!!
This makes adjustment super easy!
especially if you need to adjust camber on front upper control arms!!! get it???
So you have to call your alignment shop and see if their alignment rack can "shoot an image" on and lifted above the rack with the hydraulic lifts.
-J
ALIGNMENT SHOPS SPECIALS - LIFETIME ALIGNMENT, 3 OR 5 YEAR ALIGNMENT DEALS?:
OKAY, this is for you to choose and research. I will say this,
most NTB's and Firestones offer alignment packages/specials.
NTB:
Go online and verify, but they offer 1, 2 and 3 year alignment offers.
call your local shop for details
http://www.ntb.com/alignment.aspx
Firesone:
Offers a lifetime alignment.......call your local shop for details
http://www.firestone.com/
Latest thread on Firestone:
https://my350z.com/forum/southern-ca...-119-99-a.html
of course, most of these places are regional and there are others out there, so call around.
I will say this though!
These specials are ways to get them to try and push more business on you.
I highly recommend you stand at the alignment rack and watch. if they insist you go wait in a waiting room............then leave............
its all up to you, but I make sure i can watch, ensure everything gets done right, hell if i could do it myself i would, but of course they dont let you.
Local to me i have had one location allow me to work on mine and do it myself........i loved it!!
I will also note that NTB tends to have newer locations and facilities and every NTB that is new that i have seen has "in ground alignment racks"
Firestones in general are always older run down buildings that never seem to have inground racks but one or two in an entire metroplex.
ALIGNMENT PROCESS: not particularly in order but here goes:
REAR:
1. alignment is always done at the REAR FIRST on the Z.
2. If your alignment tech starts in the front, hit him and make him start in the rear.
3. Camber - adjust at your newly acquired camber arm adjustment point. Ensure jam nuts are loose.
4. TOE - SPC style toe bolts -- loosen the nut side of the toe bolt to where its finger tight loose or so, but do not remove the nut! and spin/adjust the toe bolt locations with a goose neck wrench at the HEAD of the SPC TOE BOLT!
5. ALIGNMENT TECH should get both left and right side symmetrical! Same camber, same toe!!!
6. ensure all toe bolts are tight and jam nuts back tight and aligment still in spec when doing so! it will move!
FRONT:
Once the rear is done....
1. Toe -
once again at the tie rods connected to the steering rack.
2. Camber -
Only possible with after market front upper control arms. Z must be lifted and "image shot" to be able to access most front UCA adjustment points.
3. Caster - only possible with SPL front upper control arms or SPC front upper control arms.
WHILE ALIGNMENT IS BEING DONE - its your responsibility to check all your bushings!!! take a flash light with you. a good one! Don't expect Mr. Firestone to do his job..
...I wanna make adjustments - What do i do:
This is a good thread:
https://my350z.com/forum/brakes-and-...ml#post8346223
This is a good thread:
https://my350z.com/forum/brakes-and-...ml#post8346223
-J
Last edited by JasonZ-YA; Jul 27, 2010 at 10:29 AM.
Thread Starter
Joined: Jan 2006
Posts: 11,204
Likes: 32
From: San Antonio/I miss DFW, TX
* Quoted from online: not me:
CASTER:
Positive caster provides the directional stability in your racecar. Too much positive caster will make the steering effort difficult. Power steering will allow you to run more positive caster. Negative caster requires less steering effort but can cause the car to wander down the straightaway.
350z and Caster:
The Z loves positive caster......the power steering in the Z is quite capable of handling more positive caster and the range is 7.4 to 8.9 with stock purposively being 8.0 degrees from factory......
I drift with 8.5 or so and love it!
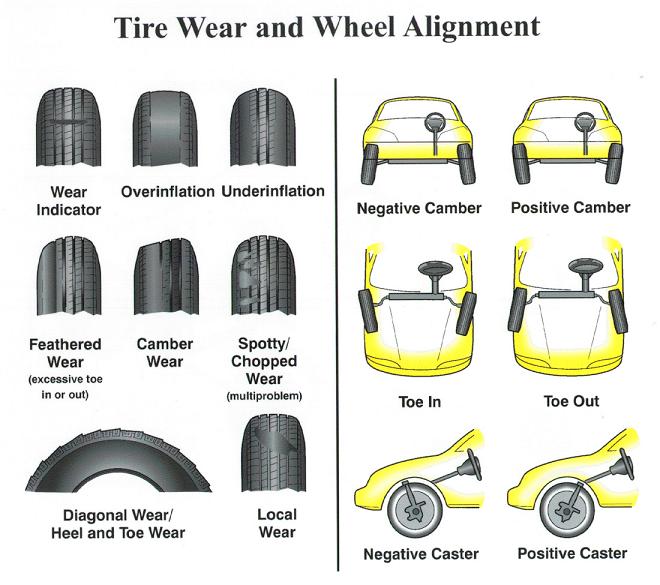
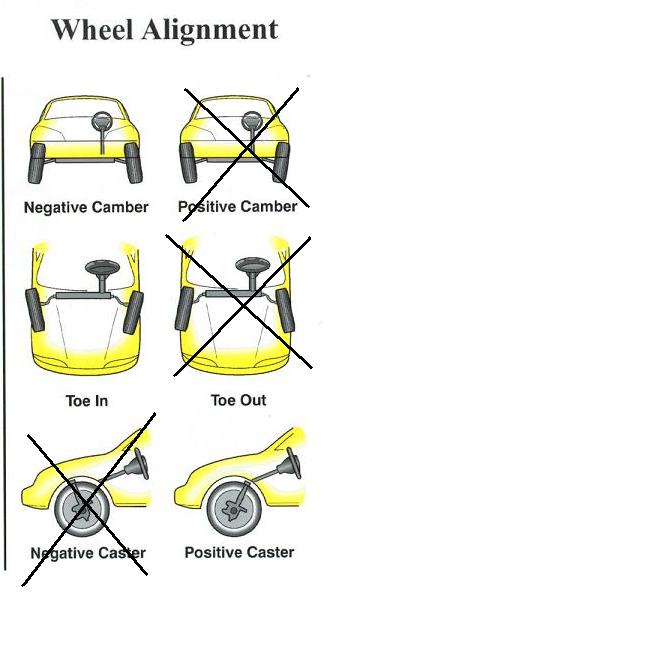
CAMBER?
Camber is the angle of the wheel relative to vertical, as viewed from the front or the rear of the car. If the wheel leans in towards the chassis, it has negative camber; if it leans away from the car, it has positive camber (see next page). The cornering force that a tire can develop is highly dependent on its angle relative to the road surface, and so wheel camber has a major effect on the road holding of a car. It's interesting to note that a tire develops its maximum cornering force at a small negative camber angle, typically around neg. 1/2 degree. This fact is due to the contribution of camber thrust, which is an additional lateral force generated by elastic deformation as the tread rubber pulls through the tire/road interface (the contact patch).
350z and Camber:
IMHO a good daily driving camber is about -1.5......yes slightly out of spec, but not a tire destroyer and relatively good handling with lowering and other mods....
TOE
When a pair of wheels is set so that their leading edges are pointed slightly towards each other, the wheel pair is said to have toe-in. If the leading edges point away from each other, the pair is said to have toe-out. The amount of toe can be expressed in degrees as the angle to which the wheels are out of parallel, or more commonly, as the difference between the track widths as measured at the leading and trailing edges of the tires or wheels. Toe settings affect three major areas of performance: tire wear, straight-line stability and corner entry handling characteristics.
For minimum tire wear and power loss, the wheels on a given axle of a car should point directly ahead when the car is running in a straight line. Excessive toe-in or toe-out causes the tires to scrub, since they are always turned relative to the direction of travel.
350z and Toe:
Like any car, bad toe will kill tires, especially on the Z.
the Z i have found to have very small toe range, bad bushings, etc and easily through a Z out of whack...
review the alignment specs at the beginning of the thread and you can see how small a range toe adjustment is

READ HERE:
http://www.aligncraft.com/terms/terms.html
DRIFTING ALIGNMENT I USE!
Also, before every drift event I take my car in for alignment.I have two bags of 80lb cement that i keep in my garage.......I put both bags in the back of the Z and then i have them put my camber at -1.0 to -1.1 in the rear. The weight of the cement mimic the "power on" when drifting and squat!
recall - rear spec is -1.08 to -2.08 --- -2.08 is way to negative for an alignment on a car with NO weight in the back....
See, I'm a budget drifter, i haz no tire sponsor (feel free to inquire if you wanna buy me tires
 ) So i need to get the most out of my tires as I can versus running neg camber and eating the inside only and wearing through tires quicker.......
I also purchase really good grippy tires up front and higher wear rating tires for the rear to get all that i can get.........the most laps out of an event...etc..
PICS of my tires after an event:

as you can see, no chording and even wear all the way across for the most part......
Previously I was like this:

take note, this wasnt out of spec camber, but more like -1.5 in the rear with no cement in the back, during "power on" drift, i would bet the rear camber was near -2.0 or worse and thus resulted in the crappy tire wear you see in the pic...
-J
Last edited by JasonZ-YA; Mar 3, 2013 at 07:27 AM.
Thread Starter
Joined: Jan 2006
Posts: 11,204
Likes: 32
From: San Antonio/I miss DFW, TX
DONE FOR NOW!!!
stop pm'n me............
na, its all good........but i prefer peepz to come here first...
I will subscribe to this thread and answer question when i can...........and of course the experts of this site can please chime in as well....
I'M SORRY, BUT THIS IS A DAMMN FORUM! - A PLACE TO DISCUSS/COMPARE AND REVIEW PRODUCTS! - Welcome to the free market!!!! I am a customer so much as the next guy, I'm a person writing a review!
HELL NO WILL I CHANGE REMOVE OR EDIT ANYTHING I POST!
THAT being said! THIS IS A FORUM - feel free to defend, comment or post off "ANYTHING" i mention.
-J
stop pm'n me............
na, its all good........but i prefer peepz to come here first...
I will subscribe to this thread and answer question when i can...........and of course the experts of this site can please chime in as well....
EDIT!
Okay I HAVE GOTTEN PM'S ETC FROM VENDORS, SUPPLIERS, SELLERS OF MANY PRODUCTS, SOME DO and SOME DON'T LIKE THIS THREAD.......Them telling me "blah, blah, blah, you can hurt my sales?" I'M SORRY, BUT THIS IS A DAMMN FORUM! - A PLACE TO DISCUSS/COMPARE AND REVIEW PRODUCTS! - Welcome to the free market!!!! I am a customer so much as the next guy, I'm a person writing a review!
HELL NO WILL I CHANGE REMOVE OR EDIT ANYTHING I POST!
THAT being said! THIS IS A FORUM - feel free to defend, comment or post off "ANYTHING" i mention.
-J
Last edited by JasonZ-YA; May 5, 2010 at 04:52 AM.
Thread Starter
Joined: Jan 2006
Posts: 11,204
Likes: 32
From: San Antonio/I miss DFW, TX
OKAY,
I wasn't gonna add this but its been asked already elsewhere so i figure i better......
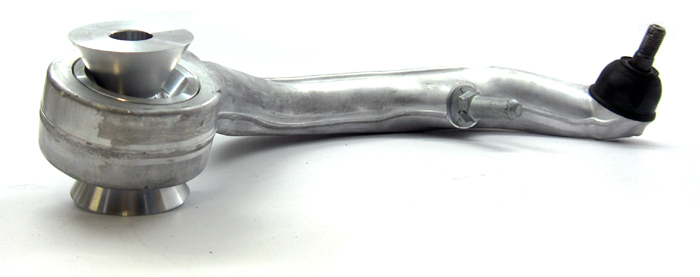
They do sell what most aftermarket companies call "front toe arms Or traction arms" - what the hell?????
CUSCO CALLS IT - ITEM A (A- Cusco Trailing Rod)

FACTORY PIC:
Anywho: Review #23 noted here - its the factory "RADIUS ROD"
YOU CAN SEE IT HERE:

OKAY, SO NOW IN THE MIX IS THIS #23................
this is not something that is meant to be adjusted for the daily driven or .75-1.5 inch drop Z....
Now, im gonna do this laymens terms to best describe, but in general lets call this a sort of caster adjuster??? which its not since caster is a term for the "steering" suspension only......ie front wheels...........but, this is essentially doing the same thing.
If you have a .75-1.5 inch drop and have one side fugged up or toe not in spec with the SPC toe bolt and an adjustable camber arm then you need to figure out what is wrong or get it fixed/adjusted correctly....
Buying this arm adjustable from the aftermarket companies and ONLY fixing one side is not good....What to your axle position????? and thrust angle?? (google thrust angle)
Now obviously this is exaggerated picture ---- but if you buy these and adjust them to be identical in length to the stock solid #23 (radius rod) but then you have the alignment tech give the drivers side 4 turns to get your toe in spec you will end up with:

Also your thrust angle will be out, odds are something else is wrong.
WHEN TO USE THIS ARM:
This is for you MR. "I WANNA SLAM MY RIDE YO"
okay, if you are slammed on OEM styled coilovers - thats the coilovers WITH a spring in the spring bucket (2 part rear).............
Then your stuck with SPC toe bolts - that being said if your slammed really low with 19 or 20 inch wheels then your screwed most likely...alignment wont come into spec.....
You must note: Adjusting at #23 is quite hard - when you adjust there you are adjusting toe WITH camber at the same time........
SOoooo....
if your slammed you can:
1. Get the slammed ride height you want.....
2. Install spc toe bolt and adjustable camber arm
3. When doing alignment have the tech put the spc toe bolt at full throw!
4. have him adjust camber in spec or close.
5. if still out of toe range at that "SLAMMED" ride height/drop then adjust #23 from STOCK LENGTH the same ON BOTH SIDES OF THE CAR.
6. have him adjust at the camber arm and spc toe bolt as needed due to #23 adjustment will throw a lot off....
not adjusting #23 the same on both sides --- you will see on the alignment machine that the thurst angle will be OUT!
Alternative when slammed:
you could instead of buying this #23 arm adjustable buy the SPL PRO MIDLINK:

This midlink will keep the spring in the spring bucket and should* allow a slammed car to get back into spec???
The spl midlink is hands down the way to go over #23, since only a highly skilled tech will get #23 right, depending on drop height of the car #23 is a moot try...
OR!!!
Buy true coilovers (1 piece rear) to SLAM your ride! and purchase actual TOE ARMS (review post 21) and eliminate the spring bucket all together.
however, most that slam their cars dont buy true coilovers to slam because they are under the impression comfort is compromised????? thats objectable and Dependant on the coilovers purchased of course.......and c-mon...your ride is slammed........ comfort...pppffff.....let me know how comfortable you are scrapping everywhere.....
You would have to research true coilovers that will allow height adjustment to drop!
**** ONCE AGAIN, IM NOT AN EXPERT SO IF OTHERS OUT THERE CAN COMMENT ON THIS PLEASE DO SO ********
I wasn't gonna add this but its been asked already elsewhere so i figure i better......
They do sell what most aftermarket companies call "front toe arms Or traction arms" - what the hell?????
CUSCO CALLS IT - ITEM A (A- Cusco Trailing Rod)
FACTORY PIC:
Anywho: Review #23 noted here - its the factory "RADIUS ROD"
YOU CAN SEE IT HERE:
OKAY, SO NOW IN THE MIX IS THIS #23................
this is not something that is meant to be adjusted for the daily driven or .75-1.5 inch drop Z....
Now, im gonna do this laymens terms to best describe, but in general lets call this a sort of caster adjuster??? which its not since caster is a term for the "steering" suspension only......ie front wheels...........but, this is essentially doing the same thing.
If you have a .75-1.5 inch drop and have one side fugged up or toe not in spec with the SPC toe bolt and an adjustable camber arm then you need to figure out what is wrong or get it fixed/adjusted correctly....
Buying this arm adjustable from the aftermarket companies and ONLY fixing one side is not good....What to your axle position????? and thrust angle?? (google thrust angle)
Now obviously this is exaggerated picture ---- but if you buy these and adjust them to be identical in length to the stock solid #23 (radius rod) but then you have the alignment tech give the drivers side 4 turns to get your toe in spec you will end up with:
Also your thrust angle will be out, odds are something else is wrong.
WHEN TO USE THIS ARM:
This is for you MR. "I WANNA SLAM MY RIDE YO"
okay, if you are slammed on OEM styled coilovers - thats the coilovers WITH a spring in the spring bucket (2 part rear).............
Then your stuck with SPC toe bolts - that being said if your slammed really low with 19 or 20 inch wheels then your screwed most likely...alignment wont come into spec.....
You must note: Adjusting at #23 is quite hard - when you adjust there you are adjusting toe WITH camber at the same time........
SOoooo....
if your slammed you can:
1. Get the slammed ride height you want.....
2. Install spc toe bolt and adjustable camber arm
3. When doing alignment have the tech put the spc toe bolt at full throw!
4. have him adjust camber in spec or close.
5. if still out of toe range at that "SLAMMED" ride height/drop then adjust #23 from STOCK LENGTH the same ON BOTH SIDES OF THE CAR.
6. have him adjust at the camber arm and spc toe bolt as needed due to #23 adjustment will throw a lot off....
not adjusting #23 the same on both sides --- you will see on the alignment machine that the thurst angle will be OUT!
Alternative when slammed:
you could instead of buying this #23 arm adjustable buy the SPL PRO MIDLINK:
This midlink will keep the spring in the spring bucket and should* allow a slammed car to get back into spec???
The spl midlink is hands down the way to go over #23, since only a highly skilled tech will get #23 right, depending on drop height of the car #23 is a moot try...
OR!!!
Buy true coilovers (1 piece rear) to SLAM your ride! and purchase actual TOE ARMS (review post 21) and eliminate the spring bucket all together.
however, most that slam their cars dont buy true coilovers to slam because they are under the impression comfort is compromised?????
thats objectable and Dependant on the coilovers purchased of course.......and c-mon...your ride is slammed........ comfort...pppffff.....let me know how comfortable you are scrapping everywhere.....You would have to research true coilovers that will allow height adjustment to drop!
**** ONCE AGAIN, IM NOT AN EXPERT SO IF OTHERS OUT THERE CAN COMMENT ON THIS PLEASE DO SO ********
Last edited by JasonZ-YA; Jun 18, 2012 at 06:02 AM.
Thread Starter
Joined: Jan 2006
Posts: 11,204
Likes: 32
From: San Antonio/I miss DFW, TX
Your welcome guys....
Okay,
I wanna add this....
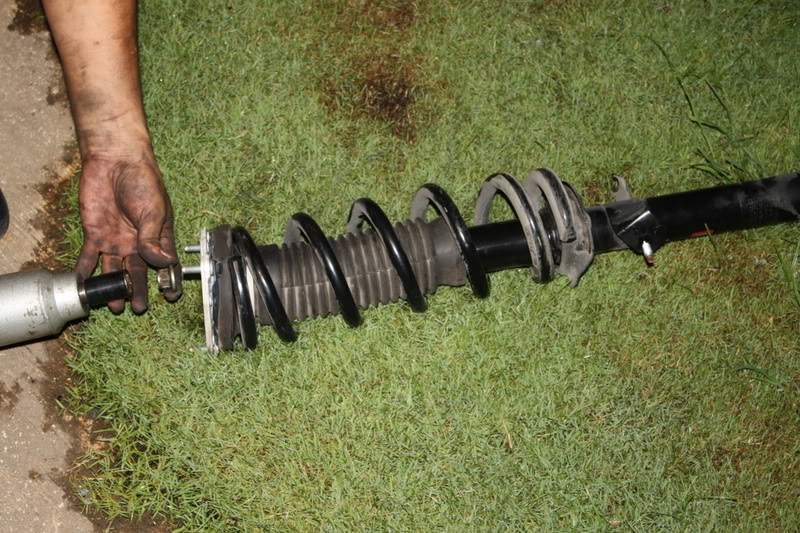
Okay, remember in post#11
I talk about using the spring compressor tool for removing the oem springs from the factory shocks.....
ALTERNATE OPTION #1:
Well, I have done this before on a 2003 350z. which to my understanding has different shocks from the 2006???? correct me if im wrong please?
Whos to say they are longer or shorter, i dont know, but here goes:
Okay, you can remove the top CENTER BOLT from the shock using an impact gun!
1. Remove the entire front shock assembly and place it on the grass.
2. Get a heavy shop towel or Blanket and fold it over the spring and shock.
3. Have someone step on the assembly with their boot.
4. with a firm grib, but free and clear from the shock IMPACT off the top bolt.
THIS WILL RESULT IN A MINOR JOLT as the spring preload isnt much!!!!
Tada!!! no having to use spring compressor tools??? GET IT???
This is a pic showing a guy that just removed - using an impact -- the center bolt:
You can read my comments on this how to here as i did a G37 install for NEXX not to long ago:
http://teamlags.com/install-eibach-springs-g37/
USING AN IMPACT!!! must use an impact – YES, you can remove the top bolt.
For anyone trying this – YOU MUST USE AN IMPACT – put the impact inline with it and fire away on the impact TILL the nut fly's on the floor and your good.
REASON i say – if you DON’T use an impact and are simply turning that nut with a socket the tension is like he says – “really is no compression in the stock springs. just a bit of a jolt when it unbolts.” thats enough force on the spring that if you turn by hand, your gonna LIKELY STRIP THE LAST THREAD ON EITHER THE NUT OR THE SHOCK ROD OR BOTH.
I have seen many friends cry over screwing up their shocks this way…
THE IMPACT SPINS IT SO FAST YOUR FINE, but DONT do it by hand with hand tools….its too slow and you run the risk of screwing up the threads…
ALTERNATE OPTION #2:
I have also done this as well on a 350z!
1. Jack the front of the car up ONLY!!! not front and rear, front only! use wheel chaulks at the rear wheels.....(with car jacked up the wheel hangs under weight obviously).
2. open hood, Remove the oem strut bar. DO NOT REMOVE THE 3 bolts holding the shock in place, if anything loosen them a bit, but do not remove them all the way! - loosen just to get some play in the assembly.....
3. get a floor jack and jack up on the tire shoving the front wheel back up into the wheel well, do not raise the car off the jack stands!!! be safe!!!
4. impact off the top nut since the strut bar is removed!
5. now slowly have a buddy bring down the floor jack while you "WEARING LEATHER GLOVES" grab the spring and shock from falling down and appart in the wheel well. this isnt too critical, lower the car wheel slowly.
SEE HERE:
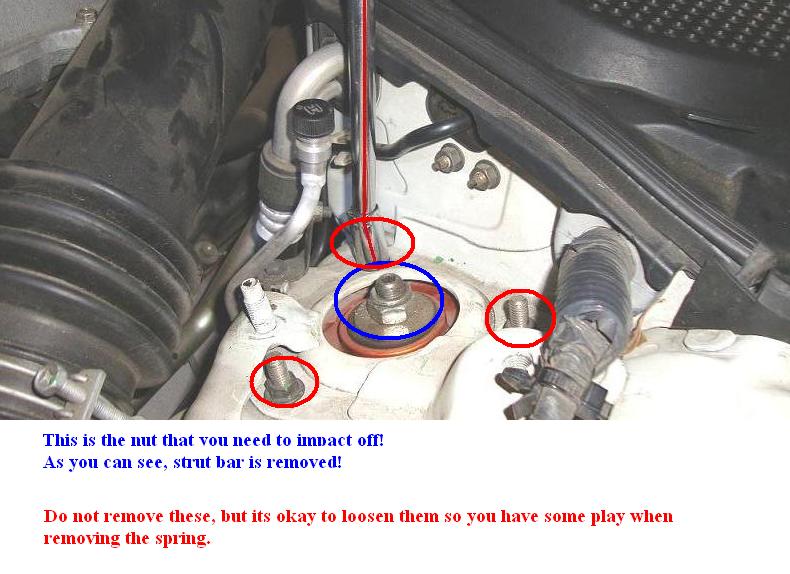
GET IT?? no spring compressor tool needed...
TRUST ME - DO OPTION ONE!!! IMPACT METHOD!
option 2 on car is easy as well, but a pain to remove from the wheel well as its now longer due to being uncompressed!
-J
Okay,
I wanna add this....
Okay, remember in post#11
I talk about using the spring compressor tool for removing the oem springs from the factory shocks.....
ALTERNATE OPTION #1:
Well, I have done this before on a 2003 350z. which to my understanding has different shocks from the 2006???? correct me if im wrong please?
Whos to say they are longer or shorter, i dont know, but here goes:
Okay, you can remove the top CENTER BOLT from the shock using an impact gun!
1. Remove the entire front shock assembly and place it on the grass.
2. Get a heavy shop towel or Blanket and fold it over the spring and shock.
3. Have someone step on the assembly with their boot.
4. with a firm grib, but free and clear from the shock IMPACT off the top bolt.
THIS WILL RESULT IN A MINOR JOLT as the spring preload isnt much!!!!
Tada!!! no having to use spring compressor tools??? GET IT???
This is a pic showing a guy that just removed - using an impact -- the center bolt:
You can read my comments on this how to here as i did a G37 install for NEXX not to long ago:
http://teamlags.com/install-eibach-springs-g37/
USING AN IMPACT!!! must use an impact – YES, you can remove the top bolt.
For anyone trying this – YOU MUST USE AN IMPACT – put the impact inline with it and fire away on the impact TILL the nut fly's on the floor and your good.
REASON i say – if you DON’T use an impact and are simply turning that nut with a socket the tension is like he says – “really is no compression in the stock springs. just a bit of a jolt when it unbolts.” thats enough force on the spring that if you turn by hand, your gonna LIKELY STRIP THE LAST THREAD ON EITHER THE NUT OR THE SHOCK ROD OR BOTH.
I have seen many friends cry over screwing up their shocks this way…
THE IMPACT SPINS IT SO FAST YOUR FINE, but DONT do it by hand with hand tools….its too slow and you run the risk of screwing up the threads…
ALTERNATE OPTION #2:
I have also done this as well on a 350z!
1. Jack the front of the car up ONLY!!! not front and rear, front only! use wheel chaulks at the rear wheels.....(with car jacked up the wheel hangs under weight obviously).
2. open hood, Remove the oem strut bar. DO NOT REMOVE THE 3 bolts holding the shock in place, if anything loosen them a bit, but do not remove them all the way! - loosen just to get some play in the assembly.....
3. get a floor jack and jack up on the tire shoving the front wheel back up into the wheel well, do not raise the car off the jack stands!!! be safe!!!
4. impact off the top nut since the strut bar is removed!
5. now slowly have a buddy bring down the floor jack while you "WEARING LEATHER GLOVES" grab the spring and shock from falling down and appart in the wheel well. this isnt too critical, lower the car wheel slowly.
SEE HERE:
GET IT?? no spring compressor tool needed...
TRUST ME - DO OPTION ONE!!! IMPACT METHOD!
option 2 on car is easy as well, but a pain to remove from the wheel well as its now longer due to being uncompressed!
-J
Last edited by JasonZ-YA; May 5, 2010 at 04:39 AM.

 This thread should be a sticky It sure is a wealth of info. Wish I would have known all this awhile back and saved the life of my tires.
Quick question on the bushings, basically if a bushing is bad it will appear cracked?
Last edited by Diesel350; Apr 13, 2010 at 06:03 PM.
Thread Starter
Joined: Jan 2006
Posts: 11,204
Likes: 32
From: San Antonio/I miss DFW, TX
For example, bushing #1, the translink bushing, its either centered or it isnt........sure you can get a flash light and inspect the inside for cracks and tears and you may see some, but who's to know when it will actually fail?????
Its more of awareness............the 350z is 7 year car now, so treat this thread and the bushings information as a Datapoint and inspect............
*Edit - added this later:
I would also like to say........Alignment is a static "image" of the cars suspension geometry.........However suspension on a vehicle is one of the most dynamic portions of the car driving down the road.......that being said aligment is also a test point, a data point of whats going on....
*If all things the same* and your front caster is off from one side to the other, then inspect the compression arm bushing and odds are its torn/damaged/mis located/not centered.............the alignment can tell you that even if you never looked and inspected that bushing till after you get an alignment.....
see what im say'n?
-J
Last edited by JasonZ-YA; Apr 14, 2010 at 04:34 AM.
Thread Starter
Joined: Jan 2006
Posts: 11,204
Likes: 32
From: San Antonio/I miss DFW, TX
There are tons of different front upper control arms........its best you do your research between them and price points/availability and decide whats best or NEEDED for your car.......
but to specifically answer your question between the two you would have to read the spec's/product description between cusco and ichiba and decide......its also good to contact vendors that actually have them "IN STOCK" and ask them what the difference is...some may have some insight on what comes with what....experience on install, customer review info to share, etc....
MY MAIN POINT - for posting those two was to show they those are "CAMBER ONLY" adjustable front upper control arms....
Where as later i show SPL and SPC options that will do "CAMBER AND CASTER"....
-J
Last edited by JasonZ-YA; Apr 14, 2010 at 04:26 AM.

Registered User
Joined: Nov 2008
Posts: 168
Likes: 0
From: Melbourne, Australia
Great write-up! Very informative.
I've spent the last 4 months trawling through threads looking fo ninformation on what to do and how to do it properly and finally understand it.. all in one spot now
I've spent the last 4 months trawling through threads looking fo ninformation on what to do and how to do it properly and finally understand it.. all in one spot now
Thread Starter
Joined: Jan 2006
Posts: 11,204
Likes: 32
From: San Antonio/I miss DFW, TX
-J
Thread Starter
Joined: Jan 2006
Posts: 11,204
Likes: 32
From: San Antonio/I miss DFW, TX
okay I have worked on a quite a few Z's, but of course my own z I can truely comment on.
I rock on my Z:
* all alignment in spec....
1. K-sport coilovers - true coilover style (1 piece rear)
I choose this due to budget and "knowing" hands down that I wanted true coilovers in order to run Toe arms over spc toe bolt crap......
2. Toe arms - the ones i made myself
3. Rear SPC Camber arms
4. Lock out washers at all 4 points in the rear for items 2 and 3.
5. Adjustable endlinks front and back - my design endlinks
6. stock sway bars
7. SPL front upper control arms.
8. Upgraded bushings everywhere:
-Front translink bushing #1 - whiteline bushing.
-#2 whiteline
-SPL compression arm bushing - worth its weight in gold!!!
-Whiteline rear spindle/shock mount bushing.
- solid diff bushings - some I made myself.
- sikky solid subframe bushings.
all other bushings are good *at the current moment
Those are what are dynamic...and alignment variable...
also,
. I do also have tein tie rods, cut steering stop and way more steering angle
. GT spec braces
. Solid braces at the nismo mass damper mount locations.
. Nismo 2way diff with nismo diff cover.
. remote diff fill port in rear hatch area.
Point im getting at:
I have had many others ride in my car with me and they are shocked........
HWY:
when i drive down a flat level hwy my car will go "STRAIGHT"......I'm talking straight as an arrow........i can put one finger on the wheel or no hands and my car will go straight for miles!
Bumpy road, uneven surfaces - ie, road near my work:
My car will go "STRAIGHT" im talking straight as an arrow........i can put one finger on the wheel or no hands and my car will go straight!!! hitting bumps, cracks in the road, everything! my car suspension will soak it all up...
Of course this is minor 1-1.5 inch bumps, little to no suspension geometry bumpsteer at all...
I dare anyone to try that in their car, even right after an alignment and see how it rides........i have yet to drive or be in a Z that does that with out all good bushings, and correct alignment..
Also, i can take my car into NTB and get my alignment checked and it will be SPOT on where it was 2-5 months ago!!
-J
Last edited by JasonZ-YA; Jun 18, 2012 at 06:08 AM.
Are there any vendors that sell a package the contains everything - i.e. arms, shocks, springs, etc.? I can see alot of people reading this and being too overwelmed to start.
Excellent post BTW
Excellent post BTW
Thread Starter
Joined: Jan 2006
Posts: 11,204
Likes: 32
From: San Antonio/I miss DFW, TX
but in general NO.......its up to the user to pick and choose what components he wants to run and why, etc....too many vairables....
-J